First Published July 2021 Version 1.7
Please
| Version | Date | Author | Comments |
| 0.1 | 26 July 2021 | Jake Favell | Initial Draft |
| 1.0 | 25 Aug 2021 | Jake Favell | Published Version |
| 1.1 | 04 Feb 2022 | Jake Favell | Product Updates: Table filtering, New work items via the My Work tab, Sum Values on Tables, User Search on the Access tab, Renaming MPP project names. |
| 1.2 | 02 Jun 2022 | Jake Favell | Product Updates: Version 3 of Table Filtering updates: Additional Field and Operator Types. Additional information on Email Notifications. |
| 1.3 | 29 Jun 2022 | Jake Favell |
Product Updates: Discover page filters remembered during the session. |
| 1.4 | 03 Aug 2022 | Jake Favell |
Product Updates: Weekly periodic table types, Multiple Yearly periodic units displayed rather than one. |
| 1.5 | 20 Sep 2022 | Jake Favell |
Guide Updates: Stage Review process (Section 8). |
| 1.6 | 18 Jan 2023 | Jake Favell |
Guide Updates: Microsoft Teams integration updates (section 15). |
| 1.7 | 05 Apr 2023 | Jake Favell |
Guide Updates: Document management (section 12). |
Contents
- User Interface
- Creating a Project
- Creating a Project - External Projects
- Creating a Project - Microsoft Projects
- Creating a Business Case
- Field, Table, and Button Descriptions
- Updating/Maintaining a Case or Project
- Stage Reviews
- Reviewing a Case or Project
- Assigning Roles
- Case or Project Versions
- Supporting Documents
- Email Notifications - Business Cases
- Email Notifications - Projects
- Teams Integration
- Read Only Access
- Reports
1. User Interface
Home Page

| No. | Item | Description |
| 1 | Menu Options |
Use these buttons to navigate around the application. |
| 2 | News/Campaigns |
All the latest news from your organisation is displayed here. Use the scrolling buttons to view the other news / Campaign items |
| 3 |
Module Tabs |
If a valid licence is held for both modules you can use these to view the different data set. |
| 4 |
Stage Carousel |
Each stage of a project/case has a specific carousel. These consist of Not Started, In Progress, and Completed. Each project will be placed in the relevant carousel based on its progress. |
| 5 |
Project/Case Cards |
The project/case card is a visual summary of each Project or case. Clicking on a card will open the item in full. |
| 6 |
Search Bar |
You can search for a project or case using criteria such as name. This is featured across all pages |
| 7 |
Quick Stats |
The Quick Stats shows some basic stats for the Projects/Cases added to the app. This will change based on the licences held. |
| 8 |
Create Buttons |
Use this button to create a new Project/Case. If you are assigned to a single type the form will load. If you are assigned to multiple types a dropdown of all types assigned will be displayed. Only available to owners. |
| 9 |
Sorting/Filter Buttons |
Use these buttons to sort the Projects by Name, Stage, or Date. You can also filter Projects by certain Stages, Types, and Status |
Project Cards

| No. | Item | Description |
| 1 | Project Type |
This shows the selected Project Type for the Project. |
| 2 |
Progress Bar |
This bar represents the progress of the Project tasks. As the tasks of the project have their individual progress updated the whole project progress is updated. |
| 3 | Project Source |
This shows the whether the project was created directly in edison365 projects module or was created from an external source. If the edison365projects logo is displayed this is a project created directly in the projects module. If the Microsoft Project logo is displayed the project was created from an External Source |
| 4 | Project Stage |
This shows thee current stage of the Project |
|
5 |
User/Date Created |
This is the user who created the Project and the date it was created. |
|
6 |
Project Name | Name of the Project |
Business Case Cards
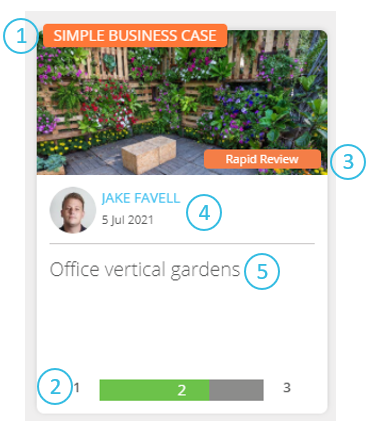
| No. | Item | Description |
| 1 | Business Case Type |
This shows the selected Case Type for the Business Case. |
| 2 |
Progress Bar |
This bar represents the progress of the Case. As the stages of the case are progressed he bar will update with the stage number. If the case has exceeded the number of days set in Target Duration the bar will be displayed in Red. |
| 3 | Stage |
This shows thee current stage of the Case. The colour of this is what is configured in the Stages configuration. Please refer to the edison365 Admin guide for further reference. |
| 4 |
Date/User Created |
This is the user who created the Case and the date it was created. |
| 5 | Business Case Name | Name for the Business Case |
edison365 Suite Banner

| No. | Item | Description |
| 1 |
Focus on Content |
Clicking on this will remove the banner image and only display the data on the specific screen. Clicking on the button again will re-add the banner image |
| 2 |
Profile Settings |
Clicking here will provide additional options on your profile such as changing the language and maintaining your profile. See below image. |
| 3 |
Language Selection |
Clicking this will display a list of Languages you can view the application in. Once a language is selected the application language will change. |
| 4 |
User Profile |
Clicking this will take you to your Delve profile |
| 5 |
My Account |
Clicking this will take you to your Office 365 profile |
| 6 |
Third Party Notice |
This will display the third party packages we use to support our products |
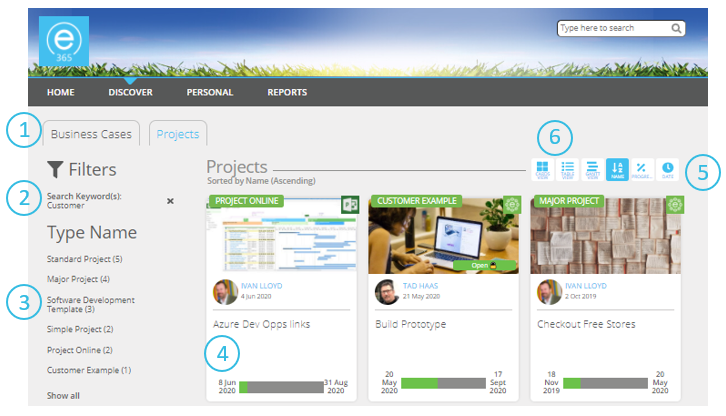
Discover Page

| No. | Item | Description |
| 1 |
Navigation Bar |
Clicking on the options on the Navigation bar will take you to the selected page. |
| 2 |
Module Tabs |
If a valid licence is held for both modules you can use these to view the different data set. |
| 3 | Filters |
The data on the Discover page can be filtered based on Type Name, Owner, Status (Projects), Category (Projects), Stage (Business Cases) and Created Date. Once a filter is applied the results in the Discover page will change to only show the module data for the matching filter(s) applied. |
| 4 |
Data/Card View |
Click this to switch between viewing the module data as a data grid or in a visual grid displaying the cards. If the Projects module is enabled a Gantt view can also be selected. |
| 5 |
Sorting Buttons |
Clicking the sorting buttons will sort the results of the Discover page. You can sort the data by Date, Progress, and Name. |
| 6 |
Case/Project Cards |
All the Projects that can be viewed based on permission levels and roles will be displayed here. Once the filters are selected the results will change accordingly |
Search and Filtering
| No. | Item | Description |
| 1 |
Module Tabs |
If a valid licence is held for both modules you can use these to view the different data set. |
| 2 |
Selected Filters |
Any Search criteria will be added automatically. Any additional filters applied will also be added |
| 3 |
Available Filters |
Based on the search criteria used the filters displayed will only match those of the criteria |
| 4 |
Matching Cases/Projects |
Based on the search criteria used all matching Projects will be displayed |
| 5 |
Sort Buttons |
Search Results can be sorted in the same way as the Home and Discover pages by clicking the corresponding buttons. |
| 6 |
Card/Data View |
Search results can be viewed in a card or data format in the same way as the Discover page. |
The refiners used on the Discover page will be remembered throughout the session when navigating between pages. This also applies to the browser and device being used.
Personal Page
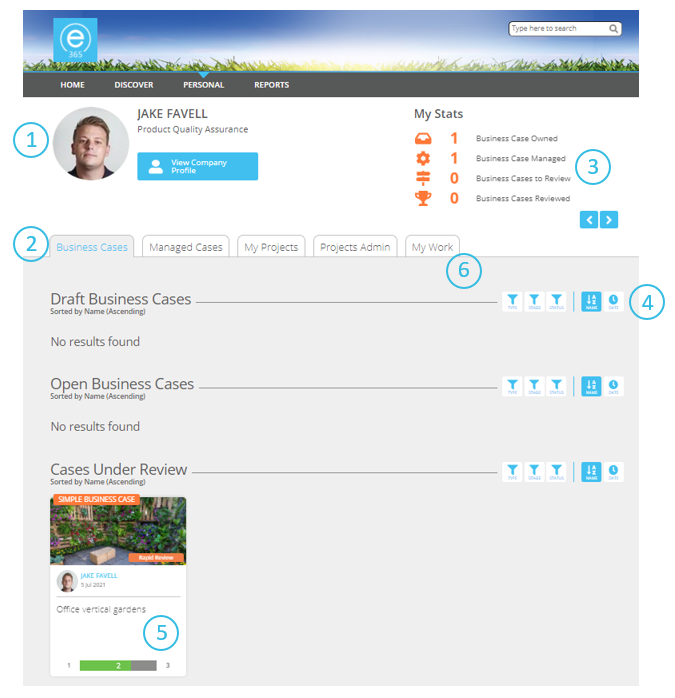
| No. | Item | Description |
| 1 |
User Profile |
Summary of the current user logged in. |
| 2 |
Personal Tabs |
The personal page tabs are where the Cases or Projects you own, manage, review or Project tasks are stored here in individual tabs. Each tab will only appear if there is at least one Case or Project that belongs in a tab. |
| 3 |
My Stats |
This displays the count of Projects owned, Projects in Progress, and Projects Completed. |
| 4 |
Sorting/Filters |
Clicking on these will sort the results of the selected tab. You can also filter the results based on Project/Case Types, Project/Case Status, and Project/Case Category |
| 5 |
Projects/Case Cards |
Any Projects/Cases in the carousels are displayed here. |
If you are assigned as an owner to a table item you can manage your work items via the My Work tab. From here you can edit any work item assigned to you and also create any new items. The below image is a visual representation of the My Work tab and the functionalities:
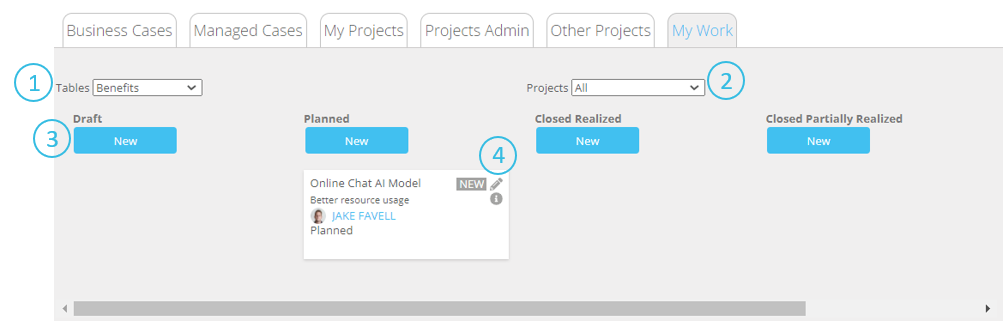
| No. | Item | Description |
| 1 | Tables | This is a dropdown field showing all of the tables you have been assigned as a work item owner on. Select the value to determine which table you wish to manage you r work item for. |
| 2 | Projects | This a dropdown field to select which Project you wish to manage you work items on. By Default All will be selected but should you wish to work on a specific project select it from this dropdown. |
| 3 | New Button | Clicking this will open the New Item window. Fill in the data and click Save which will assign a new work item to the selected table on the selected project. |
| 4 | Task Functions | Here you can manage tasks either on the board view by dragging and dropping them on the different columns. Alternatively you can click on the Pencil icon to edit the work item data. The other option is an 'i' icon. Click this to view the work item data in a read only format. |
Project Page
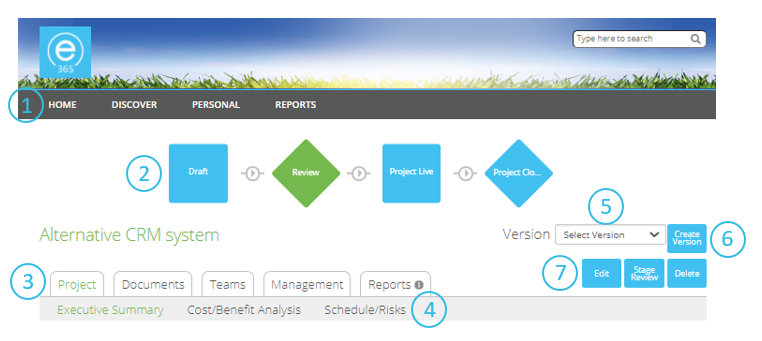
| No. | Item | Description |
| 1 |
Menu Options |
Use these buttons to help navigate around the app. |
| 2 |
Progress Bar |
The Progress Bar is a visual indicator of which stage the Case is in as well as the other stages. The current stage will display in Orange.. This will only appear when enabled |
| 3 |
Tabs |
These tabs show different sections of the project. Project is the form data used for the project type, Documents is where supporting documents can be managed, If enabled the Teams tab is where a Teams Channel in Microsoft Teams can be assigned, , Management is broken down into sub tab: Access to assign or remove users from roles, Properties shows the type and currency of the project and History to show a historical trace of the Project |
| 4 |
Project Tabs |
If enabled a project can be broken down into specific sections. Clicking each one will display the fields and tables for the selected tab |
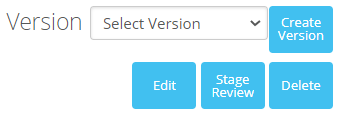
| 5 | Version |
A dropdown to show the different versions of the Projects |
| 6 |
Create Version |
Clicking this will create a version of the Project at the time the button was clicked |
| 7 |
Function Buttons |
These buttons are used to help manage the processing of the Project. These buttons are dependent of your role. |
Business Case Page

| No. | Item | Description |
| 1 |
Menu Options |
Use these buttons to help navigate around the app. |
| 2 |
Progress Bar |
The Progress Bar is a visual indicator of which stage the Case is in as well as the other stages. The current stage will display in Orange. |
| 3 | Tabs |
These tabs show different sections of the Case. Case is the form used for the Case Type, Documents is where supporting documents can be managed, If enabled the Teams tab is where a Teams Channel in Microsoft Teams can be assigned, Management is broken down into sub tab: Access to assign or remove users from roles, Properties shows the type and currency of the Case and the History to show a historical trace of the Case |
| 4 |
Business Case Tabs |
If enabled a Business Case can be broken down into specific sections. Clicking each one will display the fields and tables for the selected tab |
| 5 | Version |
A dropdown to show the different versions of the Business Case |
| 6 |
Create Version |
Clicking this will create a version of the Business Case at the time the button was clicked |
| 7 |
Function Buttons |
These buttons are used to help manage the processing of the Business Case. These buttons are dependent of your role. |
Project and Case Forms
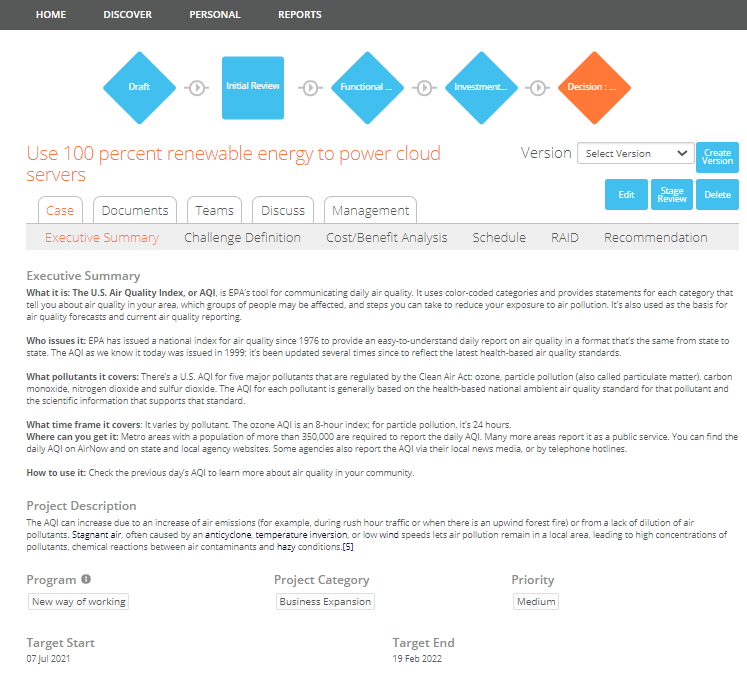
All fields from a form that is assigned to a Case or Project Type will be displayed here. In edit mode the fields will be opened to enter data to them. Some fields or tables assigned to a form maybe set as read only so data cannot be entered. These are highlighted in grey and cannot be altered. Some fields will be mandatory to complete the form, these are marked with a *. If a form does not have any tabs set the form will be displayed in full on the project tab. Some sections of a form can also have a header included. This will only apply to single column zones and is set by an Administrator.
If the Case or Project Type you are working with has stages each stage can have separate rules applied.
Administrators can also set pre-populated data to a field on a form for a specific type. If an admin sets pre-populated data, this will be set when a new Project for the designated type is created.
A form will occasionally include buttons. When selected, the buttons will redirect you to a URL or function that has assigned to that button.
Only one user can edit a Case/Project at a time. Whilst a user is in edit mode the Case/ Project will appear as checked out (See image for reference message). If two or more users try to edit the Project at the same time an error will be displayed depending on the action executed.
Back to Home
Project and Case Forms - Tables

| No. | Item | Description |
| 1 |
Full Screen |
Clicking this will display the table and the data in full screen mode. |
| 2 |
Command Bar |
When a Case or Project is in edit mode all tables (excluding aggregate tables) will include a command bar to improve editing capability of the item, if multiple changes are required. If a table is blank only the New Item function can be used. Only one row can be selected at a time. |
| 3 |
Row Checkboxes |
Clicking a row checkbox will highlight and select a row to allow you to use the command bar functions. |
| 4 |
Table View |
Clicking this will change the view of a table |
| 5 |
Appear on Personal Page |
This switch sets whether the row data appears on the Owners Personal page. If Yes the item will appear on the Owners Personal page. If set to No it will not |
| 6 |
Year Selector |
Clicking the arrows either side of the year will display the data for the selected year |
| 7 |
Table Data |
The rows and the corresponding data is displayed here. Clicking on the data in the first row will display a summary of all of the data for the selected row when in view mode. |
| 8 |
Sum Value |
If configured by an administrator a number field on a table can include a Sum Value. Any number field values will have an automatic calculation included and the total will be displayed here. |
Some functionalities on the command bar in Business Cases are not displayed in the same way as they are for Projects.
Filters can also be applied to table data to display specific data. To access the Filters click on the Filters on the View section. This will open a filter block where you can select any text fields from the table. Once you have selected which fields to filter by and then which operator to use. There are 2 options Equals where the value filtering by has to match exactly. The other option is Contains which is where a partial match can be used. The last filter field is Value which is the value of the text field on the table you wish to filter by. You can add multiple rows to filter by when you click on the Add More button. This will add a blank row for you to filter by. You can remove any additional filter options by clicking the Remove button which will remove the filter row. Once all filters have been click the Apply button to filter the table data based on the options set. To remove a filter click the Clear button which will revert the table to display all of the data.
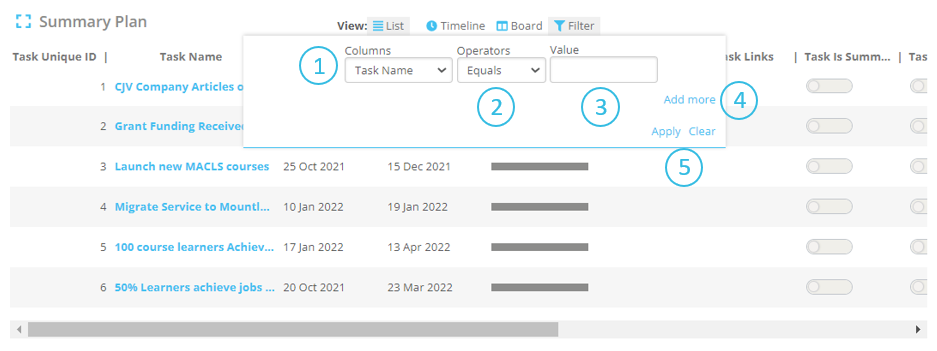
| No. | Item | Description |
| 1 | Columns | This is a dropdown to display all of the text fields on the table./ Select the field from this dropdown to determine which field is used to filter by. |
| 2 | Operators |
This is a dropdown which changes depending on the Column you are filtering. Below is a summary of the operators for different data sets by column:
|
| 3 | Value | Textbox field to set what table data you are filtering the table against. |
| 4 | Add More | Clicking this will add more rows to apply filters on. Once multiple rows are added a Remove button will be placed next to the new rows click on this to remove the additional filter row. |
| 5 | Functions | The 2 buttons here are Apply which should be used to Apply he filter once all of the filter criteria has been entered. Once clicked the table data will be filtered based on the filters used. The other button is Clear which will remove the data form he filter block and display all table data |
Filters can only be applied to Text, Number, and Date field types.
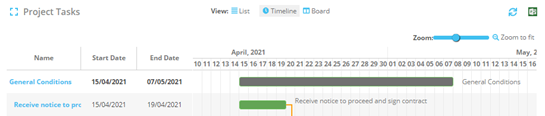
Task tables include a view where data can be displayed as a Gantt chart. When in edit mode click on the Timeline view and the table will be displayed in the Gantt view. From here the
task data can be edited by dragging the bars for the tasks or milestones. Below is a summary of the data and functions.

| No. | Item | Description |
| 1 |
Full Screen |
Clicking this will display the data in a full screen view where the data can be viewed clearer. Data can also be edited in this view |
| 2 |
Task Name |
This is the name set for the Task. Clicking on a task name will also focus on the task if out of view. |
| 3 |
Start/End Dates |
These are the dates set for the Start and End dates for the given Task/Milestone. If a row has a Start and End date as the same date with a Duration of 0 the row will be a milestone. |
| 4 |
Zoom Level |
Sliding this to the left and right will change the zoom level of the chart. |
| 5 |
Task/Milestone Bar |
All rows on the Timeline view indicate a Task or Milestone. Tasks are indicated by a bar and a Milestone is a diamond. Any row with an orange arrow from one row to another indicates the rows are linked to each other. A row that has a grey bar is a task that have dependencies and can only be completed when the other tasks are completed. |
If a Parent Task is deleted all child tasks associated with it will also be deleted. Should you wish to keep the child tasks please remove association from the Parent task prior to deletion.
When a Periodic table type is added the table will start from the month used in the Year Start option set by your Administration team. Below is a Weekly Periodic table where the Year Start has been set to January.

As you can see the table starts on w/c 27 Dec even though the Year Start has been set to January. This is due to weeks using the weekday order of Monday to Sunday. In this example January starts on a Saturday so the table starts 27th December as that is the Monday prior to the start of January. This also applies to the end of the month so if the end of the month is a Friday part of the following month will be included in the weekly period.
An update to Yearly periodic tables are multiple years are now displayed on the table rather than just one year that has to be scrolled.

The table will start from the previous year to the current year and will include 8 years. To view previous and future years use the scroll arrows on the year selector.
2. Creating a Project
When assigned to a Project type as an Owner you will have the ability to create Projects for that type. From the Home page if you want to create a project click on the Create a Project button:
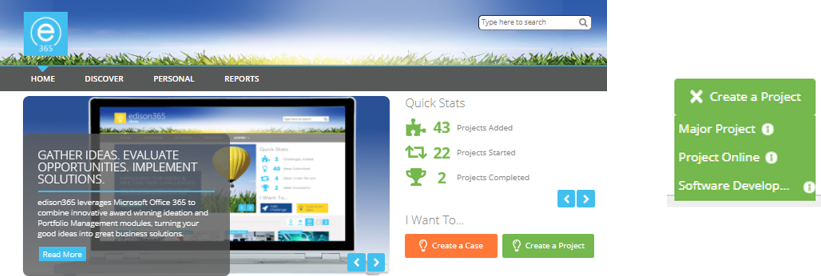
If you are assigned to a single Project type the form for that type will open automatically. If you are assigned to multiple Project types a list of assigned Types is displayed when clicking on the Create a Project button. Once selected the form for the chosen type will be displayed
Once opened complete the form and choose one of the following options:
Save – Saves the current state of the project and remains open for further changes.
Save and Close – Saves the current state of the project and returns to view mode.
Cancel – The project will not be created and any data for the project entered will not be saved.
Back to Home
3. Creating a Project - External Projects
Some Project Types can be used to surface Project Online Projects. When a Type that is selected that allows Project Online surfacing an additional window will be displayed before the project form is displayed.
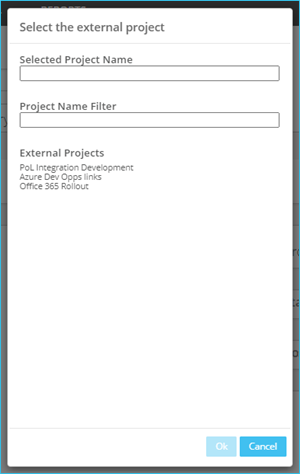
Once the Project Online project is selected it will be highlighted and the OK button can be used. Once the OK button is clicked the Form for the Type will be displayed as normal.
Projects from edison365projects and Project Online can be differentiated by the icon on the top right corner of the project card.

The Project Online projects have the Project Online icon and the edison365projects projects have the edison365projects icon. The icons are also displayed on the Properties page of the project.
Back to Home
4. Creating a Project - Microsoft Projects
The Projects module can be configured to allow projects to be created from a Microsoft Project mpp file. If a type is configured to support this the following will be displayed after the type is selected when creating a Project.

Once the modal is opened you can select whether to use an existing mpp file or create a new file.
To create a project from a new mpp file ensure the option of ‘Create New MSP Project’ is selected. Once selected click the OK button which will take you to the project form for the type with the Title already set as the name for the mpp file. This can be changed if required.
To create a project from an existing mpp file ensure the option of ‘Use Existing MSP Project File is selected. Once selected the files names below this option can be selected. When an mpp file is selected click OK and this will automatically assign the title and any tasks from the file to the designated tasks table on the form. Once the existing option is selected you can also enter search criteria in the Name Filter to narrow the name list.
Each mpp file is stored in your SharePoint site under the edison365 MPP Files section of the Site Contents. Any mpp files can be uploaded here and any created will also be stored in this location. Once added they will be added to Select the MPP file modal.
One major difference on a project created from an mpp fille is the tasks table data is read only and populated directly from the file. To refresh the data, click on the arrow icons above the zoom slider. Once clicked this will pull any new tasks data to the table.
You can also access the mpp file by clicking on the MS Projects icon next to the refresh icon.
The MPP file data cannot be changed however the name of the Project used in edison365 can be changed which will not impact the name on the MPP file.
5. Creating a Business Case
When assigned to a Case type as an Owner you will have the ability to create Business Cases for that type. From the Home page if you want to create a Case click on the Create a Case button:
If you are assigned to a single Project type the form for that type will open automatically. If you are assigned to multiple Project types a list of assigned Types is displayed when clicking on the Create a Project button. Once selected the form for the chosen type will be displayed
Once opened complete the form and choose one of the following options:
Save – Saves the current state of the project and remains open for further changes.
Save and Close – Saves the current state of the project and returns to view mode.
Cancel – The project will not be created and any data for the project entered will not be saved.
Back to Home
6. Field, Table, and Button Descriptions
Some fields, tables, and buttons will have a Description added by the Administrator to give more context about the field such as what the field is used for and any rules on the field.
When a description is added to a field it will be displayed as the below on a form. The image below represents a field. When added to a table the same icon will be displayed.

If you click on the icon to the right the description set for the field will be displayed as follows

To close the description simply click away from the icon and the description be removed.
Back to Home
7. Updating/Maintaining a Project or Case
At times, all of the data required to complete a Case or Project will not be available to the user when first created. As a Process Manager of a Type, you will be able Edit the Case or Project to add the additional data or make any other changes. Such as assigning users, attaching or removing documents, and selecting the currency of the Case or Project. To do this open the relevant Case or Project and click on the Edit button.
This will open the Case or Project in Edit mode and changes can now be made to the form and any other sections of the Case or Project where it is allowed depending on user rights. Once the changes have been made Click Save and Close the project to confirm the changes.
If a Case or Project is no longer required it can be deleted by the owner(s) of the Case or Project. To do so click on the Delete button. This will trigger a confirmation message. If Yes is selected the Case/ Project will be deleted. If No is selected the Case/ Project will remain as it is.
Back to Home
8. Stage Reviews
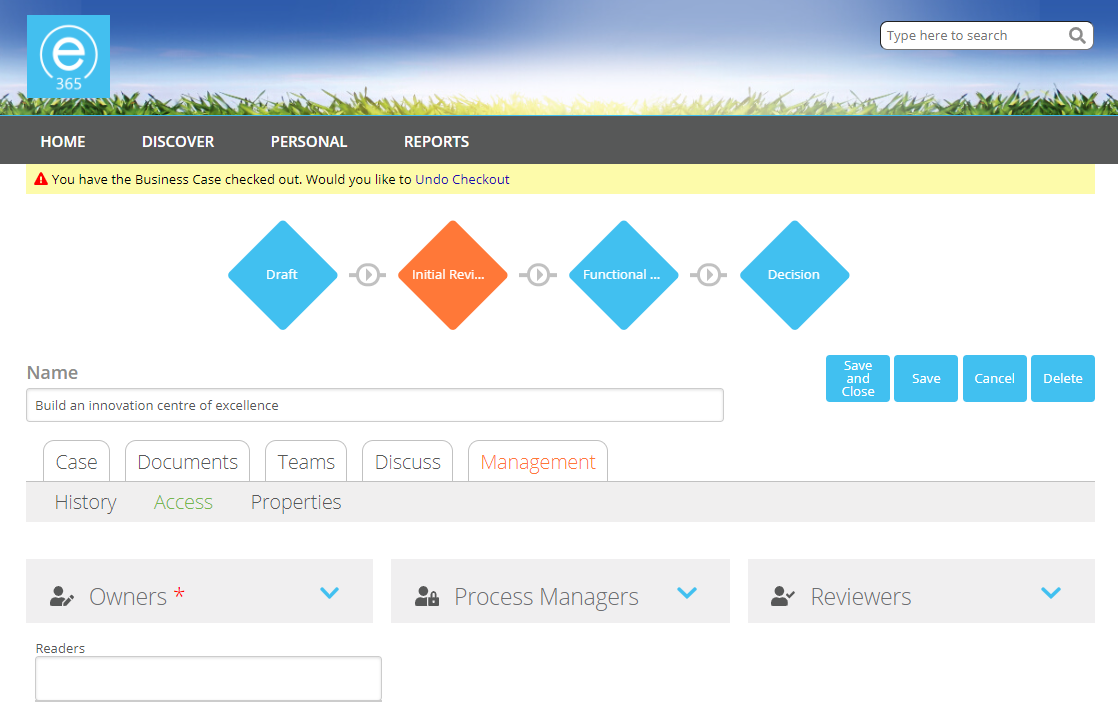
On a Business Case or if enabled for a Project and you are assigned as a Process Manager your role will be to progress the case or project through the various stages. If you are happy with the current stage and wish to progress the project, further click on the Stage Review Button.

Once the Stage Review is button is clicked a sub menu will be displayed where you can select the stage to progress the case or project to. Click on the ‘Change Stage to:’ dropdown which will open the list of possible stages. Now select the stage to progress to and Click OK and add an optional comment to support the reason. This will now move the project to that selected stage


Depending on how your stages are configured you will either move the Case or Project to an Open Stage or an Under Review stage. The easiest way to know is by looking at the shape of the stage indicator on the the progress bar. If it is a square shape that is an Open stage and if it is a diamond shape that is an Under Review Stage.
Both Open and Under Review stages follow the same process in how they are moved from stage to stage. The only major difference is when a Case or Project is in an Open stage the Owner of the Case or Project will need to click on the Submit button (pending any case or project changes). Once clicked the Process Managers assigned to the Case or Project will receive an email notification to advise them the Owner is happy for the case to be moved to the next stage. When the Case or Project is an Under Review stage the Process Manager will need to assign reviewers (these can be set manually or automatically assigned at type level). Once the reviewers have carried out a review the Process Manager will receive a notification of the individual responses and one last notification once all reviewers have carried out a review. From here the Process Manager can determine the best cause of action for the Case or Project.
Back to Home9. Reviewing a Business Case or Project
If a case or project type is in a stage that is an Under Review stage, a Process Manager will need to ensure at least one reviewer is assigned. If the process manager moves a project into a 'Review' stage, a set of reviewers will be automatically assigned if the Administrator includes them on the Project Type.
If a project is in a Review stage and you are assigned as a Reviewer to allow the Process Manager to progress the Project, you will need to review the project. If this is the case the following button will be displayed on the Project page:
To review the Project, click on the Review button which will open the following modal:
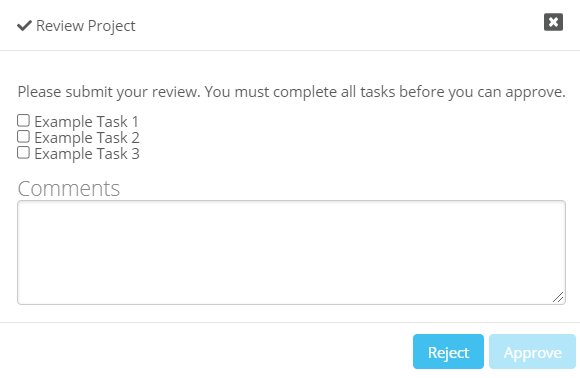
From here you can Reject the review if needed but if you want to Approve the stage ensure a tick is added to the Task list. Once a tick is added to all tasks the Approve button can be clicked.
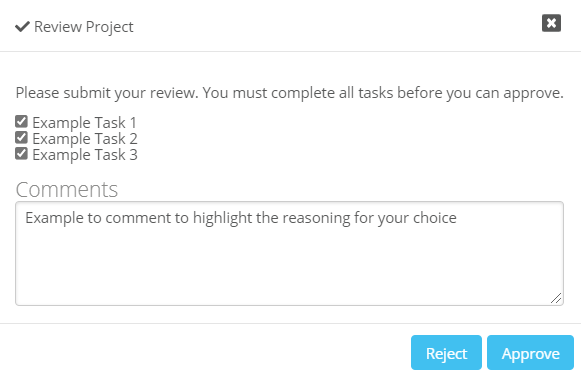
Once the Approve or Reject button is clicked your decision will be stored in the Reviewers for the stage and in the History tab.
Back to Home
10. Assigning Roles
Each Case or Project will require specific roles. When a case or project is created you will be automatically assigned as an Owner. From here you can also assign any additional Owners. To assign a user to a specific role ensure the project is in Edit mode and click on the Management tab. From here click on the Access sub tab and click on the blue downward arrow on the role to open the user controls. All of the possible users for the role will be in the grey section on the left and all users currently assigned will be in the white section.
To assign a user to the desired role click and drag the user to the drag drop zone to add them to the role. Click on the Save or Save and Close to assign the user to that role. To delete a user from a role open the user controls in edit mode for the role and click on the blue bin icon next to the users name which will remove them and re-add them to the available list.

If a user group has a number of users linked to the group a search field is added at the top of each role when expanded. To search for a user place the cursor in the text box and start entering the name of the desired user(s) to search. Once the search criteria is entered the users will be filtered to display only those with the matching criteria.
In the example below 'ja' has been entered so all users with in their name will only be displayed. Once the search criteria has been removed all users will be displayed again.

The Reviewers role users are all automatically assigned when the project is moved into a specific stage. All of the reviewers are assigned by an Administrator when the Type is created and can be added anytime.
Reviewers can also be assigned on an Ad-Hoc basis. To add a new reviewer open the user controls for the Reviewers and click on the textbox within the controls. Enter the name of the additional reviewers which will match to any users. Click on the user to add which will then add them to the list of current reviewers.

Please note the Owners will appear in the order added to the role with the top Owner being listed as the Owner on the project card.
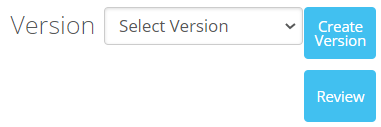
11. Versions
An Admin, Owner, or Manager of a Case or Project you can create different versions to keep track of any changes made to a Case or Project at any time. On each Case or Project a Create Version button is placed on the form.
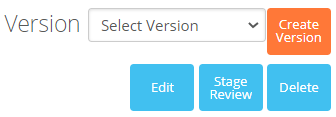
Once clicked the Create Version modal will open. Now you can add a comment for the version creation and click Save which will create the new version.

Once a version is created it can be viewed by clicking on the Select Version drop down and selecting the version number. This will then display the data of the Case or Project at the time the version as created.

12. Attaching Documents
An Admin, Owner, or Manager of a Case or Project you may want to include additional documents to support the Case or Project. Each Case or Project has a Documents tab (depending on the document library used). Once clicked this will display the documents page for the Case or Project. An administrator may also include documents to be attached automatically to a specific Project type at time of creation. These will automatically be added when a new Case or Project is created for that Type.
Depending on the type for the case or project will determine which document management library is used. If the type is configured to use No Documents the documents tab will be missing:

If either Documents in SharePoint or Documents outside of edison365 is selected the Documents tab will be displayed

If your case or project type uses the Documents in SharePoint document management library option the following will be displayed in the UI. To upload a document click the Browse button which will open a File Explorer window where you can select which documents to upload. Once the files are elected they will appear in the Upload File box. Once happy with the documents click the Upload button to add the documents.
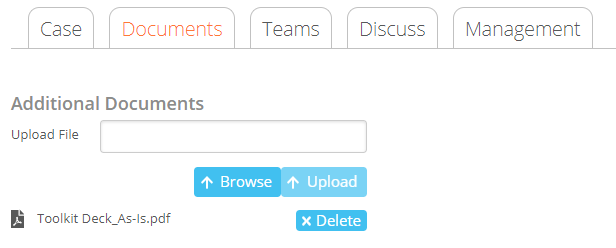
To delete an uploaded document ensure the case or project is in Edit mode and click the Delete button next to the relevant document.
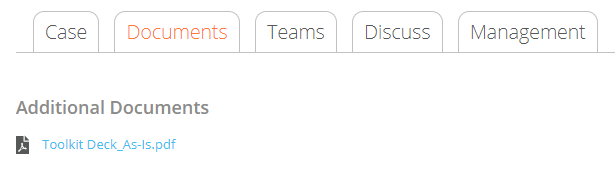
To view an uploaded document ensure the project or case is in View mode and from the Documents tab click on the relevant document you wish to view.
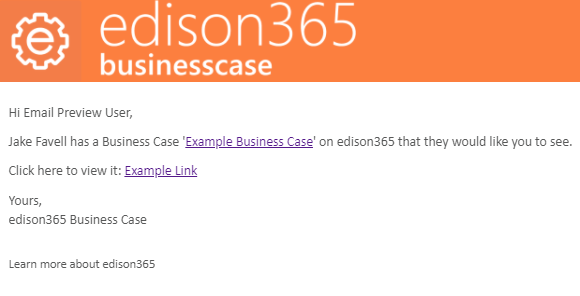
13. Email Notifications - Business Cases
If an administrator has enabled email notifications, there are certain actions that will trigger an automatic email notification to certain users when the actions
have been carried out. These actions are as follows along with an example of the email templates:
- Business Case Created > All possible process managers will be notified.
- Business Case Owner Assigned > Assigned Case Owners notified.
- Business Case Submitted > All possible Process Managers will be notified.
- Business Case Stage Changed > All assigned Owners when a Process Manager changes the stage.
- Business Case Review Assigned > Any Reviewers listed or added.
- Business Case Review Actioned > All Process Managers when a reviewer has reviewed a stage.
- Business Case Review Completed > All Process Managers when all Reviewers have reviewed a stage
Below is an examples of what the notifications will look like.
If you have executed any functionality the requires an email notification for yourself such as assigned yourself as a Process Manager ot reviewed a case you are the Process Manager of an email notification.
14. Email Notifications - Projects
If an administrator has enabled email notifications, there are certain actions that will trigger an automatic email notification to certain users when the actions
have been carried out. These actions are as follows along with an example of the email templates:
- Project Created > All possible project owners will be notified
- Project Owner Assigned > Assigned Project Owners notified.
- Project Submitted > All possible Process Managers will be notified (If stages are enabled)
- Project Stage Changed > All assigned Owners when a Process Manager changes the stage (If stages are enabled)
- Project Review Assigned > Any Reviewers listed or added (If stages enabled)
- Project Review Actioned > All Process Managers when a reviewer has reviewed a stage (If stages are enabled)
- Project Review Completed > All Process Managers when all Reviewers have reviewed a stage (If stages are enable
Below is an examples of what the notifications will look like.

If you have executed any functionality the requires an email notification for yourself such as assigned yourself as a Process Manager or reviewed a case you are the Process Manager of an email notification.
15. Teams Integration
If your administrator has enabled the Teams feature you can link a Case or Project to a Team in Microsoft Teams. When in edit mode for a Case or Project you can link them to a Team by clicking the Link to a Team text on the Teams tab (image below).
The image below also shows how a link to a Team is displayed when set. In edit mode the link can be deleted by clicking the bin icon next to the tab name. To view the Team click on the tab name and this will open the Team in the Teams app or the Teams browser depending on your selection.

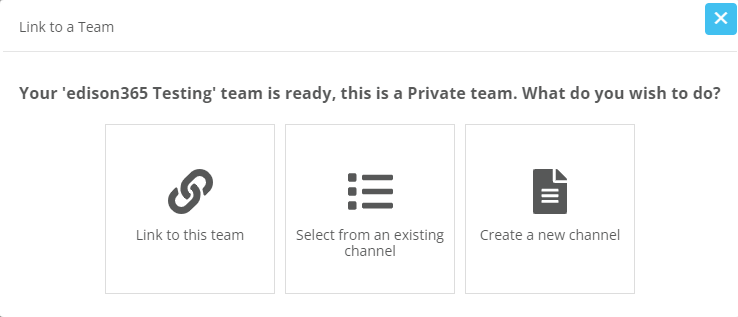
Once clicked Microsoft Teams will authenticate your user account to ensure you have authority to link the Project to a Team. Once the authentication is complete a window will open where you can assign an existing any Team that you are a member of, or you can create a new Team.

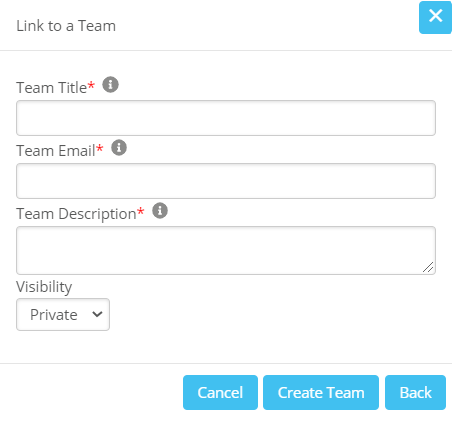
When an existing Team is selected the first below image is displayed. From here you can select any Team that you are a member of to link your Project to. The second image is the form that needs to be completed to create a new Team. If a new Team is created the following info is required:
- Team Name – The name as displayed in Teams that the Case or Project will be linked to.
- Team Email – The email address that you wish to associate the Team with to manage any memberships and any other management tasks.
- Team Description – Information on the Team that is displayed to users when they request access to the Team.
- Visibility – If set to Private only members will see the Team. If set to Public, all users can view the Team and request access.

Once a Team has been assigned a Channel will need to be set. Again, you can assign an existing Channel from the selected Team or a new channel can be created.
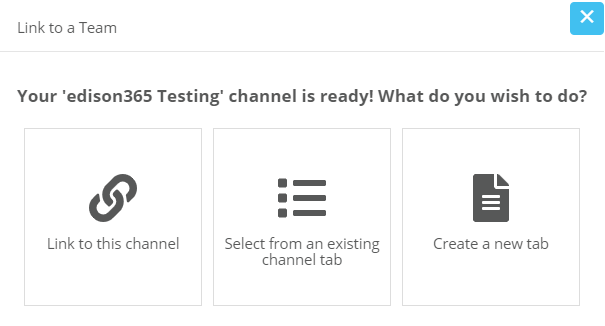
If you decide to use an existing channel you will need to use the Select from an existing channel option which will display the following:
Should you choose to use an existing channel a drop down of all channels for the team will be displayed. Should you wish to create a new channel you will be presented with a new window where you need to enter the following:
- Channel Name: The name you wish to give the channel.
- Channel Description: A brief summary of the channel and its purposes.
Once the Channel is assigned the Tab will need to be set. Like Channels, an existing tab can be selected or a new tab can be created. If you select an existing tab the project assigned to that tab previously will no longer be assigned. If you choose to create a new tab a window with a Tab Name textbox will be displayed where you can enter the tab name.
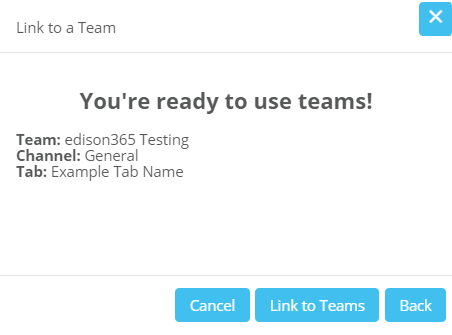
Once the Team, Channel and Tab have been configured a summary of the Them will be displayed. If happy with the Team configuration click the Link to Teams button. You can go back to previous steps by clicking the Back button. You can also leave the cancel the linking by clicking the Cancel button.
16. Read Only Access
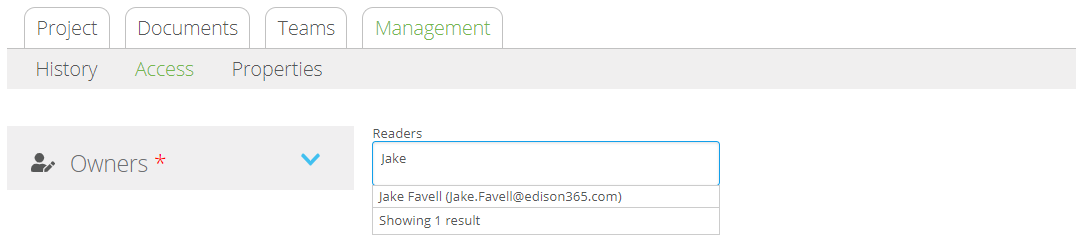
A user who is not assigned a role to a Case or Project or even a Case or Project type can be assigned as a reader. This can be assigned by an Admin, Project Owner or Project Manager. If a user is assigned as a reader the Project will be added to the designated users Home, Discover, and Personal pages in the relevant carousels. Once the user accesses the Project they will have no authority to edit or manage the Project and can only view all the data. This can be granted in the Management tab when in edit mode.

To assign a reader to the Project simply add the name of the user and a people picker will display any matches. Once the correct user is added click Save and Close and the user will be able to view that Project and no others for that Project Type.
17. Reports
Each Case or Project Type can now be configured to include reports embedded into each Case Project for that type. These reports are Power BI reports so a Power BI license will be required to allow a user to view the report and the data for it. Below is an example of a project and each of the functionalities of the page.

| No. | Item | Description |
| 1 | Full Screen |
Clicking this will display the selected report in full screen mode. |
| 2 | Report Selection |
Clicking this will open a dropdown list of the different embedded reports associated to the type. Once a report is selected the data will be displayed. |
| 3 | Filters |
Clicking the arrow icon will expand the Filter options. From here you can change it a Basic or Advanced filter set. Once a filter is applied you can also narrow the results by using a search bar included. To close the filters click the opposite arrow icon |
| 4 | Report Tabs |
Clicking these will display different sets of data on the report based on the tab selected. |
| 5 | Report Data | Based on the Report and Filters selected the data will be displayed here |
Last Updated: February 2022