Published January 2022 Version 1.4
| Please Version | Author | Comments |
| 0.1 | Kyle Beloin | Draft |
| 1.0 | Jake Favell | Published Version |
| 1.1 | Jake Favell |
Updates: Triage Metric Types |
| 1.2 | Jake Favell |
Update: Power BI Reports on Challenge Types, Default Challenge |
| 1.3 | Jake Favell |
Update: Enabling and Disabling of notification emails on a global level. Open Innovation Users: Delete user ideas and delete users. |
| 1.4 | Jake Favell |
Update: Open Innovation Settings changes (Expand Parent Challenge by default on ideas page) |
| 1.5 | Harry Newman |
Update: Configure Challenge Types changes (New limit on number of challenge types) |
Contents
- Introduction
- Deployments
- Administrator's Console
- Manage Database
- Configure Application
- Edit Settings
- Allow Anonymous Idea Submission
- Teams Integration
- Audience Approvers Emails
- Auto Subscribe Notifications
- Custom Report Link Url
- Expand Parent Challenge
- Help Link Url
- Hide Project Server Links
- Maintain Triage Values
- Personal Link Label
- Challenge and Ideas Labels
- Show Challenge/Idea Details
- Show Idea Owner on Idea Board Cards
- Show View Company Profile Button
- User Profile Image Source
- Messages Culture
- Default Group ID
- Discussions Enabled
- Network
- Configure Triage Fields
- Configure Challenges Types
- Configure Fields
- Configure Stages - Challenges
- Configure Stages - Ideas
- Configure Stages - Stage Change Events
- Configure Forms
- Configure Notification Branding
- Configure Audiences
- Configure User Roles
- Project Online Credentials
- Manage Campaigns
- Manage Categories
- Stock Images
- Manage Anonymous Content
- Manage edison365 Mapping
- Token Management
- Manage Gamification
- User Idea Challenge
- Attachments
- Uploading Images
- Open Innovation
- Look and Feel
- Power BI Reports
1. Introduction
This document provides instructions for managing the edison365ideas and Open Innovation applications and covers administrative tasks related to application configuration and administration.
The audience for this document is the edison365ideas Administrator.
1.1 Application Permissions
edison365ideas relies on SharePoint permission groups to ensure users have access to only elements of the application within their remit. There are four permission groups that are created by default. Instructions for assigning permissions are documented in section 3.4 below.
| edison365 Administrators | Members of this group can access the edison365ideas administrator settings. These users have full control across all functionality. |
| edison365 Challenge Creators | Members of this group can create challenges from edison365ideas and access the report functionality. |
| edison365 Idea Creators | Members of this group can create ideas from edison365ideas. |
| edison365 Viewers | Members of this group can view ideas and challenges from edison365ideas. |
1.2 Site Permissions
In addition, users should also be added to the out-of-the-box SharePoint permission groups as appropriate for their profile.
| edison365 Owners | Full control, e.g. SharePoint Site Administrator |
| edison365 Members | Contribute, not widely used |
| edison365 Viewers | Read, most users should be added to this group |
| edison365 Visitors | Read, not widely used |
2. Deployments
edison365ideas can now be deployed by the edison365ideas Administrators rather than edison365 themselves. Once the edison365ideas app has been deployed to the SharePoint Site Collection, open it in the usual fashion and the following screen will be displayed:

From here you can choose whether to deploy the edison365ideas application with a blank database or with demo data template set by edison365 to inspire Challenges and Ideas. To select a template, click on the radio button next to the Blank or DemoData option based on how you want to deploy the application. Once selected click on the Start Deployment button to kick off the deployment.

Once the process has been kicked off a progress bar will be displayed to show how far along the deployment is. Once the deployment is completed a button labelled ‘Start edison365ideas’ will be displayed. Click on this button to begin using edison365ideas.
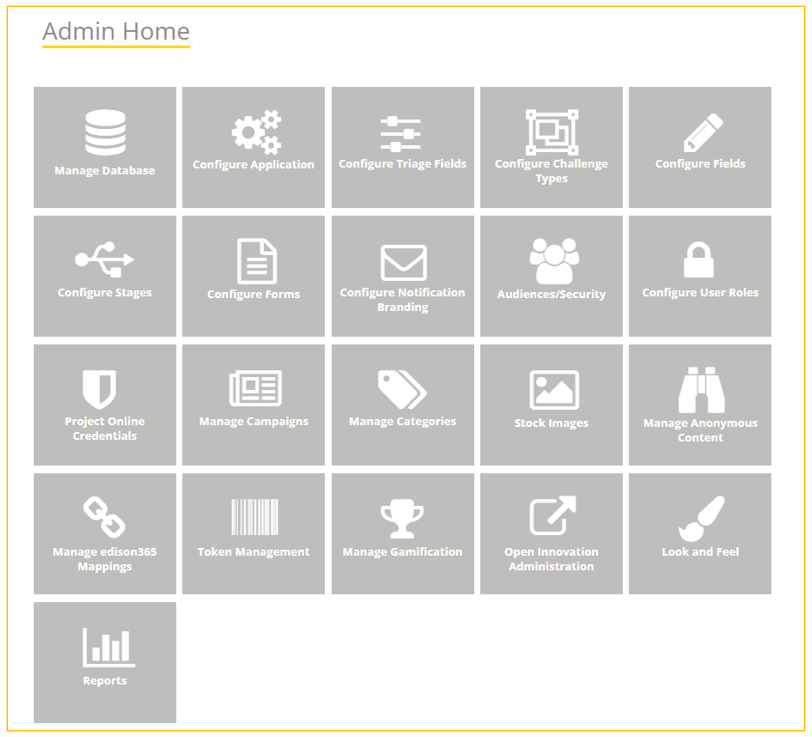
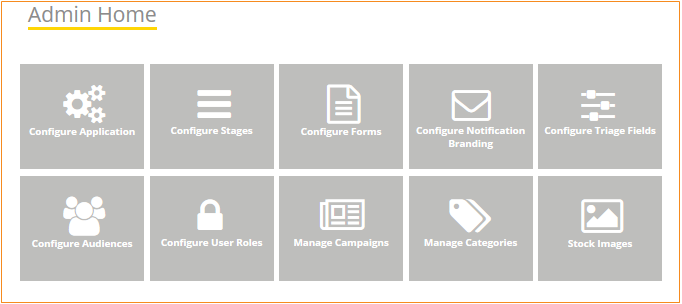
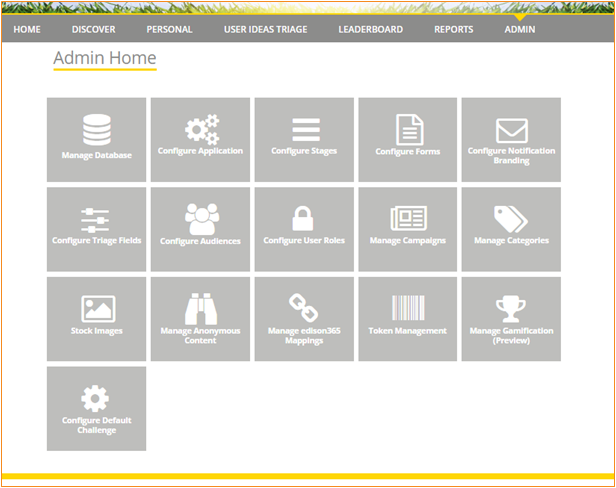
3. Administrator's Console
The Administrator’s Console is accessed via the top navigation bar. The Admin link navigates to the admin home page. Below is a screenshot of the edison365ideas admin homepage.
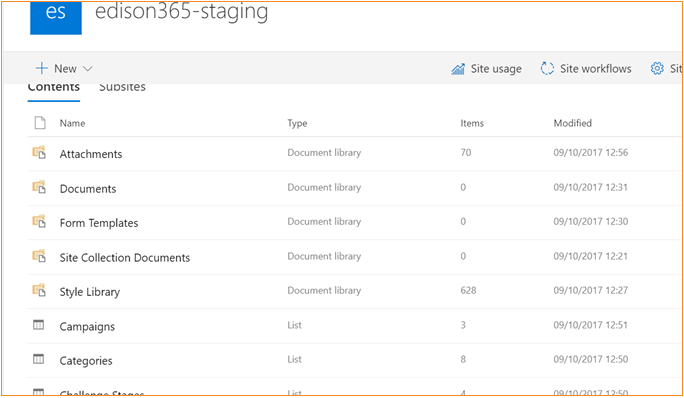
Tasks that are not so frequently performed are executed via the edison365ideas SharePoint site. The SharePoint site serves as a content store where everything related to the application is stored, including Challenges and Ideas, Images, Reports, and some Configuration Settings.
4. Manage Database
Warning; This is optional and only required if the gamification feature is enabled.
The gamification feature requires an Azure SQL database to store the data, this is the Azure cloud database so there is no server to maintain. This database is created via the organization’s Azure portal; it is recommended to start with an S0 tier on the DTU purchase model and monitor the usage / performance, scaling up to a higher standard tier if required.
Tip: For the best experience, consider enabling features such as:
- Auditing and Threat detection: https://docs.microsoft.com/en-us/azure/security-center/security-center-enable-auditing-on-sql-servers
- Monitor the SQL performance recommendations and send support@edison365.com the details on a monthly basis (preferred): https://docs.microsoft.com/en-us/azure/sql-database/sql-database-advisor-portal or turn on Automatic Tuning: https://docs.microsoft.com/en-us/Azure/sql-database/sql-database-automatic-tuning-enable
Once the database details are available, access edison365ideas with an administrator account and click the Admin link then click the new Manage Database tile.

Complete the details and click save.
Once completed, this message will appear below the Save and Cancel buttons:

5. Configure Application
The information for application configuration is stored in edsion365ideas. The values in the configuration table determines the look and feel of the site, logo, copy and features available. The settings here are predefined with the application default values.
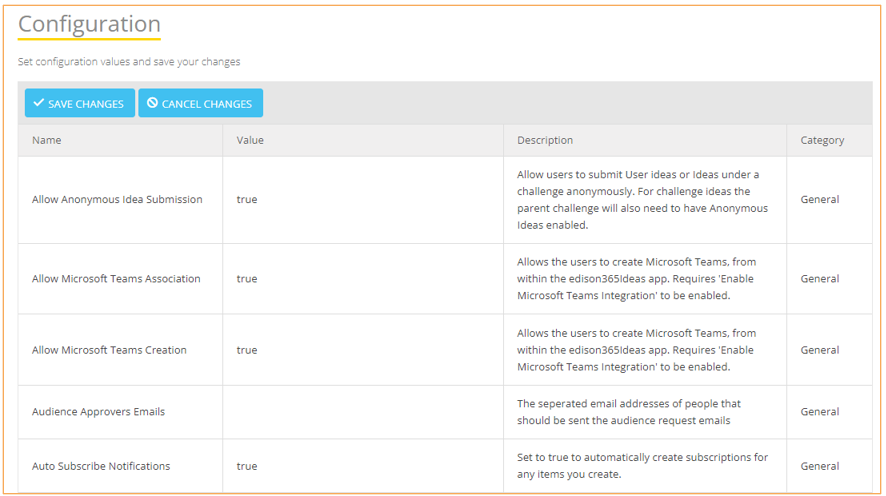
5.1 Edit Settings
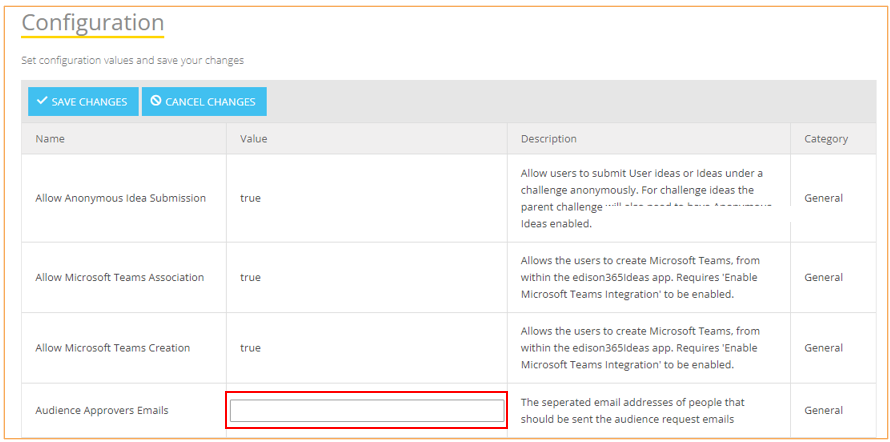
To edit a setting, click on the value cell for the setting name and edit the setting as required. Once the settings are updated as required click the Save Changes button at the top of the grid.
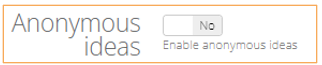
5.2 Allow Anonymous Idea Submission
Allow ideas to be submitted anonymously, if the global setting here is enabled, the “Anonymous Ideas” setting on the challenge will need to be enabled also to allow an anonymous idea to be created for the challenge:
Once enabled, this presents the user with a checkbox on the idea from above the Owners field:

Checking the checkbox will then remove the Owners input box:

5.3 Teams Integration
This controls whether an Idea or Challenge can be associated with a team in Microsoft Teams.

Enabling this allows users to link an Idea or Challenge to an existing Team in Microsoft Teams.

Enabling this allows users to create Teams in Microsoft Teams for the desired Idea or Challenge.

To make use of this feature one of the Office365 tenant administrators will have to first access the following link to authorize the edison365 application in Azure AD:
Once this link is clicked and access is granted to the edison365 Azure AD Application, this will allow edison365ideas and Microsoft Teams to work together to on your tenant.
Once enabled and users have started to link Ideas and Challenges the following buttons will be added to Ideas or Challenges:
When a Team has not been assigned to an Idea or Challenge:
Image 1 is from Design 1 and image 2 is from design 2.

When a Team has been linked to an Idea or Challenge the user can change or remove the linked Team:

5.4 Audience Approvers Emails
A comma separated list of emails addresses for users who would approve / get notified of audience membership requests
5.5 Auto Subscribe Notifications
Automatically enable subscriptions for items the current user creates .
5.6 Custom Report Link Url
A URL pointing to a custom report page. If this is left blank the option will not show on the navigation.
5.7 Expand Parent Challenge
Set to true to expand the parent challenge card by default on the idea page

5.8 Help Link Url
A URL pointing to a custom help location. If no value is entered, then no link in presented in the navigation.
5.9 Hide Project Server Links
By default, this is set to false but this can be changed to true so that when projects are created in Project Online from an idea using the triage page, a link to the project in Project Online is available.
5.10 Maintain Triage Values
This controls whether the triage values should be maintained if the idea is updated to be associated to a different challenge or updates from or to a user idea.
5.11 Personal Link Label
The label used for the “Personal” navigation link
5.12 Challenge and Idea Label
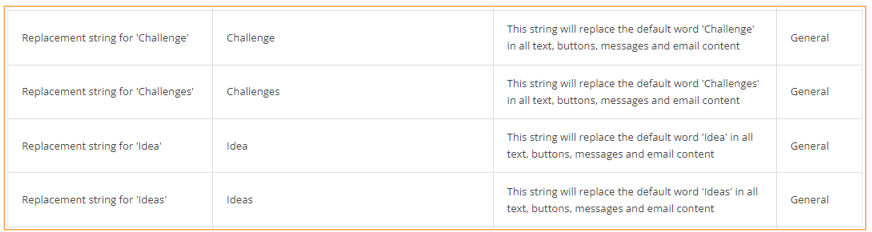
If you wish to use a different name for your Challenges or Ideas. You can set this in the Replacement string for ‘Challenge’ for single challenges. Replacement string for ‘Challenges’ to set the plural name for Challenges. Replacement string for ‘Idea’ for single ideas. Replacement string for ‘Idea’ to set the plural name for Ideas. The names set here will be displayed throughout edison365 Ideas.
5.13 Show Challenge/Idea Details
The details and history tabs on both of the Challenge and Idea pages can be shown or hidden by setting the values to True or False respectively.

5.14 Show Idea Owner on Idea Board Cards
This controls whether the Idea Owner name and profile image are displayed on the Idea card when viewing the Ideas Board.

5.15 Show View Company Profile button
The View Company Profile button that is on the Personal page can be displayed or hidden by setting the value to True and False respectively.

5.16 User Profile Image Source
This controls which endpoint is used to generate the users profile image. By default, Outlook will be selected on all new and existing deployments.

5.17 Messages Culture
This controls the language for system notifications including emails. This dropdown contains the currently supported locales:

This matches the list of languages the users can set:

5.18 Default Group ID
ID of the Yammer group where all conversations will be stored.
Note: Yammer is now Viva Engage. In order to find the Group ID please follow the steps in this article.
5.19 Discussion Enabled
Disable / enable the Yammer (now Viva Engage) discussions.
5.20 Network
The Yammer network name such as company1.com
Note: Your domain name is the string just before .sharepoint.com. For example,
https://company1.sharepoint.com for the example above.
6. Configure Triage Fields
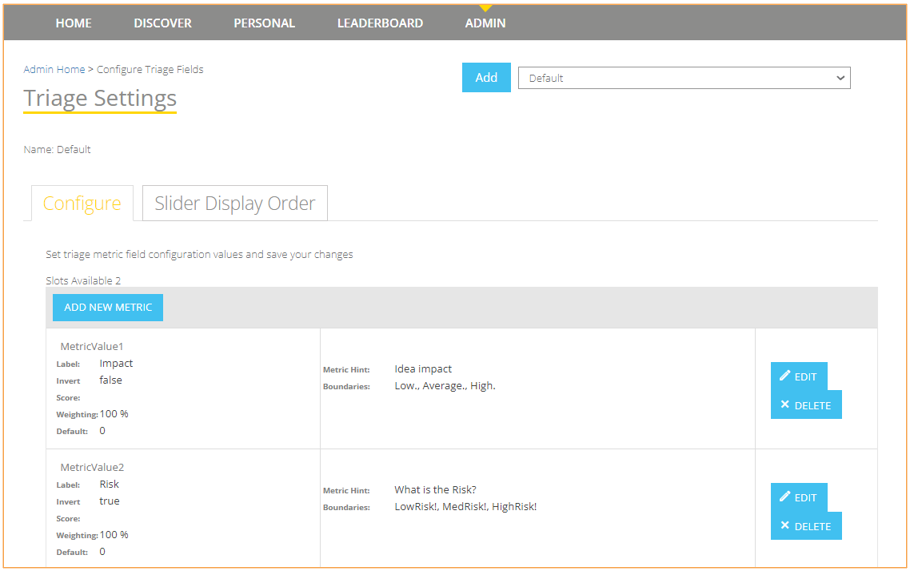
edison365ideas provides the ability for ideas to be triaged against configurable triage metrics. Example metrics could be cost, risk or time. It is possible to configure up to 8 metrics, an example triage can be seen below:

This feature is configured on the Configure Triage Fields page. Triage metrics which are the ways an idea is scored can be assigned to a different types. By default a single Metric type will be created. if you prefer different metric types for different Challenge types you can create different types with individual metrics for each type.
To create a new Metric Type click on the Add button which is next to the Metric Type dropdown. Once the Add button is clicked the following window is opened:

Simply enter the name for your new Metric Type and click OK which will create a new blank Metric Type for you to create the required metrics and metric values.
When a new metric needs to be created click the ADD NEW METRIC button which will open the following window:
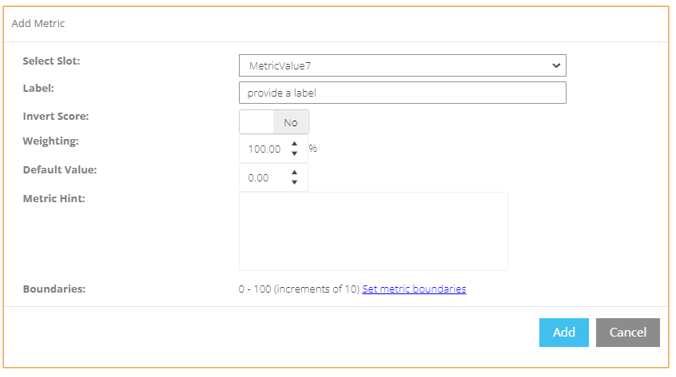

Complete the form as required:
- Label: This is the metric label
- Invert Score: This setting is used to invert the score for metrics such as “risk” where a high rating should lower the score
- Weighting: This setting controls how the weighting of that metric in the idea score calculation, values between 1 - 100
- Default Value: It is possible to set a default value for the metric, values between 0 - 100
- Metric Hint: A prompt for the users that will appear as a tool tip on the triage page when hovering over a metric
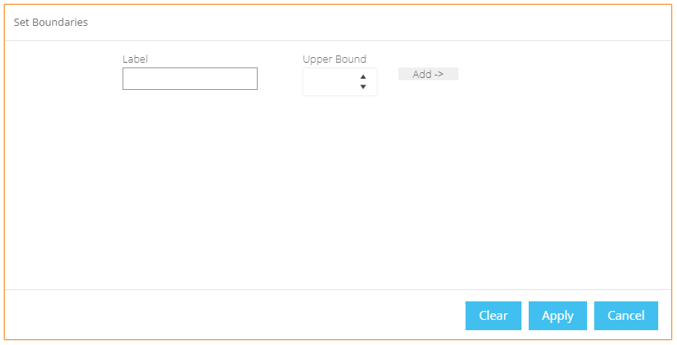
- Boundaries: This controls the metric slider control boundaries and labels
On the Set Boundaries pop up, the Clear button will clear all the boundaries set and the users would see numbers in increments of 10 up to 100. Once set, click Apply to apply the changes to the that metric then click the Add button on the Add Metric pop up to commit the changes.
Then set the display order for the metrics on the Slider Display Order tab:

To change the order click on the Display Order dropdown and select a new value which will change the order of the metric sliders on the Triage page. Once you are happy with the order of the sliders click on the Save Changes button to commit the changes.
7. Configure Challenge Types
Challenges can now be configured differently to ensure each challenge can be managed in a way to suit it’s audience and needs. This is managed through the Configure Challenge Types tile. A default Challenge type will be created initially that all Challenges will belong to.
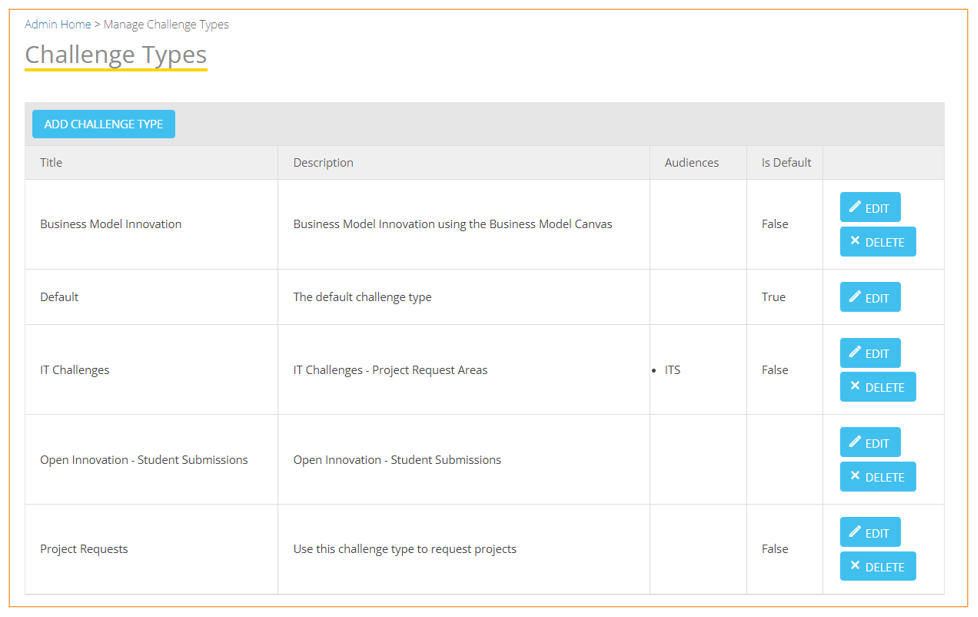
If additional Challenge Types are required, click on the Add Challenge Type button to open the Add Challenge Type window.
Please note that there is a limit of 58 total Challenge Types.
The below image is an example of a blank challenge type.

To create a new Challenge Type the following information can be added. Mandatory fields will be marked with a *:
- Title* - Given name of Challenge Type that will appear throughout the edison365ideas app.
- Description - Text to describe the use or aims of the challenge. This will only be visible on the Challenge Types grid.
- Audiences - Select any of the audiences to restrict access to the Challenges for the Type to members of the selected audiences.
- Triage Metrics - A dropdown to choose which of the Triage Metrics are used when triaging ideas for a Challenge of the Type.
- Default Challenge Description - A rich text field to add default text in the Description field for all Challenge for the type.
- Default Idea Description - A rich text field to add default text in the Description field for all Ideas of Challenges for the type
Additionally you can also add reports to a Challenge Type. To add a report to a Challenge Type Click the Add New Report button. This will open the following modal:

The following information will be required to support Reports to be added to a Challenge for the Challenge Type:
- Report Title - Name of the Report as displayed on Reports tab of the Challenge page
- Report URL - URL for where the report will be generated from.
- Section - The specific page from the Power BI Report to use.
- Field Name - This should be the field used in the database which the Business Case ID is stored against.
- Table Name - Table from the Power BI report to use.
- Display Order - This is a read only field which will automatically select the next available slot based on other reports.
Once all of the Reports data is added click on the Add button and the modal will close and the Reports list will be updated as below. Please note the URL has been hidden in this example:

Now on all Challenge for the type a Reports tab will be added where the report listed can be viewed. To delete a report from the Type click the Delete button which will remove the report from the type.
If a Challenge Type has a specific Triage Type assigned to it and later changed to a different triage type the triage scores set for any ideas will be reset.
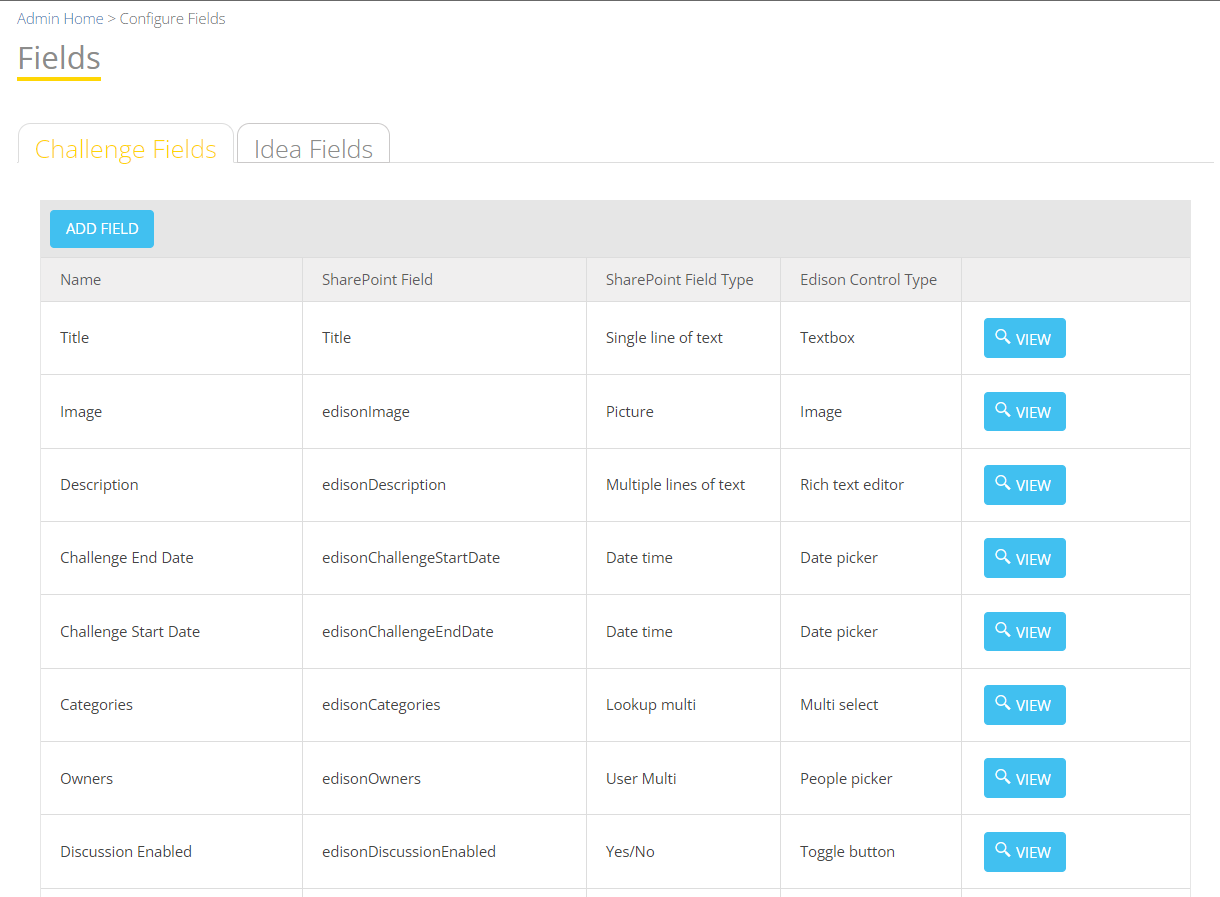
8. Configure Fields
edison365ideas has a set of default fields for both Challenges and Ideas. Administrators can add new fields for both Challenges and Ideas to allow them to be tailored specifically for the users needs. To create a new field, click on the Add Field button. Once clicked the Add Field window for the Challenge or Idea is displayed depending on which tab is selected.
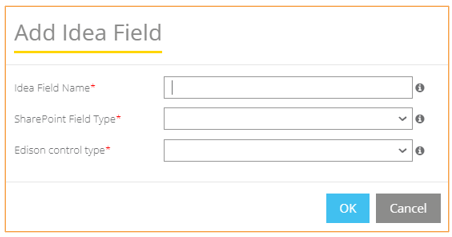
Once a name has been entered you can select a field type along with any additional config if the field type allows it. The following field types can be used along with any additional configuration options:
- Single Line of Text – Simple textbox that allows a single line of text to be added.
- Number – A textbox field that only allows numbers and full stops to cover decimal points.
- Multiple Lines of Text – Can be configured to set the field as a Textbox, Rich Text, Multi Select, or Drop Down.
- Date Time – A date picker.
- Yes/No – Boolean field with Yes or No options. Default option can be set.
- User Multi – People Picker which allows multiple users to be selected.
- User – People Picker which only allows one user to be selected.
- Picture – A field to allow a user to select a Stick Image or Upload their own image.
- URL – A field to set a URL with an additional summary. When the URL is clicked once set the user is redirected to the site set.
Once the name and field type is set click on the OK button and the field will be created and ready to be added to Forms.
Fields can also be used to be displayed on the form on the Open Innovation portal if you have this configured once a SharePoint Field Type has been set. To use a field in the Open Innovation, ensure the check box for ‘Show in Open Innovation’ is checked. Once checked a new set of fields will be added to the config as below:
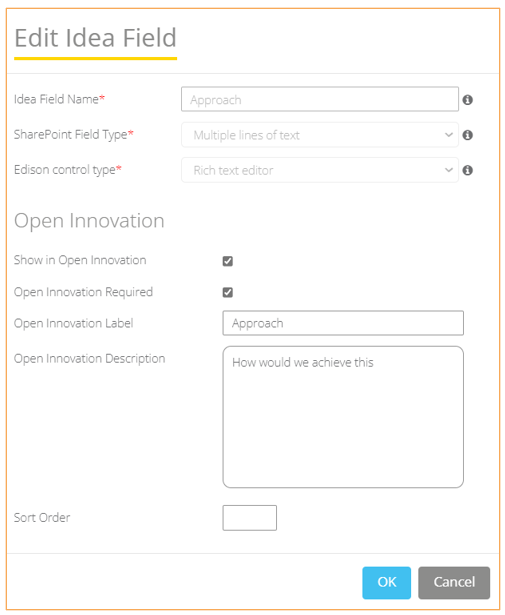
The additional fields allows you to configure the field in Open Innovation as follows:
- Open Innovation Required: If checked the field will need to have a value in Open Innovation. If blank the field can be blank in Open Innovation.
- Open Innovation Label: How the field will be named in Open Innovation.
- Open Innovation: Description: Provides further information as to what the field is used for.
Once created the new field will display at the bottom of the grid:
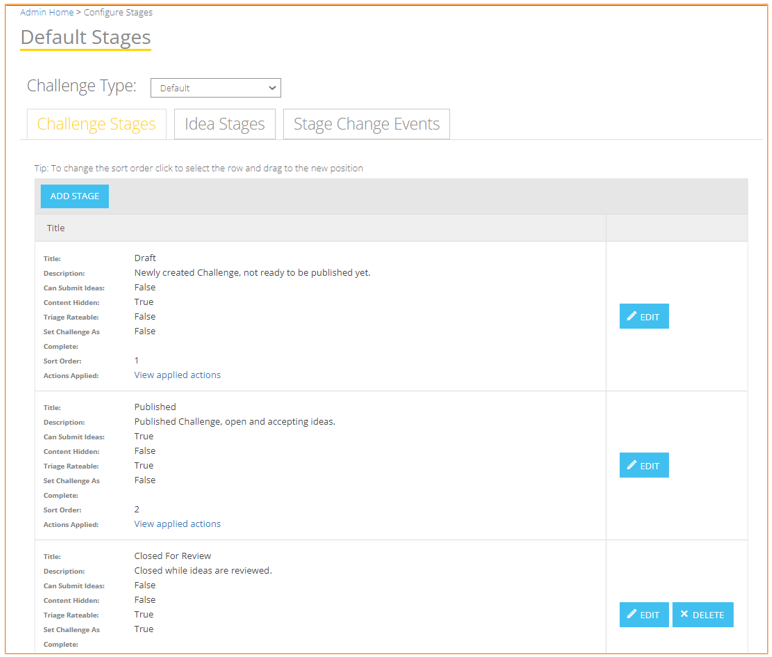
9. Configure Stages - Challenges
Challenge stages are predefined and located in the Challenge Stages tab. The values determine how and when Challenges are displayed. Settings here should not be changed without proper consideration. The default stages are below.
- Challenges in Draft stage are not visible to the wider community. This stage can be edited but not deleted
- Published Challenges are visible to the wider community and users can submit ideas in response to these challenges. This stage can be edited but not deleted
- Challenges that are Closed for Review are visible, but users can no longer submit ideas to the Challenge. This stage can be edited or deleted
- Closed Challenges are complete and though they are visible, users can no longer submit ideas. This stage can be edited or deleted
You can select which Type you are viewing the stages of by clicking on the Challenge Type dropdown. When a Type is selected the Stage Settings for that Type will be displayed.
New stages can be created using the Add Stage button. A new pop up will appear:
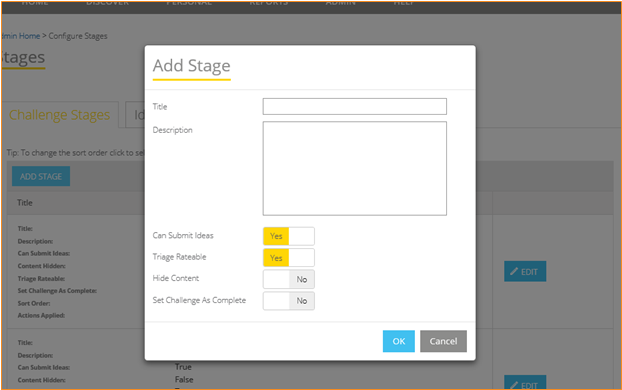
Enter the stage name and description then decide how this stage impacts the application:
- Can Submit Ideas – controls if new ideas can be added to the associated challenge in this stage
- Triage Rateable – controls if the ideas associated to the challenge in this stage can be rated
- Hide Content – controls if the challenge should be hidden from the home page and discover pages in this stage
- Set Challenge As Complete – controls the doughnut days remaining chart on the challenge page
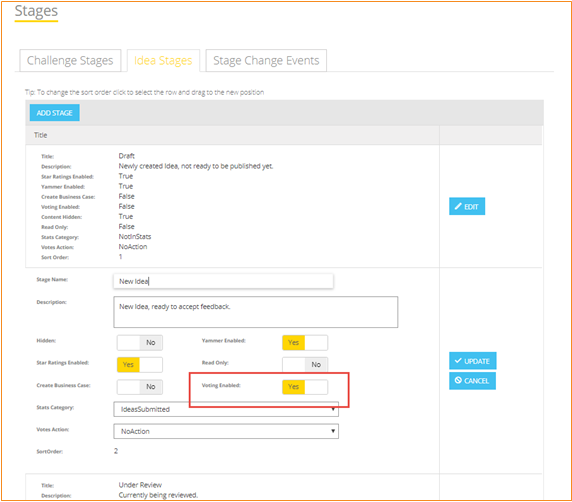
10. Configure Stages - Ideas
Idea stages are predefined and located in the Idea Stages tab. The values determine how and when Ideas are displayed. Settings here should not be changed without proper consideration. The default stages are below.
- Ideas in Draft stage are not visible to the wider community. This stage can be edited but not deleted
- New Ideas are visible to the wider community and users can participate in Yammer discussions and submit ratings in response to these ideas. This stage can be edited but not deleted
- Ideas that are Under Review are visible, but users can still participate in Yammer discussions and submit ratings in response to these ideas. This stage can be edited or deleted
- Closed Ideas are visible, and users can still participate in Yammer discussions, but ratings feedback is not available. This stage can be edited or deleted
- Awarded Ideas are visible, and users can still participate in Yammer discussions and ratings feedback. This stage can be edited or deleted
- Ideas in Require More Information stage are open for Yammer discussions, but ratings feedback is unavailable. This stage can be edited or deleted
When on the Ideas tab the Challenge Type drop down will still appear. This is used to alter the settings for ideas of that Challenge Type. It works in the same way as the Challenges so select a Challenge Type and the settings for the ideas of that Challenge Type are displayed :

New stages can be added using the Add Stage button. A new pop up will appear:

Enter the stage name and description then decide how this stage impacts the application:
- Star Rating Enabled – controls if the idea can be rated using the star rating in this stage
- Yammer Enabled – controls if Yammer discussions are enabled in this stage. Discussions being available also depends on the Challenge and Idea having the discussions enabled set to true.
- Create Business Case – controls if a Business Case can be created when the stage is reached.
- Voting Enabled – controls if the Idea can be voted by users who view the Idea.
- Content Hidden – controls if the idea should be hidden from the home page and discover pages in this stage
- Stats Category – controls which stats category the idea appears in on the homepage. The options are IdeasSubmitted, IdeasUnderReview, SuccessfullIdeas, NotInStats.
- Votes Action – controls what happens with users votes when the stage is reached. Votes can be Refunded, Locked, Locked and Refunded, or No action taken.
11. Configure Stages – Stage Change Events
There is a default stage change event the updates the idea stages to “Under Review” when the associated challenge stage changes from “Published” to “Closed For Review”:
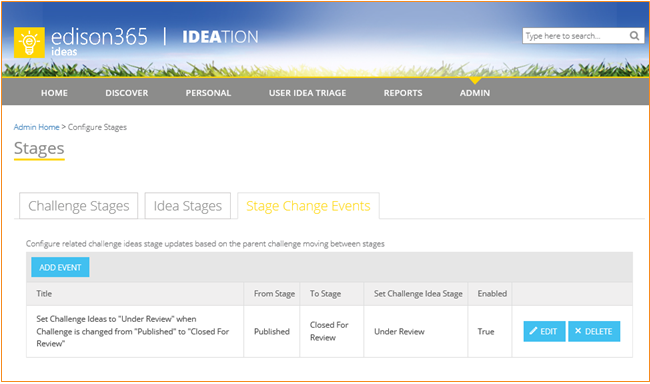
This can be deleted or edited. New events can be created using the Add Event button which load the following form:

12. Configure Forms
edison365ideas supports having custom forms for Challenges and Ideas. Custom forms are defined per stage for a challenge or idea. A form can also be edited based on the Challenge Type selected using the Challenge Type drop down. Each Type has it’s own form and field configuration. The forms are configured in the forms page:

There are limits to the number of custom fields for each type, ideas and challenges, these are summarised below:
| Field Type | Number of Fields that can be allocated. |
| Boolean | 15 |
| Date | 15 |
| Multiple Lines of Text | 25 |
| Number | 20 |
| Picture | 10 |
| Single Lines of Text | 20 |
| URL | 10 |
| User (People Picker) | 10 |
| Multi User (People Picker) | 10 |
The configuration process is the identical for challenges and ideas. Firstly, the fields are defined then the fields are associated to the forms. This guide will cover creating two new fields for the idea form and associate them to the default Require More Information idea stage. Stages are configurable, see sections 4 and 5.
Click the Idea Fields tab and then click the ADD FIELD button:

A pop up will appear:

This pop up allows you to select any of the custom Challenge or Idea Fields created to associate with the Form. Click on the Field drop down to display all the available fields. Once a field has been used once on a Form for a Type it cannot be used again for the same Type. Once the field is selected the field name selected will appear in the Label field. This can be changed if needed.

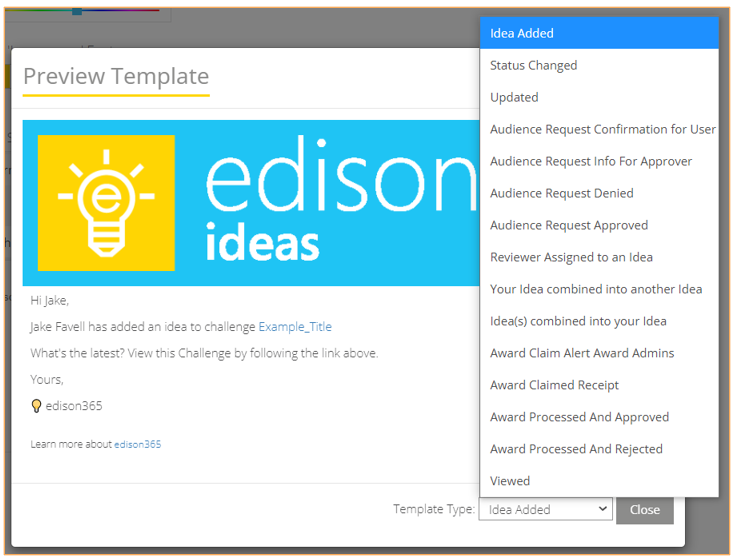
13. Configure Notification Branding
Emails can be fully styled to suit your own branding needs. Before email notifications can be used throught the edison365ideas application they will need to be enabled by switching the 'Send Notification Email' switch to Yes.

Once enabled the branding options will be displayed as below.

The email notifications can be customised in the following ways:
- Banner Logo Address: URL to banner image
- Banner Colour: Banner colour that can be set using the hex value or colour picker
- Show ‘Learn more’ Footer: Enable / disable the learn more email footer
- Email Signature: Update the email signature
Once the settings are updated and saved, the emails can be previewed using the preview button:
Default branding:
Updated branding:

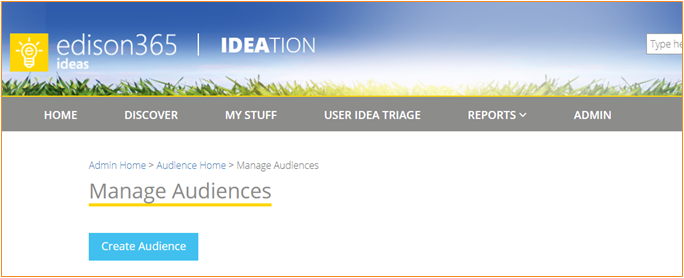
14. Configure Audiences
edison365ideas provides the ability to target content on certain pages in the application. This feature is optional, it is configured on the Configure Audiences page as seen below:
 This displays the Audience Home page. Note that if no email addresses are added to the “Audience Approvers Emails” setting on the main edison365ideas configuration page, the notice seen above will be displayed. When users request to join an audience from their My Stuff page, the email notifications will be sent to those email addresses.
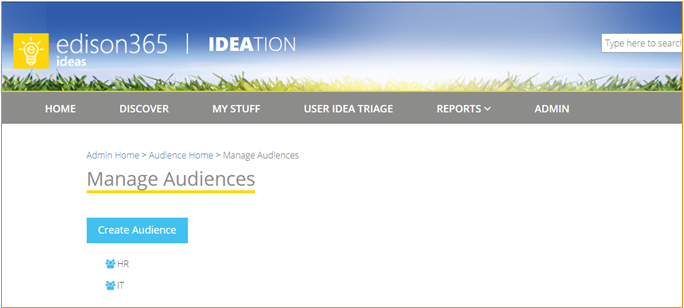
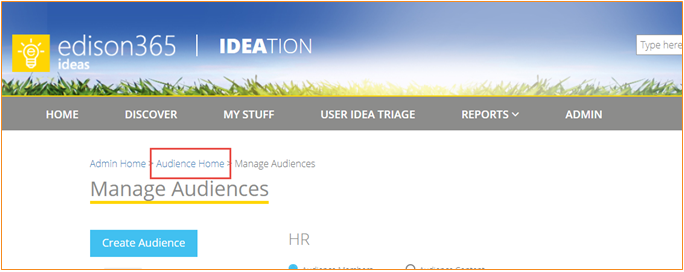
From the Audience Home page, the audience feature can be configured. Firstly, define the audiences, for example a simple audience configuration with just two audiences of IT and HR. Click Manage Audiences to load the audience management page.
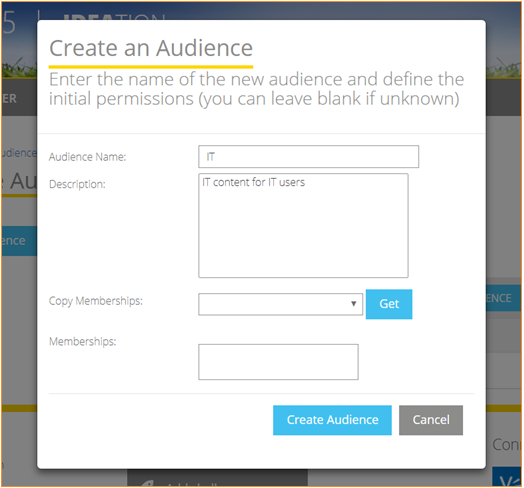
Click Create Audience to load the “Create an Audience” pop up:
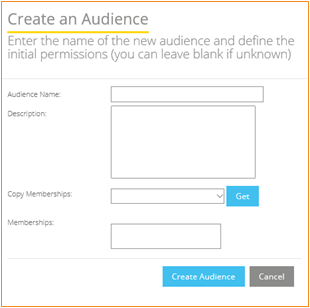
Complete the form as required:
- Audience Name: This is the audience name
- Description: This is the audience description
- Copy Memberships: Automatically assign members from one membership to the new audience.
- Memberships: This is used to add the users, AD Security Groups or SharePoint groups to the audience
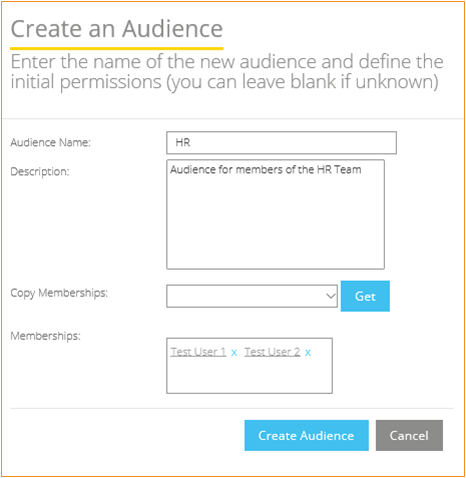
Press the Create Audience button. The view will update to state that the audience is being created:
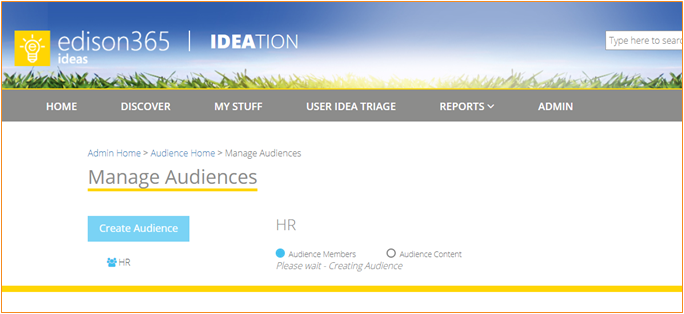
Once completed, the page will display a table:
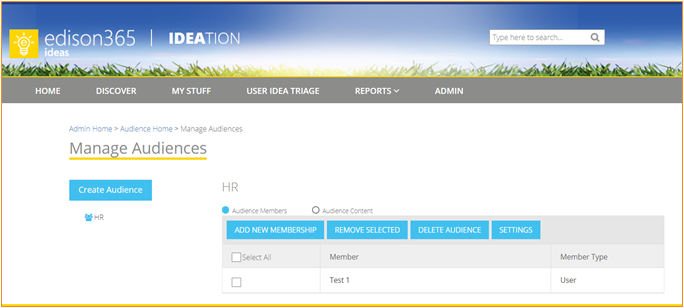
Either the audience members can be displayed / modified, or the audience content displayed by using the radio buttons. The audience content are challenges or user ideas. Create the audiences and memberships for the audiences as required. When creating the subsequent audiences, the form includes another property:
- Copy Memberships: This enables the memberships from an existing audience to be copied into the new audience if required
Audiences would then be visible on the page:
Clicking the Audience would load the details.
Now the content, Challenges and User Ideas, needs to be tagged with the correct audience. Navigating back to the Audience Home using the breadcrumb link:
Note: If content is not tagged, the application will display the content as it does today without the audience feature. Once a Challenge or User Ideas is tagged with the audience/s that content will be displayed / hidden from the Homepage, the My Stuff page and the Discover page for the logged on user based on their audience membership. Search results page is not trimmed based on the Audience. Audiences are not security, it is content targeting. Audiences do not impact Admin users, Admin users see all content as the edsion365ideas Administrators are added to each audience.
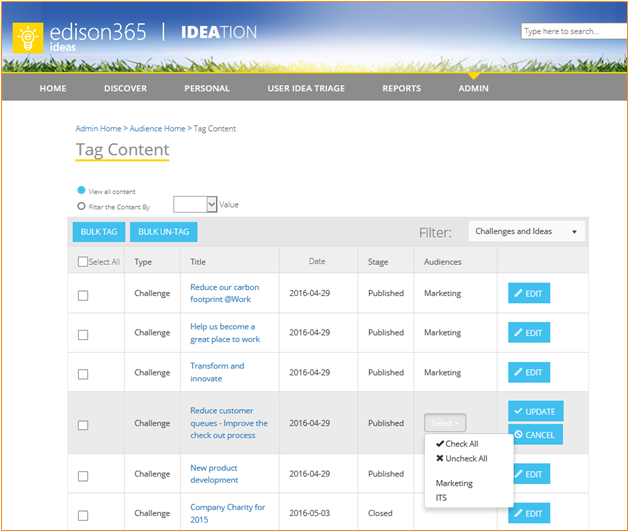
Click the Tag Content button to view the tag content page as seen below:
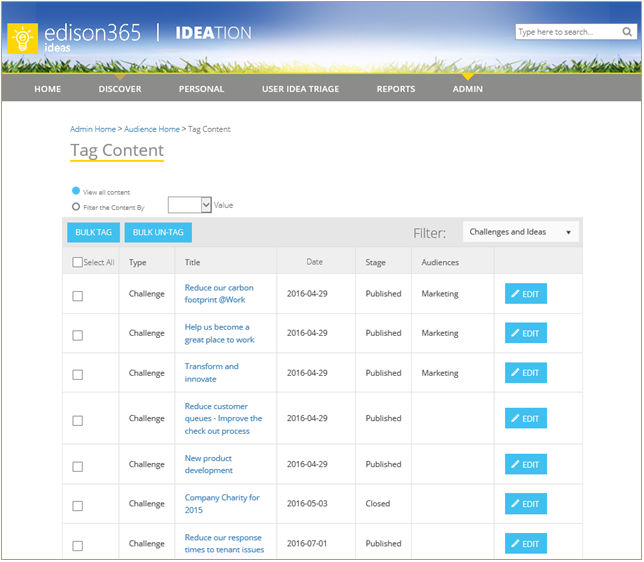
Here's a list of the Challenges and User Ideas are displayed. Audiences are added to the Challenges or User Ideas only. Challenge ideas will inherit the audience settings from the challenge. Select the content:
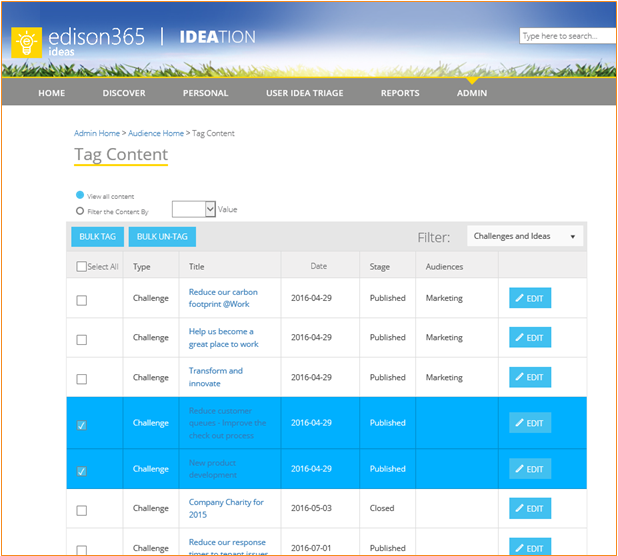
Click Bulk Tag and on the pop up, select the audiences:
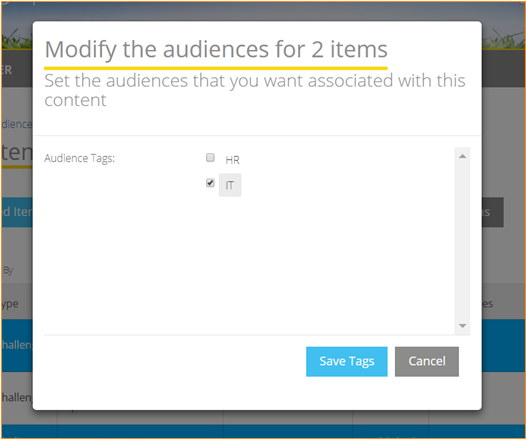
Click Save Tags.
Individual items can be updated using the inline Edit option:
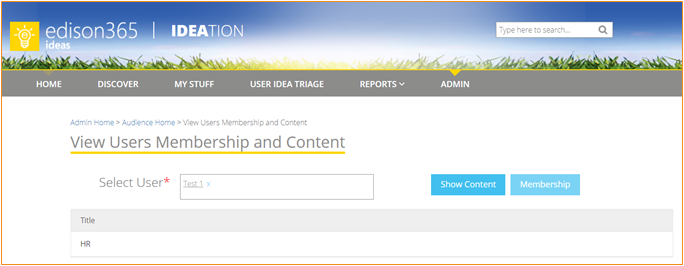
Other admin features include View User Membership and Content, View Access Requests and View Audience Job History:
- View User Membership and Content
Type in the username and click Show Content to see what content that user will see on the Homepage, Discover and My Stuff:
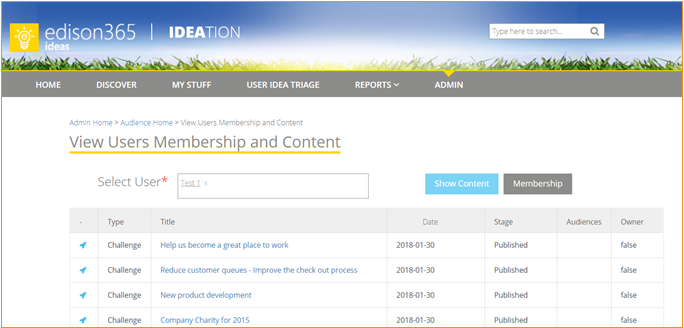
Click Membership to see the audience memberships for the user:
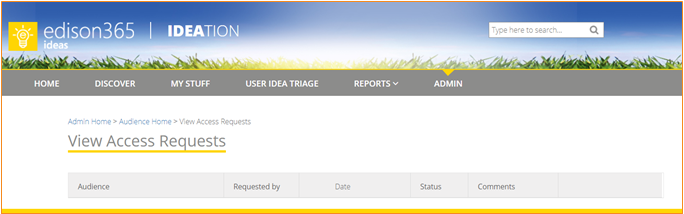
- View Access Requests
This view displays a list of all user membership requests:
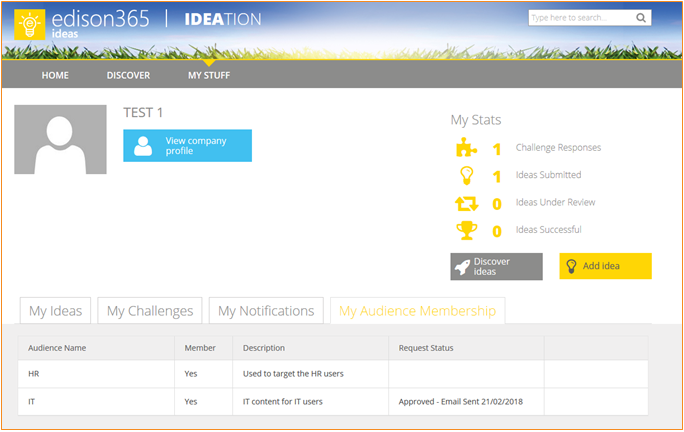
A user can request access to an audience from the My Stuff page:
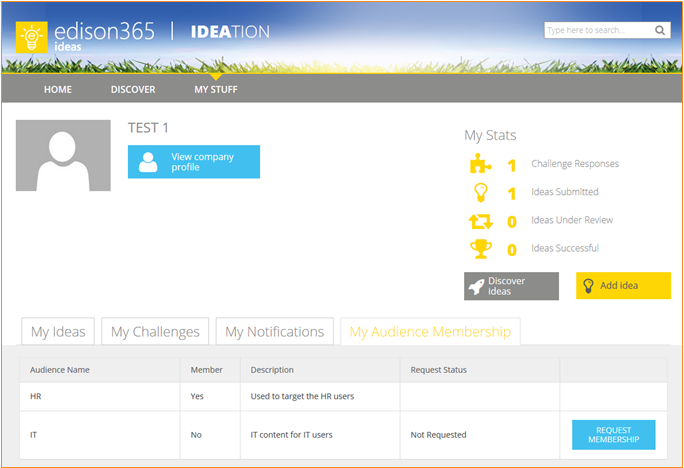
For audiences the user is not a member of, they can click the Request Membership button:
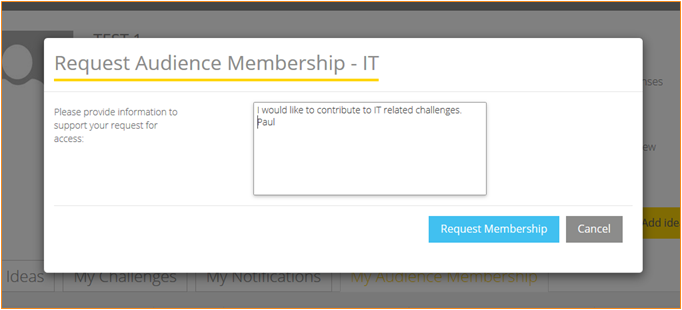
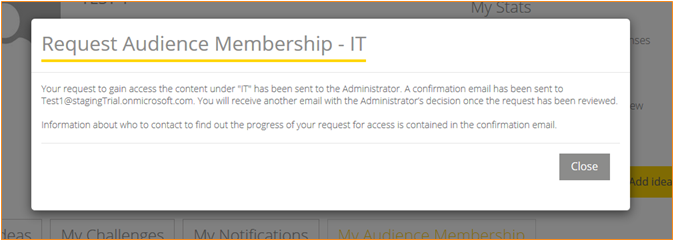
A confirmation message is then displayed:
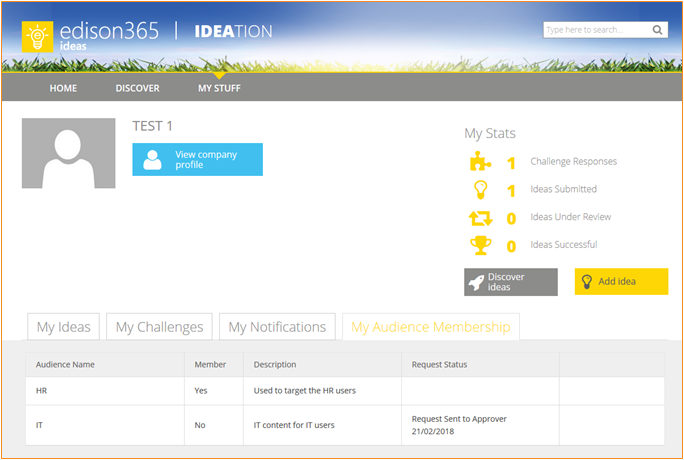
The grid displays the Request Status:
The configured audience approvers would receive an email similar to the one below:
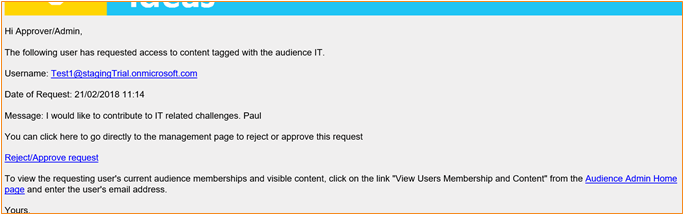
The admin View Access Requests table will display the access requests to all edison365ideas administrators:
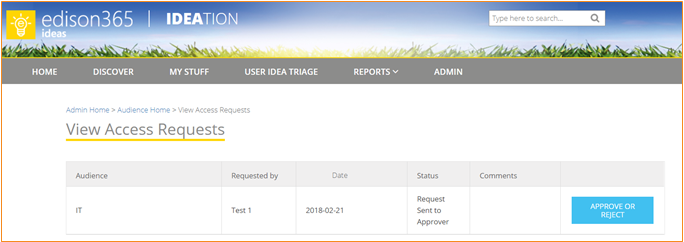
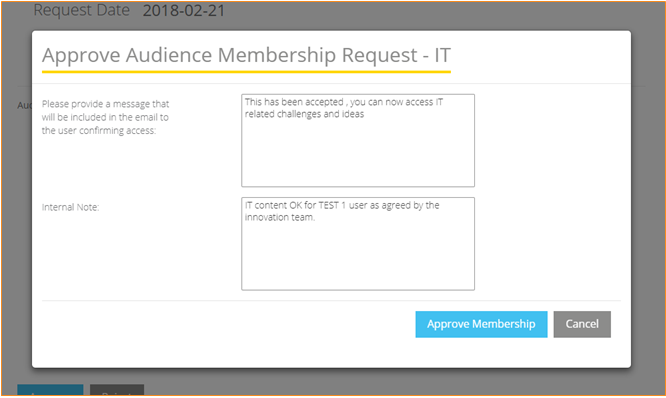
Here the request can be approved or rejected using the action button:

This example has been approved and provides the ability to add comments:
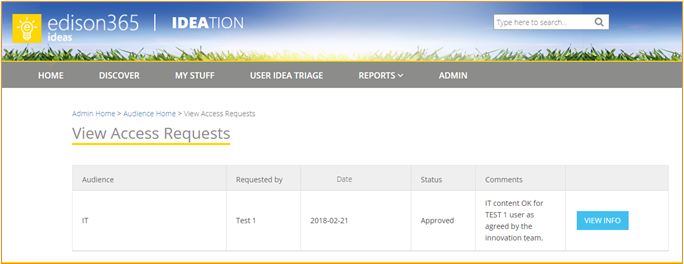
The end user would receive an email and see the update on the My Stuff > My Audience Membership tab:
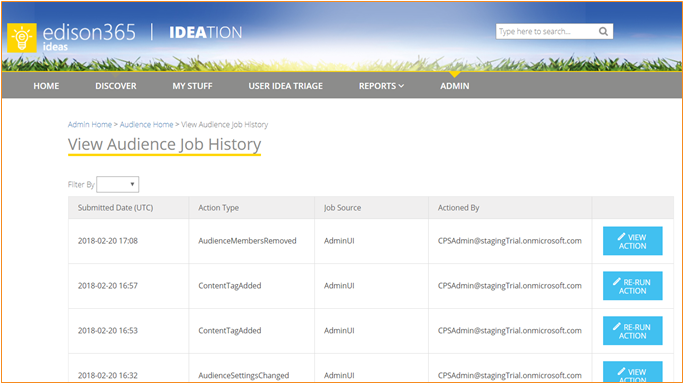
- View Audience Job History
This view enables administrators to view job history and re-run certain actions if needed:
Challenges can now be set to an Audience or set of audiences. This is ensure only members of certain of the selected audiences can Create and manage ideas from that Challenge. The first step to set this up is to click on the Advanced tab of the Audience config page:

The next step is to enter a user name and password of a user in the respected fields and click on the Setup Challenge Security button. Which will display the screen as follows:
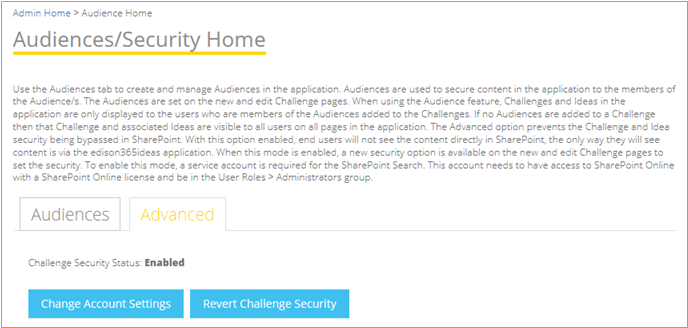
The Audience Security is now all setup. If you no longer wish to use the Audience Security feature you can click on the Revert Challenge Security button which will remove all Audience security and allow all users to see all challenges and ideas global permissions pending.
If the Global Admin who is assigned as the Search API Connect is no longer has Admin access the user assigned can be changed by clicking the Change Account Settings which will display blank User Name and Password fields again to re-enter a new user.
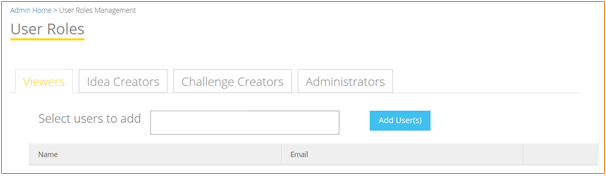
15. Configure User Roles
User Roles definitions are set out in section 1.1 above. Below are instructions for adding and removing users to one of these pre-defined groups.
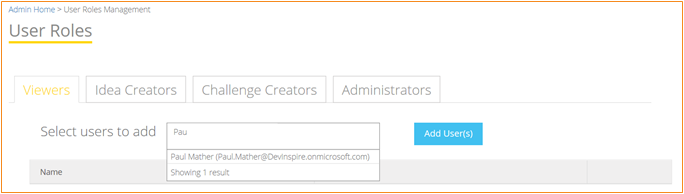
15.1 Add Users
| Step No. | Description |
| 1 | Navigate to Configure User Roles via the Admin menu in Ideas. The User Roles page is displayed. |
| 2 | Select the correct tab based on the users role with in edison365ideas |
| 3 | Start to type the users name which searches existing users and when found click on the user to add them to the group. |
Add user:
Type and select user name:
15.2 Remove Users
| Step No. | Description |
| 1 | Navigate to Configure User Roles via the Admin menu in Ideas. The User Roles page is displayed. |
| 2 | Select the correct tab based on the users role |
| 3 | Click on the Delete button next to a user. |
User Roles page, remove user:
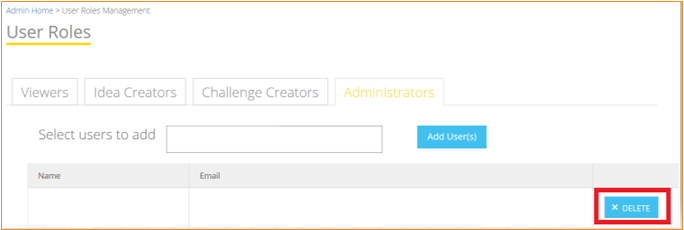
Please note the name and email address for the user in the group will display in the relevant columns but has been removed in the screenshot.
16. Project Online Credentials
During the triage process for an idea can have a project created from it for Project Online. To configure this click on the Project Online Credentials tile from the Admin Console which will display the following:
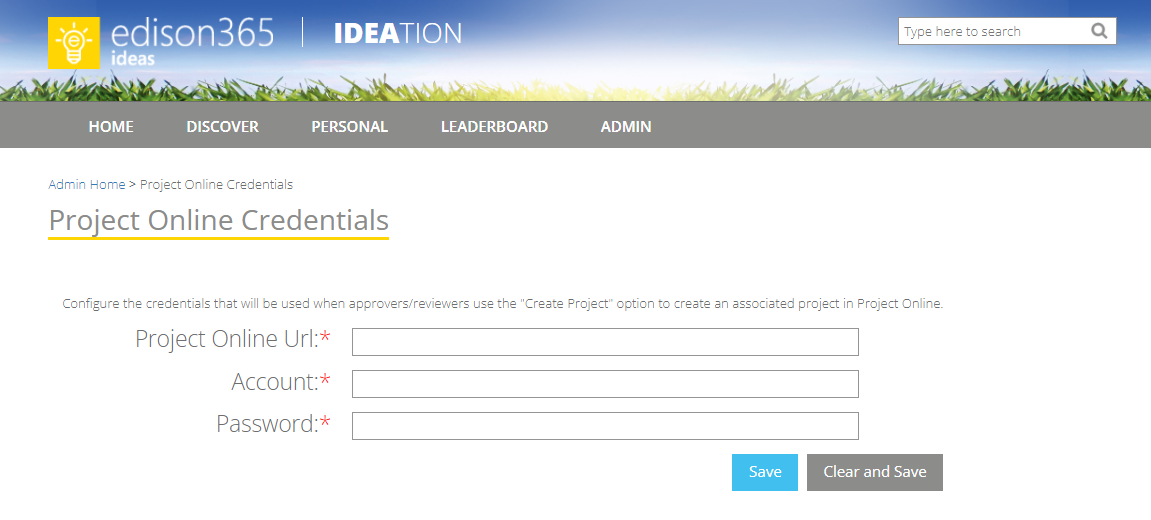 Once on the page enter the Url for the Project Online instance in the Project Online Url field. This will be used so when the Create Project button is clicked edison365ideas knows which instance of Project Online to create the project to. The next step is to add user credentials that has access to create projects in Project Online. This account will be used as a way to access Project Online to create the project. So it may be best to use an all round admin account for project online. Once all of the details are supplied click the Save button to complete the configuration.
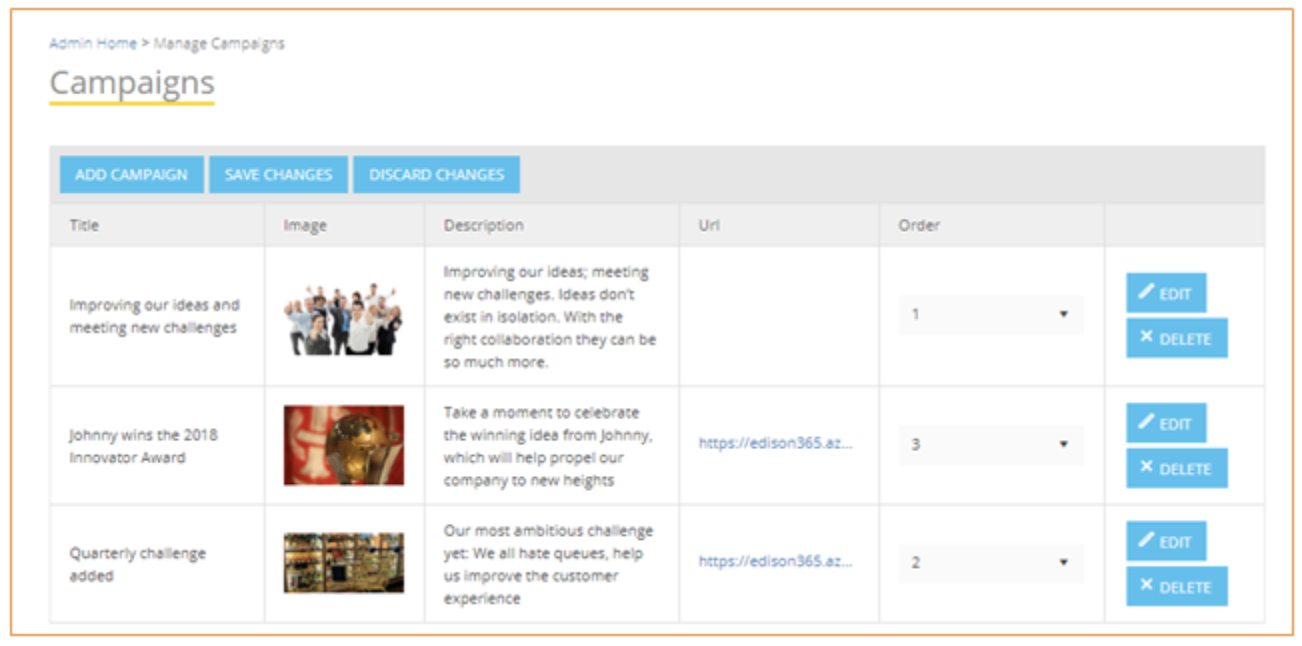
17. Manage Campaigns
The Manage Campaigns section allows a user to manage campaigns in the edison365ideas application. Campaigns appear on the homepage on the top left carousel. These are configured from the Admin page in edison365ideas by accessing the Manage Campaigns tile. The below screenshot is an example of what the campaigns admin screen can look like.
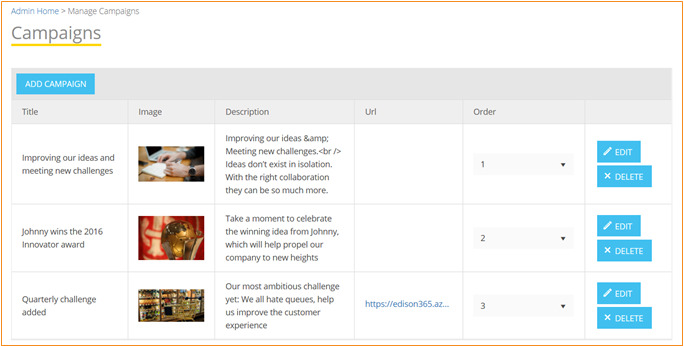
The image below represents the form used to create or edit a Campaign.
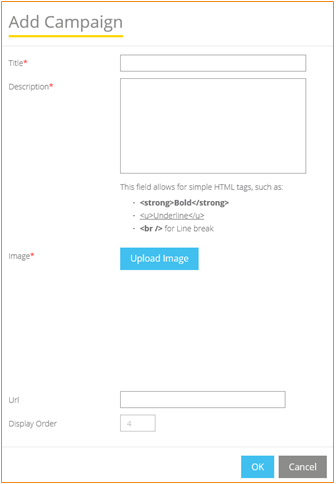
The items are explained as follows:
- Title: the campaign title. This is a mandatory field.
- Description: further additional information about the Campaign. This is a mandatory field.
- Image: image that will be displayed, stored in the Images library. This is a mandatory field.
- edison365 URL: link and description to the related Challenge.
- Display Order: Shows what order the campaign is displayed. This is a read only field and can only be changed by physically changing the order in the Manage Campaigns screen.
The order of the campaigns is set on the main grid, update the order as needed then press the Save Changes button that appears:
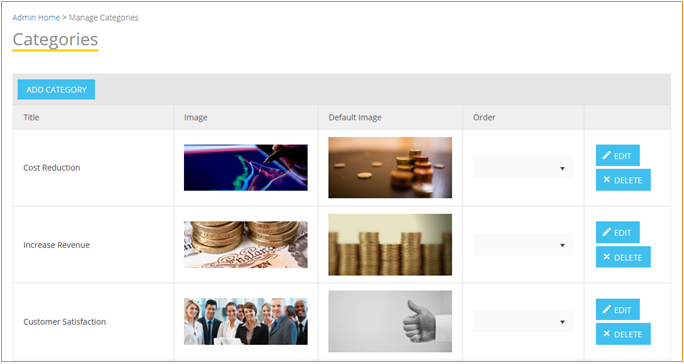
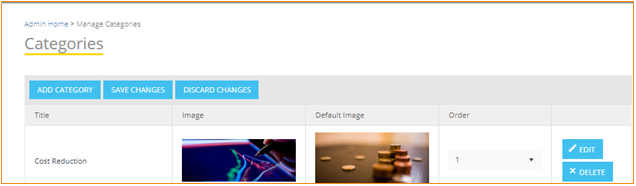
18. Manage Categories
The Manage Categories section allows Administrators to access a view of Categories stored in the Categories list. This allows Admin users to add new Categories and view, edit or delete existing Categories. Below is a screenshot of how the Categories will look:
Set the order of the Categories using the menu options:
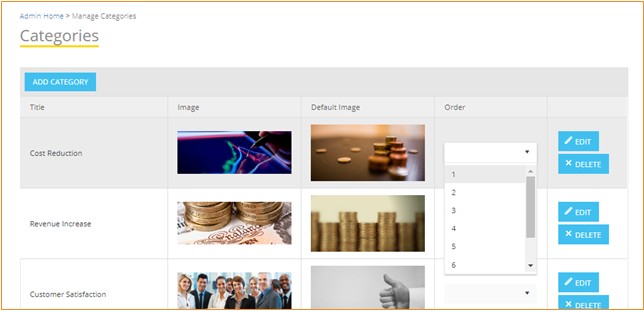
Then save the changes using the Save Changes button that appears:
When a user selects to add a Category, the following window is presented to the user:
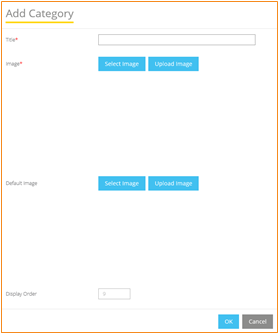
The items are explained as follows:
- Title: the category title. This is a mandatory field.
- Images: Image to be used for the category
- Default Image: the default image that will be displayed for the content tagged with the category
- Display Order: Shows what order the category is displayed. This is a read only field and can only be changed by physically changing the order in the Manage Categories screen.
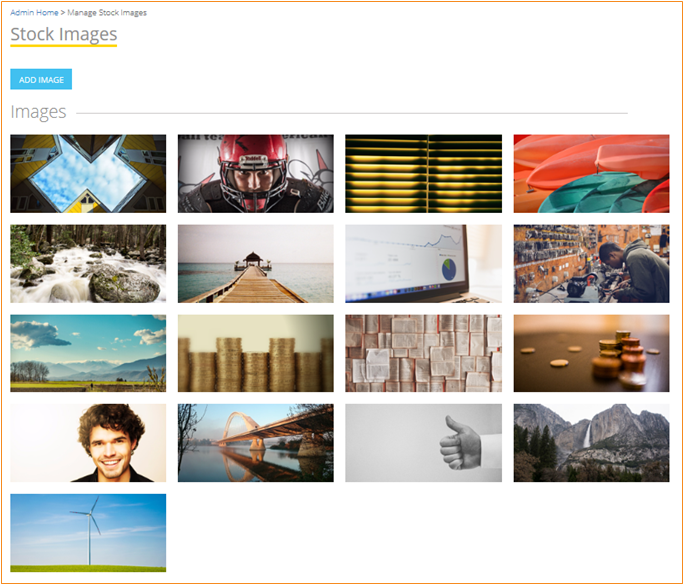
19. Stock Images
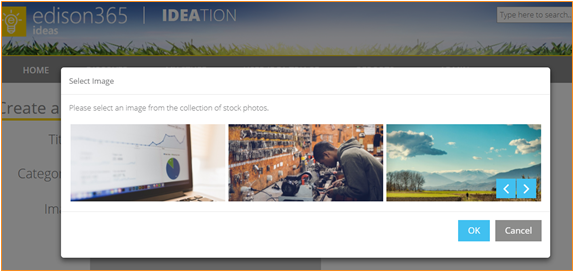
edison365ideas makes use of a variety of images across the site. These images are located in the Manage Stock Images list accessible in the Admin menu. These images are used throughout the application when a user uses the select image option.
When clicked on the user is presented with the following screen:
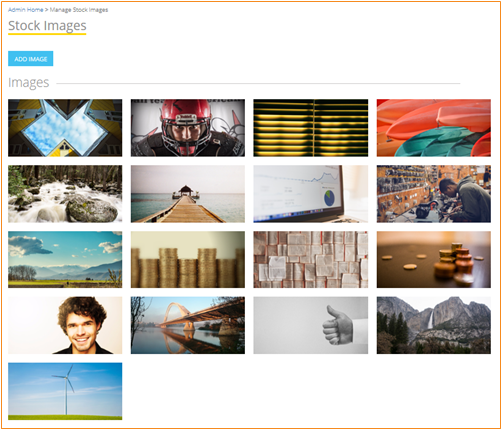
From here the user can add an image to be made available in the select image dialogue window.
Selecting an image in edison365ideas:
20. Manage Anonymous Content
This allows the administrators to easily view all the ideas that have been submitted anonymously:
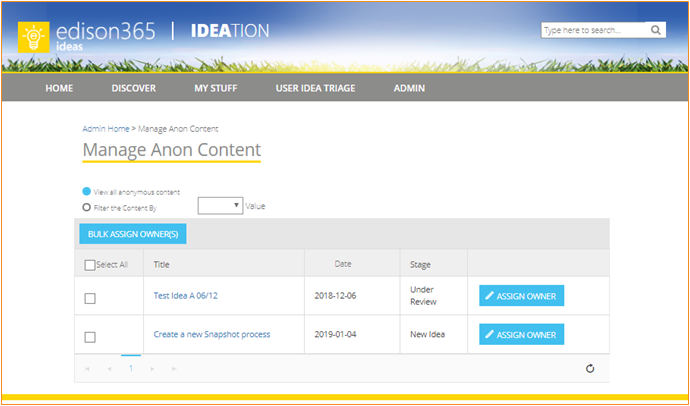
The ideas can easily be assigned owners if needed using this admin feature.
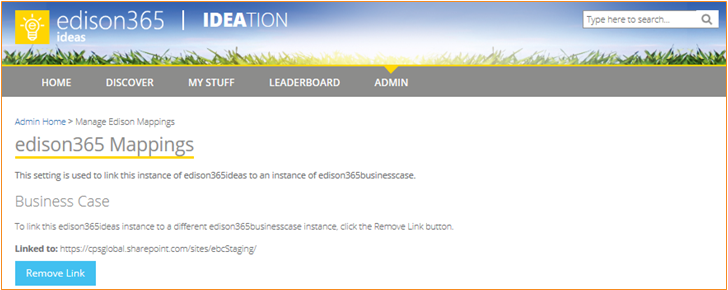
21. Manage edison365 Mapping
Business Cases can now be created in edison365businesscase directly from an Idea*. Before this can happen both edison365ideas and edison365businesscase needs to be linked. The first step is to access the Product Links tile on the edison365businesscase admin console:

Enter a password and click the Generate Token button. A GUID token will be displayed, copy the token to the clipboard.
Now in edison365ideas access the Manage Edison Mappings tile from the admin console and the following screen will be displayed.
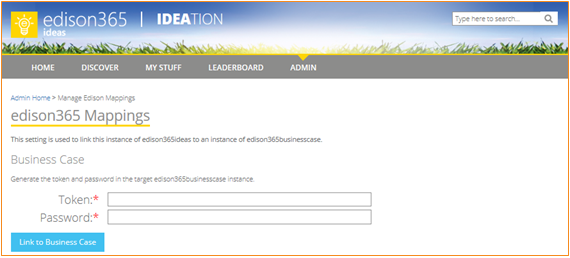
Enter the password entered in edison365businesscase and the generated token in the respective fields and click Link to Business Case
If the password and token are entered correctly the following screen will be displayed to show the link has been successfully established. If you no longer wish to link the edison365ideas and edison365businesscase instances, click the Remove Link button and the link will be deleted and a Business Case can no longer be created from an Idea.
22. Token Management
Once a link to edison365businesscase has been established a token will be required for an Idea and Business Case to be linked. All the tokens generated will be stored here when a Business Case is initially created from an Idea. When the Business Case is fully created the token will be removed from the list. It will be displayed as a grid with the token, and any Ideas associated to the token included. If the delete button is clicked the token will be removed and the link between the Idea and Business Case will be removed and the process to create a Business Case from the Idea will need to be restarted which will also generate a new token.
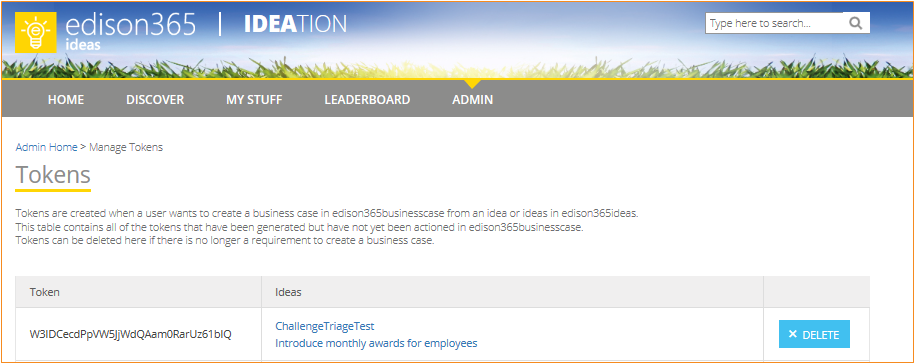
Please note this feature is currently unavailable due to an update being required on edison365businesscase. This will be available in the next edison365businesscase release.
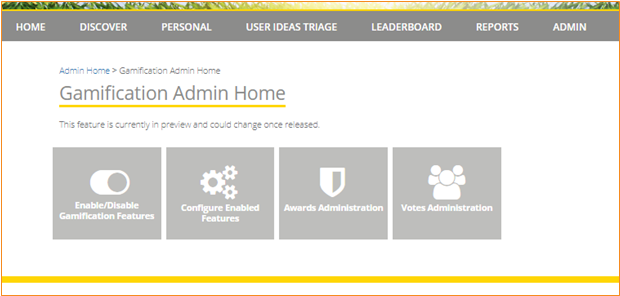
23. Manage Gamification
The gamification feature has been released in preview. Clicking the Manage Gamification (Preview) tile loads the following:
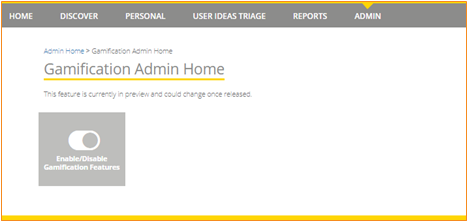
Click Enable/Disable Gamification Features:
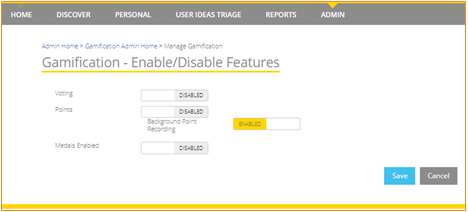
Enable the settings as needed, here these have all been enabled:
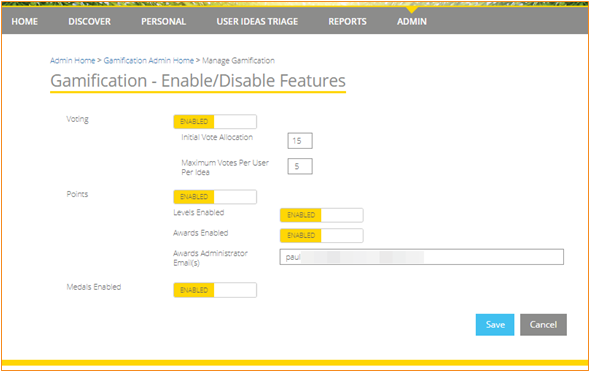
Click Save and the following will appear next to the Save button:

Voting:
This feature enables user to vote on ideas, the initial vote allocation for all users can be set here, in this case 15 and the maximum votes per user per idea, in this case 5. These values can be changed as needed. The vote option is also control via the idea stage, there is a new option to enable voting based on the idea stage:
Points:
This feature enables the users to earn points through various actions in the edison365ideas application. If points are not enabled, the system can be configured to still record points in the database. If the points are enabled two other features can then also be enabled. The level features which means user to achieve levels based on the points earned. The awards feature enables the organization to configure awards in the system, users can exchange points for the awards from the Awards tab on the Personal page if configured. The awards feature also requires valid emails addresses for the edison365ideas users who are the awards administrators, these are the users that will receive email notifications when a user claims an award. The award administrators will then need to log into edison365ideas Admin Awards Administration page to action the claim.
Medals:
This feature enables the users to achieve medals based on certain actions in edison365ideas.
Now Click Gamification Admin Home from the bread crumb navigation and click the Configure Enabled Features tile (the tiles here could be different based on the gamification features enabled):
Gamification – Configure Features:
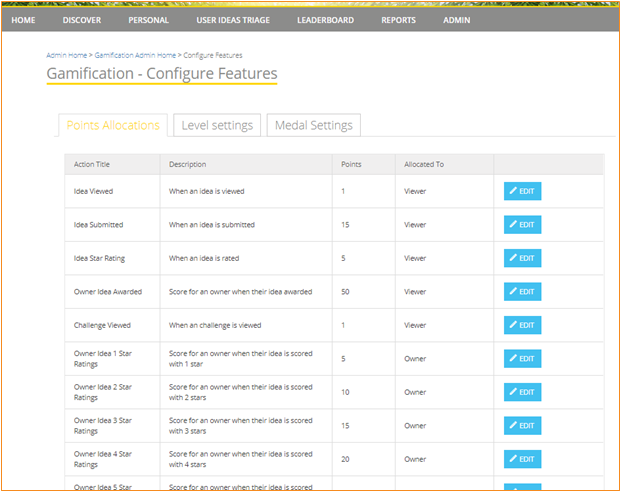
The view will vary based on what gamification features have been enabled.
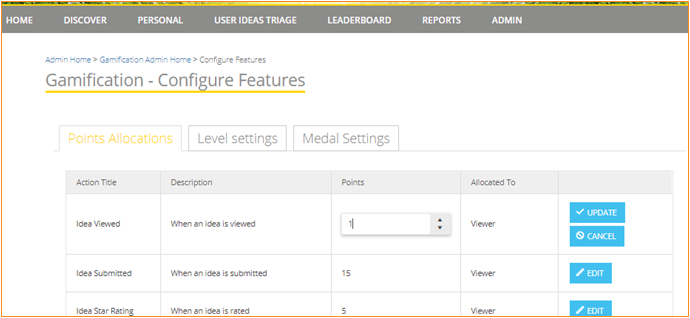
Point Allocations:
This table contains all of the actions that enable points to be awarded, the majority of these actions do already contain the points value, but these should be edited to based on the requirements. Click the Edit button and update as required:
Level settings:
The level settings tab enables the levels to be configured based on the points:
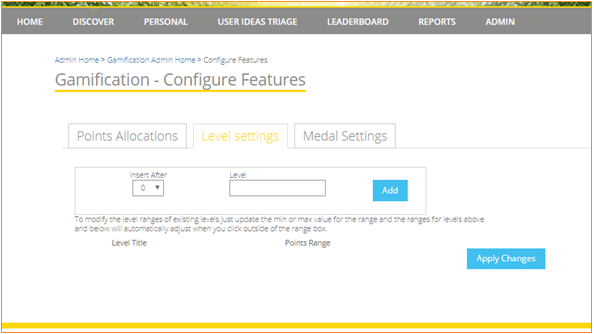
Create the first level and click Add then add the points range 0 to 15 as an example then add the next level. Update the points range based on the requirements, here is an example:
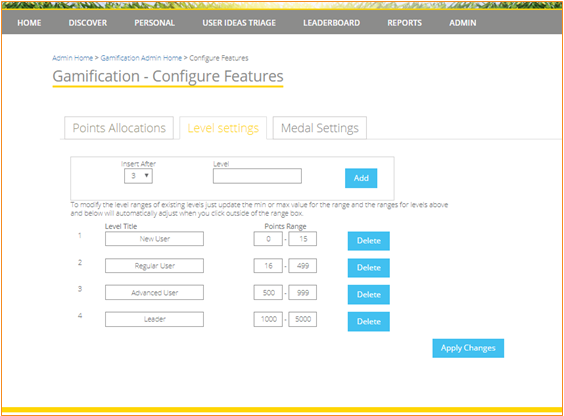
Please note, add all of the level titles in then set the points range, start with setting the highest value in the bottom right corner and work your way up. Then click Apply Changes. A confirmation message will appear stating ‘The new level settings have been saved’ along with an OK button. Click the OK button and the changes will be applied.
Medal Settings:
The medal settings tab enables the organization to set the number of actions to required to receive a medal:
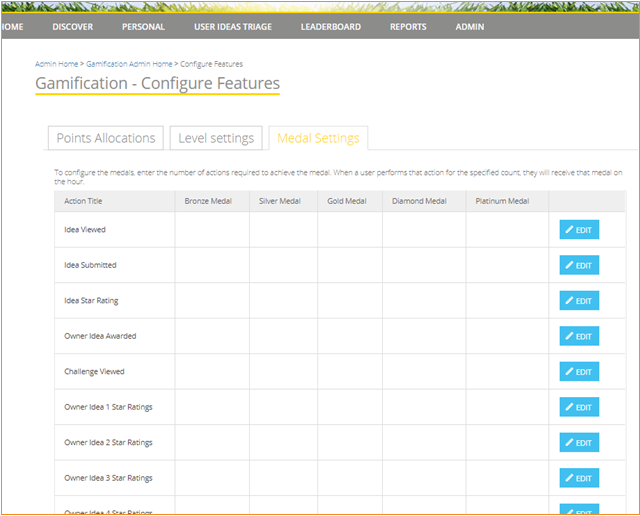
These will all be blank when deployed, to add values in for an action click the edit button:
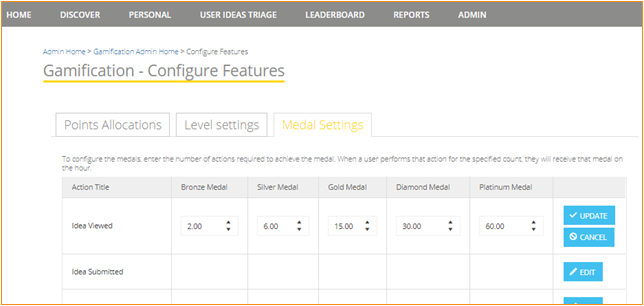
Click Update once complete and repeat for the other actions.
Now Click Gamification Admin Home from the bread crumb navigation and click the Awards Administration tile:
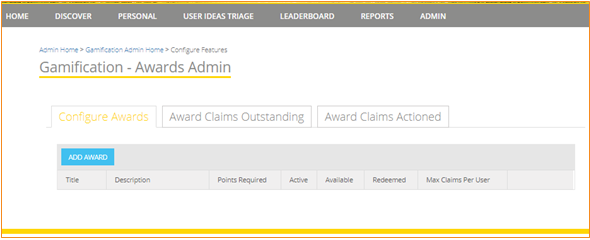
Configure Awards:
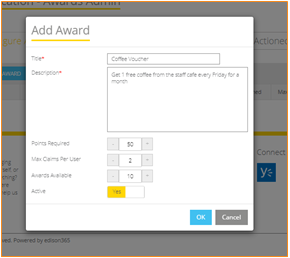
On the configure awards tab, the awards can be added using the Add Award button and complete the form with the award details:
Add other awards as required.
Award Claims Outstanding:
This tab displays the outstanding awards claims, this is where the edison365ideas Administrators or the edison365ideas Awards Administrators can action the claims – approve or reject. If the awards are approved, it will be down to that user who approved the award to ensure the user receives the award claimed.
Award Claims Actioned:
On this tab the claim history can be viewed for all user award claims.
Now Click Gamification Admin Home from the bread crumb navigation and click the Votes Administration tile – this table will be empty, it will populate with users as users are added to the database via the gamification feature:
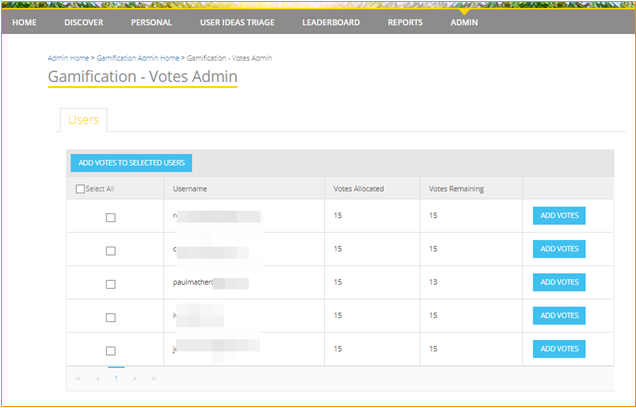
Here the users vote allocation can be increased, either on an individual basis or in bulk.
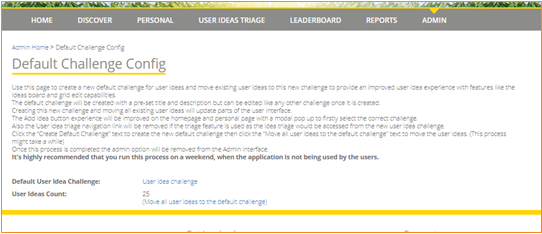
24. User Idea Challenge
To create the new default user idea challenge and migrate the existing user ideas to the new challenge, as an edison365ideas Administrator access the Admin section then click the new Configure Default Challenge tile found at the bottom left corner:
The Default Challenge Config page:

This page contains some notes around this feature. Once this process is completed this tile will be removed as it is no longer required. It is recommended to do this when users are not using the system purely as some settings are cached so end users might not see the changes until they close edison365ideas or force a refresh in the browser using Ctrl + F5 once the process is completed.
Click the Create Default Challenge button, this creates the new challenge and updates the page with a link to the new challenge and the current user idea count:
Click the link to open the new “User idea challenge”:
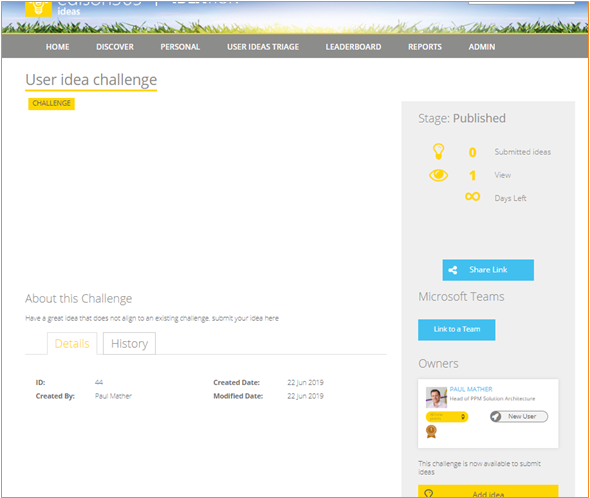
Edit this challenge to update the Title, Description, Image and Owners plus other settings as required.
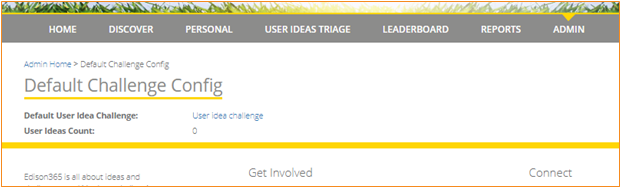
Back in the other browser tab where the Default Challenge Config is available, click the link “Move all user ideas to the default challenge” to move all existing users ideas to the new default challenge. Once completed the page will display:
Now click Admin Home and press Ctrl + F5 to force a fresh of the page and the interface changes will be visible – the quick way to tell is that the User Ideas Triage link will be removed as will the Configure Default Challenge tile.
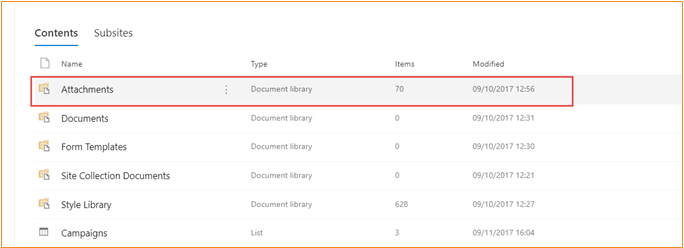
25. Attachments
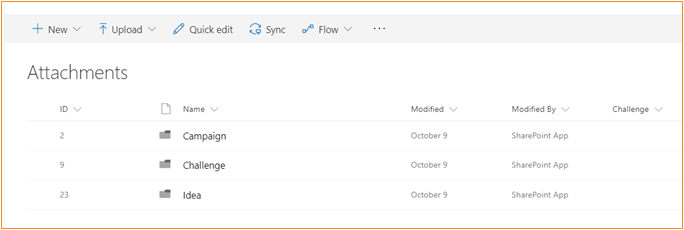
The Attachments library stores all images and documents uploaded by Users when they create a Challenge or Idea and choose the Upload Image option or add attachments. The Attachments Library contains three folders, Campaign, Challenge, and Idea. Within each folder are separate folders representing each Challenge, Idea. Or Campaign.
26. Uploading Images
Images can be uploaded to Libraries directly, but it is recommended to use the Stock Images admin feature in edison365ideas or the upload image features throughout the application so that the images are the correct size for the application. To ensure images are displayed in the correct location, it is important to ensure that metadata is fully completed. Minimum image width is 750 pixels and the image must have a 2:1 aspect ratio. The ideal image size is 750*375 pixels.
If there was a requirement to upload images directly, some details are below.
26.1 Upload Image
| Step No. | Description |
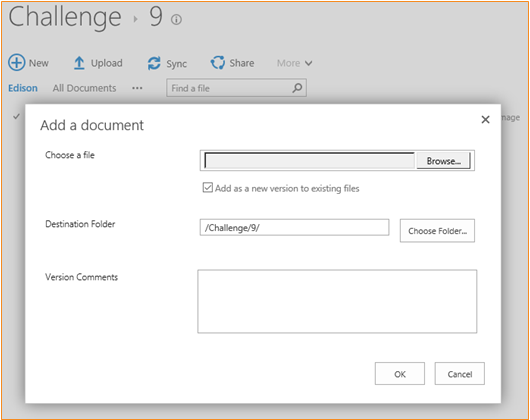
| 1 | Navigate to the relevant library, in this case, Attachments > Challenges. This example shows how to upload a new image to an existing Challenge, but the procedure is the same in other libraries. |
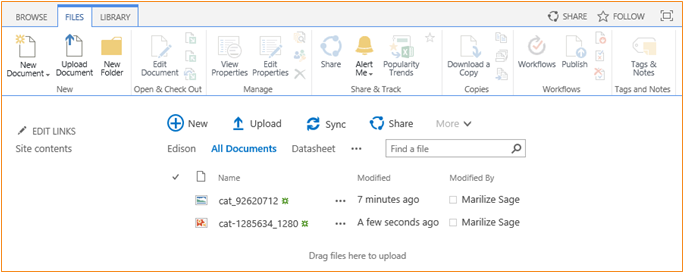
| 2 | Click Upload to display the dialog. Browse to the desired file and click OK (image 1). |
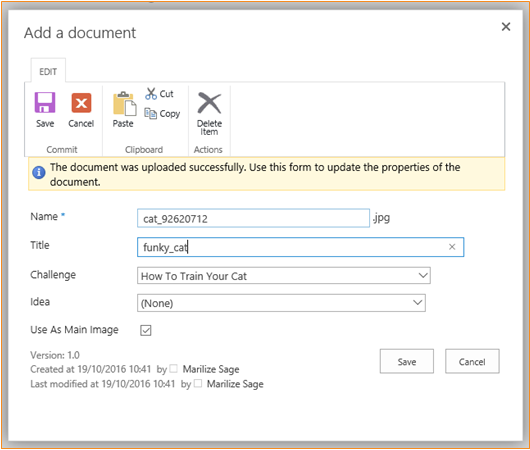
| 3 | In the Image Properties dialog, complete the form by typing a Title, and complete any other required fields (image 2). |
| 4 | Click Save to close the window. |
Step 1:
Step 2:
26.2 Delete Image
| Step No. | Description |
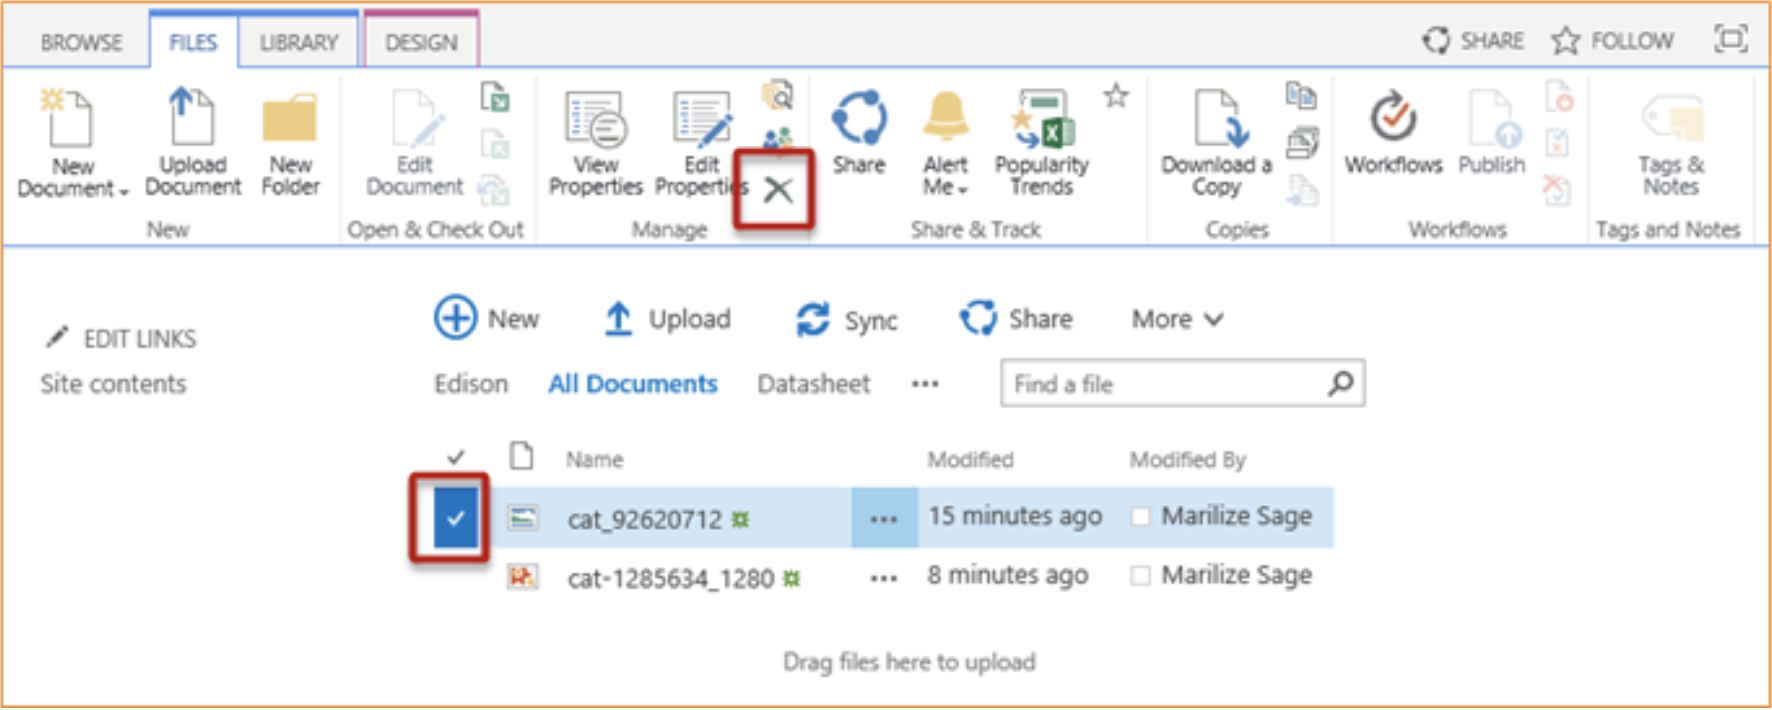
| 1 | Navigate to the relevant library, in this case, Attachments > Challenges. This example shows how to delete an image to an existing Challenge, but the procedure is the same in other libraries. |
| 2 | Click on the Files tab in the top left corner to display the Ribbon. Note that many actions are greyed out (image 1). |
| 3 | Activate the checkbox next to the image to be deleted. This will also activate the Manage section of the Ribbon. Click on Delete (image 2). |
| 4 | Click OK on the confirmation dialog. |
Step 1:
Step 2:
27. Open Innovation
27.1 Administration Panel
Once Open Innovation has been integrated, your admin console panel will be updated with the Open innovation settings tile.

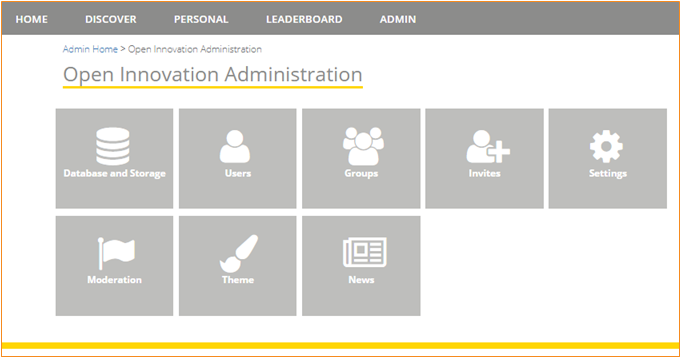
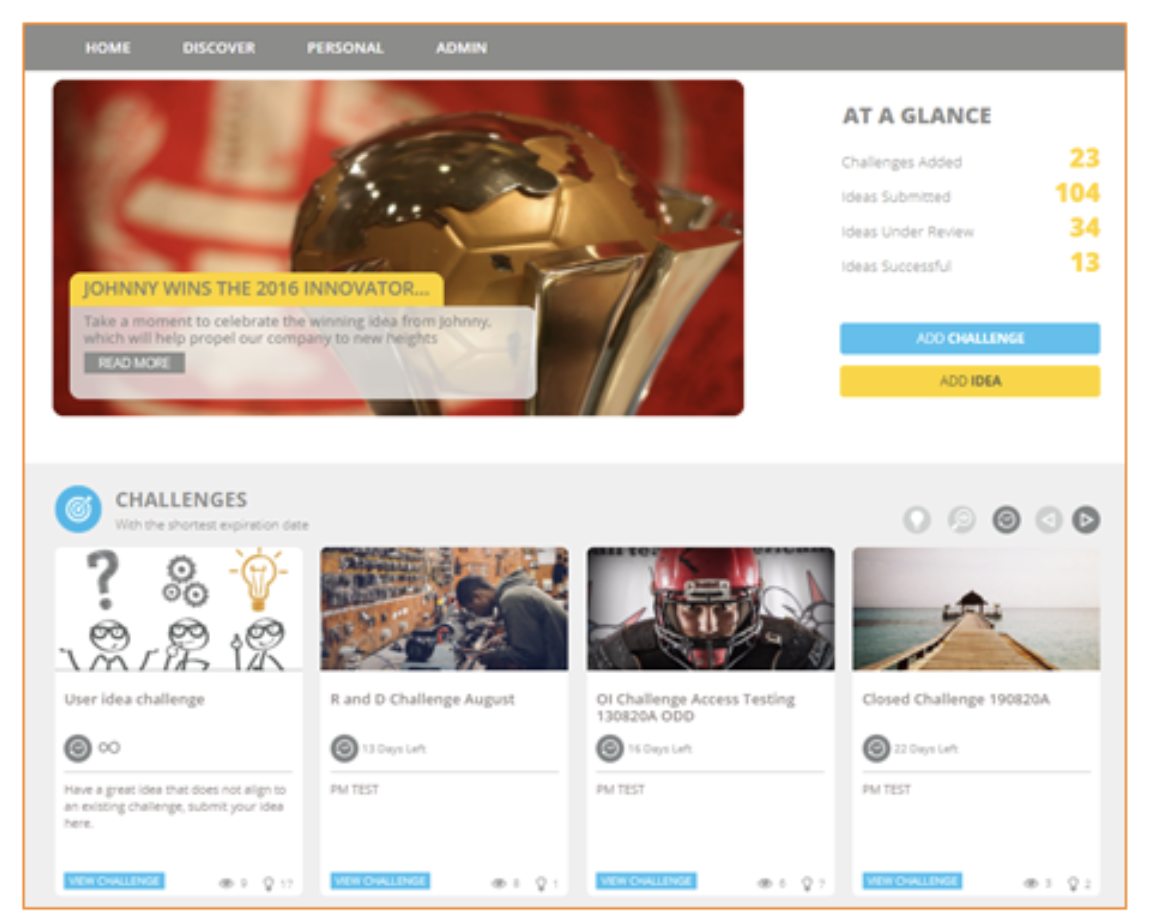
Below is a screenshot of the edison365 Open Innovation admin homepage.
27.2 Database and Storage
Use this tab to configure your Open Innovation portal. The public setting controls how users can access the portal:
There are 3 levels of access:
- Open: Anyone has access to your open innovation portal.
- Requires approval: Users who access your Open Innovation portal must be approved prior to gaining access.
- Invite only: Only those who have been invited by email can access your tenant.
Below is a screenshot of the form:

If you require any further support on this, please contact edison365 support.
27.3 Users
In this section you can view all the open innovation users. From here, users can be blocked from open innovation and delete those users' idea/s if required. Users can also be completely deleted from the Open Innovation Portal. Use the search option to search for a user. If the open innovation portal mode is set to Requires Approval, use the View Pending Approvals view to approve or reject user access requests. They will then move from this screen to the view of all users.
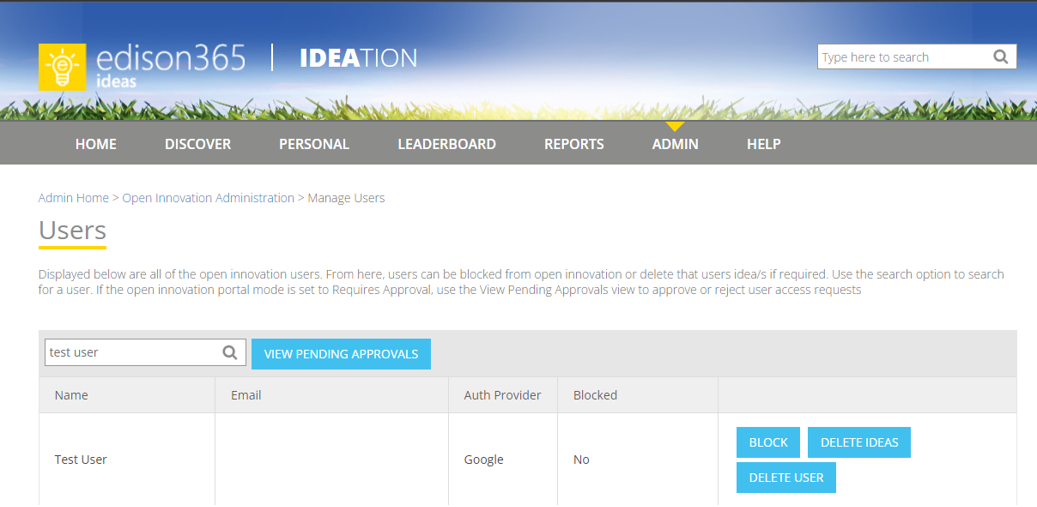
If a user is blocked from accessing the Open Innovation portal when the Block button is clicked you can determine the length of the block. By default it is set as one month. This can be changed to any date or set indefinitely.

To delete a users ideas from the Open Innovation portal click on the Delete Ideas button. Once Clicked a window will be opened displaying all of the ideas the user has created in the Open Innovation portal:
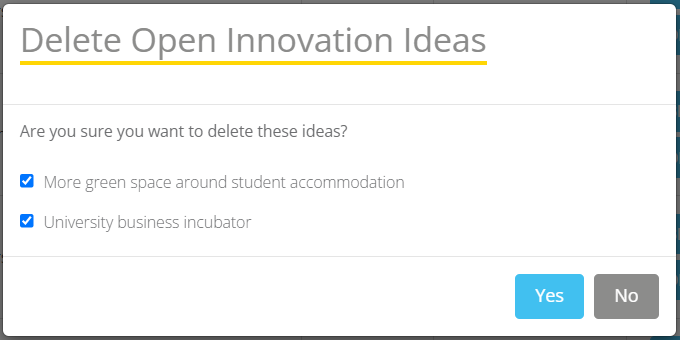
To delete a users idea ensure a tick is added to the idea that you need to delete and then once all are selected click the Yes button which will then delete the Ideas from the Open Innovation portal.
Users can also be completely deleted from the Open Innovation portal. To delete a user click the Delete User button. and the following message will be displayed:
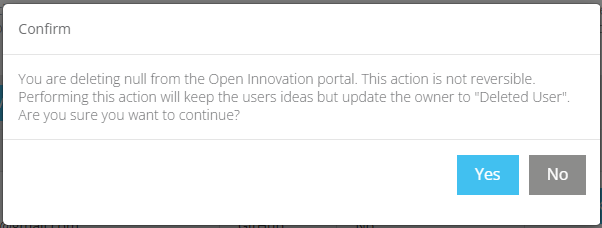
If you are happy to delete the user from the Open Innovation portal click on the Yes button which will completely delete the user from Open Innovation.
Once a user is deleted from the Open Innovation portal there is no way to revers the deletion so please ensure the correct user is being deleted and you are happy for the user to be deleted.
27.4 Groups
This page is used to manage the groups a Challenge is open to in your Open Innovation portal. A group is a set of uses who can view and add ideas. The below image is an example of the Groups grid. Once the grid is opened click on the Add Group button which will open the Add Group window:

To create a group, add a name for the group in the Title field and an optional Description and click OK which will add it to the Groups grid. Once the group is added click on the Members button to add users to the group. From here enter a user in the People Picker field and select the user which will add them to the Members list. To remove a user simply click the ‘X’ icon next to the user who needs to be removed.

27.5 Invites
This page is used to manage user invites to your open innovation portal. The below grid is an example of what the invites list looks like. Once an invite is sent the invitee has a week to register to the Open Innovation portal. Once this date and time has passed the invite will expire and will be removed from the list. If the Public Access is set to Invite Only the invitee will require a new invite.

To submit a new invitation, click on the ‘Invite Someone’ button which will display the below window will be displayed:
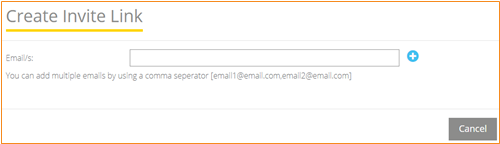
From here you can invite as many people as required by clicking on the Email/s field and entering all the email address the invite links are to be sent to. If you are sending an invite to 2 or more people you can separate the emails with a comma separator. Once the email address(es) are added click on the '+' icon which will add them all below. After they are added a ‘Create’ button will be added, click this and a summary of the invite links will be displayed. Now click Send Invite Email and the email link in the summary will be sent to the invitee.
27.6 Settings
The settings page is where you can configure your Open Innovation application. Please see below for a summary of each setting and its purpose:
- Help - This is a textbox to add a link that will be included on the application login page for users to click on. The link provided should be a link with a help guide on how to use the application. This is not mandatory.
- Terms & Conditions - This is a textbox to add a link that will be included on the application login page for users to click on. The link provided should be a link with the terms and conditions of use for your Open Innovation portal. This is not mandatory.
- Allow Gravatar Identicons - A user can include a profile picture using Gravatar Identicons rather than a custom image via a url. By using this switch you can set whether users can use Gravatar images or not.
- Expand Parent Challenge by default on the ideas page - When a user is viewing an Idea in Open Innovation the associated Challenge can be viewed via a collapsible element. By enabling this option that element will be expanded when the idea is opened. If disabled the Parent Challenge element will be collapsed.

27.7 Moderation
This admin page allows you to manage reporting threshold and review reported comments. This is where reported comments will appear for you to moderate. If you wish for comments to be automatically hidden when they reach a certain number of reports, you can set the threshold here.
Please see below a screenshot of this view:

If the threshold set is not set or the comment has not reached the set amount the comments will need to be reviewed. The grid will display the user who has submitted the comment in the User column and the reported comment in the Comment column. When a comment is reviewed it can be Deleted to ensure no user can see the comment again. Or if the comment is deemed to be safe the Admin can authorize the comment which will keep the comment on the Idea.
To support the decision-making process the Admin can use the Reports and Thread buttons. The Reports button will display all users and users' feedback as to why they reported the comment. The Thread button will display the full thread the comment is included to allow the Admin to view the full history of the comments.
27.8 Theme
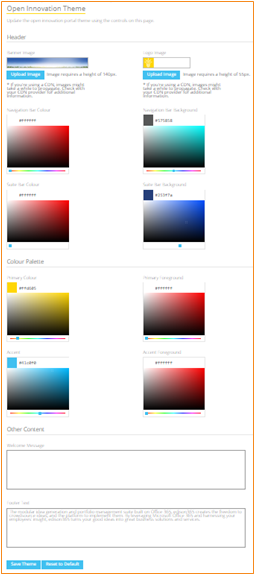
The Themes section allows you to fully configure the look of your Open Innovation portal to support branding. This includes personal logos and banners as well the colouring of the portal itself. You can also add a custom welcome message and footer text to provide information for users of the portal.
To change the Banner and Logo images follow the same process as the edison365ideas Themes page. Click on the Upload Images buttons for the banner or logo and follow the steps. Once set the images used will be displayed throughout the Open Innovation portal. To change the colours set use the sliders below each of the colour selectors or add the HTML colour code.
Once the Theme has been configured click on the Save Theme button and the configuration set will be used in all the Open Innovation portal. To revert to the default theme simply click on the Reset to Default button. To keep the default theme settings the Save Theme button must be clicked.
Width: 1037
Height: 140
Logo dimensions
Ratio: 4.36
Width: 240
Height: 55
27.9 News
Use this section to add news articles or announcements to your open innovation homepage. Please see below a screenshot of this page:
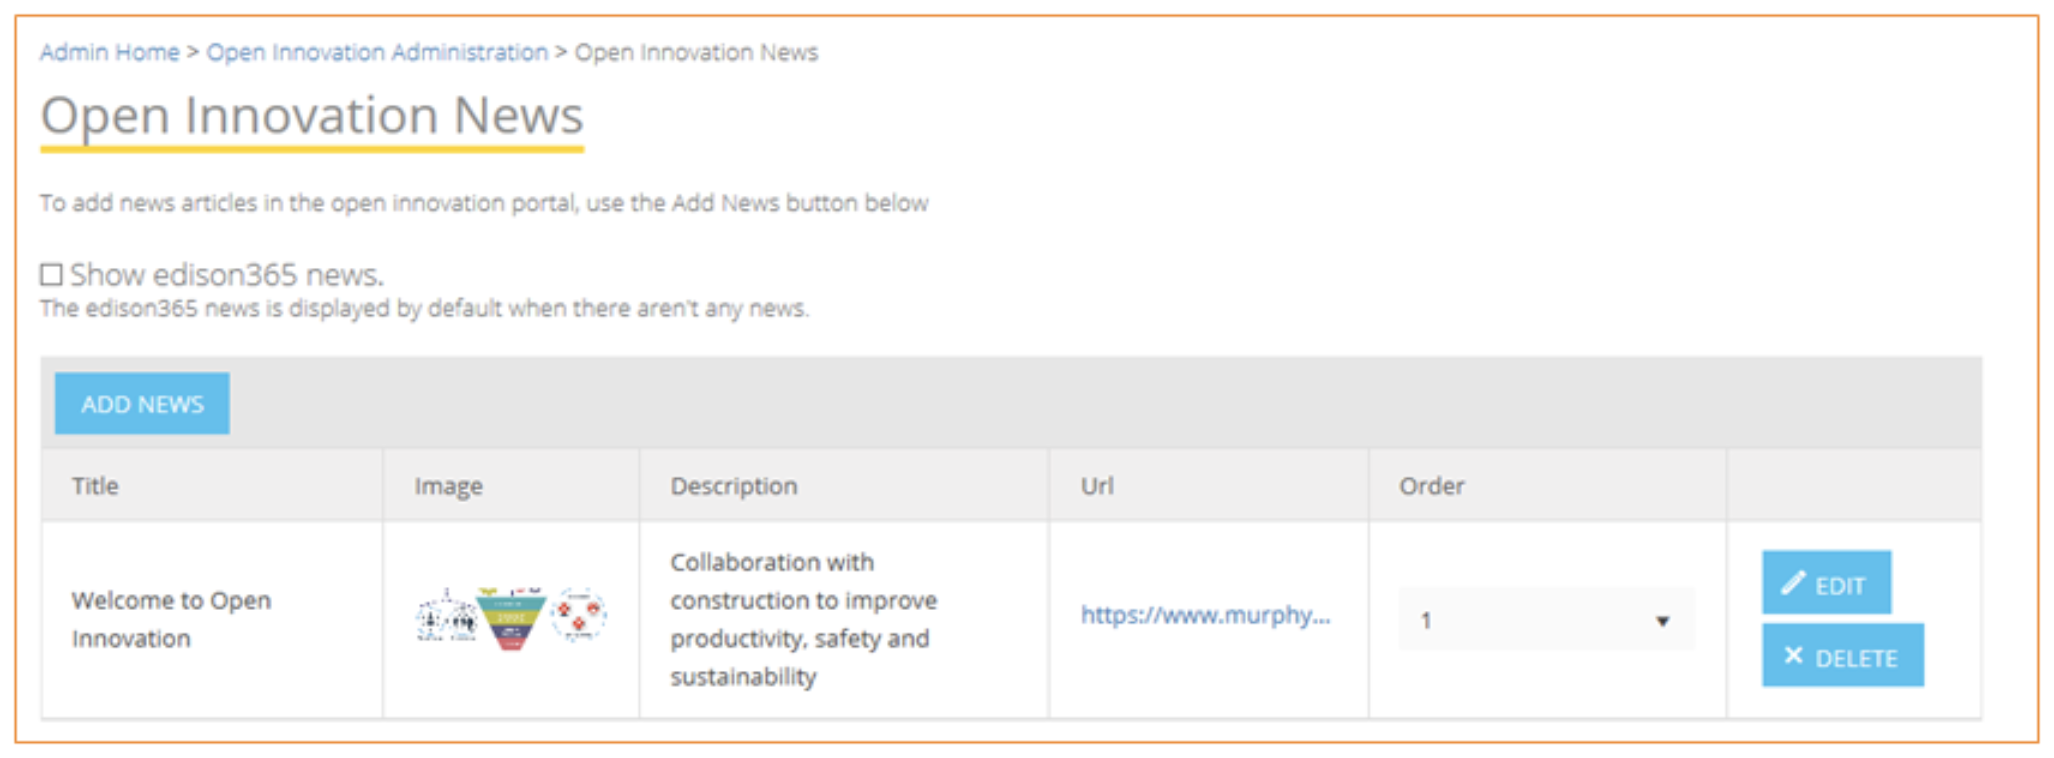
To add a News Item, click the Add News button which will open the Add News window from here a Title, Image, and Description is required. You can also add a URL to support the News Item if required. This will need to be the full URL (https://www).
You can also set whether you wish to show the edison365 News. This is all the most recent news on edison365 and our product range. If you have at least one custom news item this does not have to be ticked. If you have no custom news items created this will be ticked by default and cannot be unchecked until a news item is added.
28. Look and Feel
Your edison365ideas instance can be viewed in two different design modes. This can be configured via the Look and Feel tile from the Admin console. The settings in both tabs were previously part of the Configure Application settings but are now located in their own area of the admin console. Once clicked you will be sent to the following pages depending on the tab selected:


Below is a summary of each of the settings on the Theme tab:
Design Mode: This is where you can select your design. Currently you can select either Design 1 or Design 2. The view of each design is as follows:
Design Mode 1:

Design Mode 2:
Footer Text: The text displayed at the footer of the page.
Custom CSS Url: A URL pointing to a custom CSS file that will allow the look of the solution to be altered to accommodate custom branding.
Colours: The colours used throughout edison365ideas. Each colour set is a hex colour selector.
Below is a summary of each of the settings on the Header tab:
Logo: Url where a custom logo is stored.
Logo image should be 240px (width) x 55px (height), or an image with this aspect ratio.
Header Background Image: Url where a custom background is stored.
Tagline/Tagline Bold: Text displayed in the Header

Navigation Link: The target and the displayed label for the link.
29. Power BI Reports
If your organisation utilises the Power BI reporting tool Reports can be added to edison365ideas. To access the Power BI Reports configuration you will need to click on the Reports tile. Once clicked the following will be displayed:
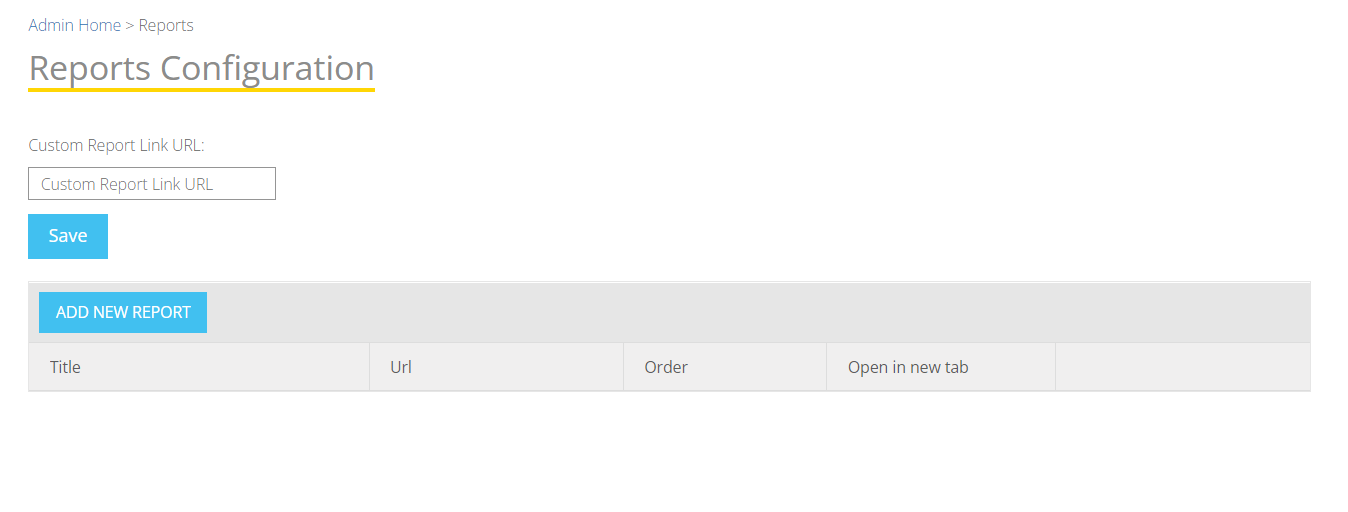
The first field 'Custom Report Link URL' can be populated with a URL that stores a general report to view. Once a URL is added to the field click the Save button which will add a Reports option on the Navigation Bar. Once clicked a new browser tab will open and the URL set on the Custom Report Link URL field in the config.

The next option is the ability to add a set of reports that can be viewed from the Reports option by hovering the cursor over the Reports option on the Navigation Bar. To add a report click on the Add New Report button which will open the following modal:
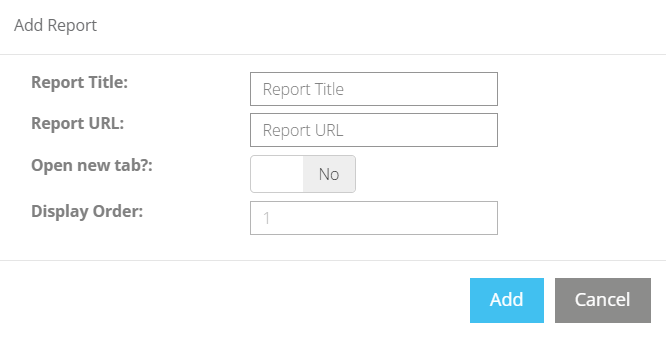
To add a report the following information will be required:
- Report Title - Name of the Report that will be displayed when hovering the cursor over the Reports option on the Navigation Bar.
- Report URL - URL for where the Report.
- Open in New Tab? - If set to Yes when the option is selected the report will open in a new tab. If No is selected the report will open in the current tab.
- Display Order - This is a read only and will be automatically set to the next in order.
Once all of the information has been added click on the Add button which will add the report to the list of added reports. Please see the screenshot of how the list of reports looks. Please note the URL has been hidden:
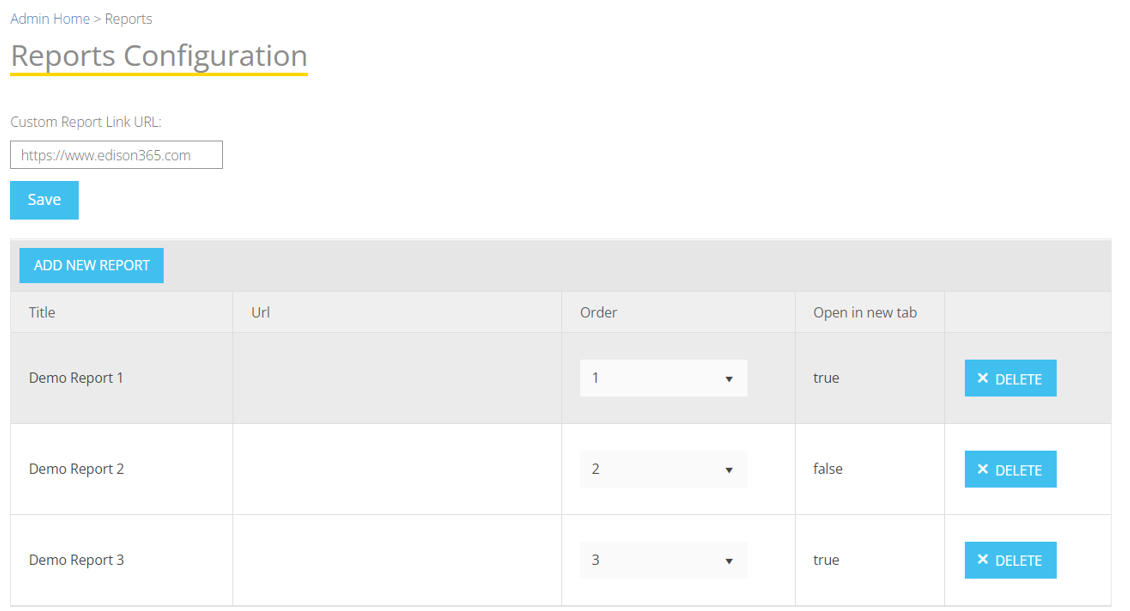
To change the order of the reports click on the Order dropdown and select a different value which will swap the order from one to another as below:

To Save the order changes click on the Save Changes. To revert the changes back to the previous order click on the Discard Changes.
To delete a report click on Delete button which will remove the report and change the order automatically of the reports.
To View a report hover the cursor over the reports option on the Navigation Bar which will display a list of all reports added. Click on the desired report to view that report.
To view a report from the list hover the cursor over the Reports option on the Navigation Bar which will display the list of reports added.