This article will walkthrough the UI and how to carry out every day tasks using the edison365ideas application. This pertains to edison365ideas Design 2. Published: November 2020
Contents
1. User Interface
Home Page

| No. | Item | Description |
| 1 | Menu Options |
Use these buttons to navigate around the app. This navigation bar is available across all pages. |
| 2 | News / Campaigns |
All the latest news from your company is displayed here. Use the scrolling buttons to view the other News / Campaign items |
| 3 | Challenges Carousel |
This will display all of the current challenges. These are sorted according to the sorting options. |
| 4 | Ideas Carousel |
The top 12 ideas for the selected sorting option are displayed here and can be scrolled using the scrolling buttons |
| 5 | Idea / Challenge Cards |
The Idea/Challenge card is a visual summary of each Idea and Challenge. Clicking on a card will open the item in full |
| 6 | Search Bar |
You can search for an idea or a challenge using criteria such as name and description. This is featured across all pages |
| 7 | Quick Stats |
The Quick Stats shows the count of Challenges, Ideas, Ideas Under Review, and Successful Ideas. Clicking each of these will redirect you to the Discover page which is filtered to display the selected quick stat. If Gamification is enabled the top user for the month and overall will also be displayed in the carousel |
| 8 | Create an Idea / Challenge |
Use this button to create a new Idea that is not associated with a Challenge or create a new Challenge depending on access |
| 9 | Sorting / Scroll Buttons |
Use these buttons to sort the Ideas or Challenges and use the scroll buttons to scroll the carousels |
| 10 | Filter buttons |
Challenges and Ideas can be filtered on Stage and/or Category. By clicking these options will present a dropdown where you select all of the configured Stages and Categories and once applied the carousel will only display the selected filters. |

| No. | Item | Description |
| 1 | Challenge Name |
The title of the challenge |
| 2 | Days Remaining |
This shows the number of days remaining before the Challenge is closed |
| 3 | Challenge Description |
Text used on the Challenge to Describe the aims of the Challenge |
| 4 | Number of Views | Number of times the Challenge has been viewed by other users |
| 5 | Number of Ideas |
Number of ideas submitted for the challenge |
| 6 | Idea Name |
The title of the Idea |
| 7 | Idea Owner |
The owner of the Idea |
| 8 | Idea Rating |
The stars represent the average score set by other users and the number to the right represent he number of ratings. Hovering over the number of stars and clicking will rate the idea. |
| 9 | Idea Description |
Text used on the Idea to describe aspects of the idea |
| 10 | Number of Views |
Number of times the idea has been viewed by other users. |
Discover Page

| No. | Item | Description |
| 1 | Idea / Challenge Tabs |
Clicking on these will determine if Ideas or Challenges are displayed. The selected tab will have a light background with yellow text |
| 2 | Filters |
Selecting any of the filters will filter the results shown. The filters include:
|
| 3 | Idea / Challenge Card |
Clicking on the card will open the Idea or Challenge in full depending on the tab you have displayed. |
| 4 | List View |
Changes the card view to a list view. The list view displays the same data from the card in a grid format |
| 5 | Seen Filter |
Clicking on this will alter the results to view the Ideas/Challenges that you have or have not viewed |
| 6 | Results Sorting / Filter |
These sort the results displayed based on the selection made. Options include average rating, number of ratings, views and created date.
|
| 7 | Clear all Filters |
Clicking this will remove all filters applied and return the Discover page to display all Challenges or Ideas. |
The refiners used on the Discover page will be remembered throughout the session when navigating between pages. This also applies to the browser and device being used.
Personal Page

| No. | Item | Description |
| 1 | User Profile |
Summary of the current user logged in. If Gamification has been enabled any enabled aspects such as medals or levels will also be displayed here. A summary of your points and ranking will also be displayed below |
| 2 | Personal Tabs |
Clicking on these will show the data for the selected tab.
|
| 3 | Results |
Any items that you own or are a part of will be displayed here |
| 4 | Stage Filter |
This allows you select the stages you wish to filter by |
| 5 | Category Filter |
This allows you select the categories you wish to filter by |
| 6 | Personal Quick Stats |
This displays the count of Challenge Responses, Ideas Submitted, Ideas Under Review, and Successful Ideas for anything you have submitted. If gamification and voting is enabled a summary of votes assigned to a challenge or idea are also displayed |
| 7 | Add Challenge |
Clicking the Add Challenge button loads the form to create a Challenge depending on access |
| 8 | Add Idea |
Clicking the Add Idea button loads the form to create an Idea that is not associated with a Challenge |
| 9 | Sorting | Clicking on these will sort the results of the selected tab |
Idea Triage
When an idea is created against a Challenge users can score the idea based on the metrics assigned to the Challenge Type of the Challenge.
Here they can use the sliders for each metric to determine how they will score each idea.

| No. | Item | Description |
| 1 | Ideas to Triage |
These idea cards represent the ideas that can be triaged. Clicking on the downward arrow displays additional data. Clicking on the speech bubble icon allows you to add a comment to the idea. The star rating and the number of views works the same as any other card |
| 2 | Action Buttons |
These can be used to Save the score set and change the stage with supporting comments. If an idea has been awarded and a Project Online project created, the corresponding project can be viewed |
| 3 | Metric Sliders |
Scroll the yellow marker up and down to score the idea. This will also calculate the score. The grey slider is the average score |
| 4 | Sorting / Filter Buttons |
Clicking these will sort/filter the ideas listed |
| 5 | Idea Triage Score |
The value in the yellow box is the value you have scored the idea |
| 6 | Average Score |
The average score for all users who have triaged the idea |
Leaderboard
If the Gamification feature has been enabled the Leaderboard option will be added to the navigation bar. This is a page where you can see how you and your peers are performing when using the Ideas app.
Depending on what aspects of gamification are enabled will also determine what is displayed in the Leaderboard. This consists of Medals, Points, and Levels. The below image has all 3 enabled.

| No. | Item | Description |
| 1 | Leaderboard Tabs |
Each tab shows live data of which users are the top 10 performers in Ideas. The top 10 this month includes the top 10 for the current month. The top 10 all time tab shows the top users since gamification is used. The Voting Leaderboard shows which Ideas have had the most votes, whether an up or down vote |
| 2 | Levels |
Along with each user their level is also displayed in the user summary |
| 3 | Points |
Each users points for the current month and all time are displayed here |
| 4 | Medals |
All the Medals a user has earned are displayed here |
| 5 | Ranks |
The Rank shows how a users place on the Leaderboard has changed over each of the time periods |
2. New Submissions
Creating a Challenge
Administrators / Challenge Creators only.

Clicking on any of the Add Challenge buttons in the application will open the Create a Challenge form.
Complete all fields marked with an asterisk (*) and any other additional data.
Saving as a Draft
When all additional data and compulsory fields are complete press Save Draft. This will save your challenge as a draft allowing you to return to it at a later date for publishing and/or editing.
Publishing your Challenge
When all additional data and compulsory fields are complete press Save and Publish

Creating an Idea
You can create an idea in two ways:
- Not linked to a challenge. This can be done by using the buttons in the same areas as the Add Challenge buttons. Be aware - this creates a User Idea not linked to a Challenge.
- Linked to a challenge. Adding an Idea directly to a Challenge. If you open a Challenge there will be an extra Add Idea button. This will link the Idea directly to that Challenge.
If the Admin has created the default user idea challenge the process will change. Rather than opening a form for a User Idea you will need to select which challenge the idea is to be associated with.

Once the Add Idea button is clicked the Create an Idea form will be displayed. If the button is selected within a Challenge, the Ideas will be created directly for the Challenge.
If the Add Idea button is clicked anywhere else it will create a User Idea. From here you can assign a Challenge to it by selecting a Challenge from the yellow banner at the top of the User Idea page.
Ensure all mandatory fields have data entered and any other additional data is added. Save the Idea either as a draft or published when ready.

If an Admin user has configured a default Challenge that can be used to assign user ideas to the process to create a user Idea. When the Add Idea button is clicked a new window is displayed:

From this window the default challenge will be placed at the top of the list. This is the challenge to use when creating a new user idea. If you know the name of the Challenge to associate the Idea with you can enter the name of the Challenge and the list will be narrowed down to display only those that match the text entered.
Once the Challenge is selected the Idea form for the selected Challenge will be displayed as below:

3. Managing Submissions
Changing the Idea / Challenge Stage
Administrators / Challenge Creators only.
To progress an Idea or Challenge it must follow a stage process. To change the stage you can open an Idea or a Challenge. There will be a Review Idea or Review Challenge button respectively. To access the button click on the expansion option below the Share Link button

- Once the Review Challenge or Review Idea buttons are clicked the Review Idea or Review Challenge windows will open depending on where the button was clicked.
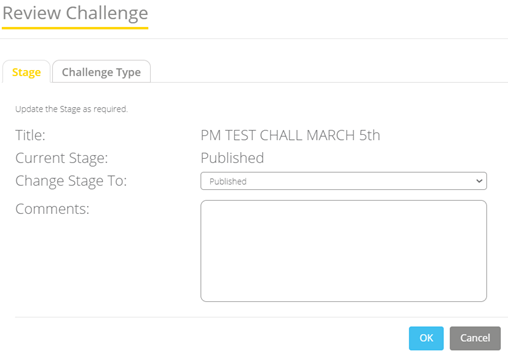
- Click on the Change Stage To: dropdown field which will show a list of the Challenge or Idea stages.
- Select a Stage and click on the OK button. You will be returned to the Idea or Challenge and the stage will be updated.
- The example above is for a Challenge. However the Idea stage change visuals are the same.
Selecting a different Challenge for an Idea
There might be occasions where an Idea and Challenge association needs to change. This can be done in the Review Idea window using the Challenge tab. If a default user idea challenge has been created by an Admin user, the User Idea option will no longer be available.
Click on the Associated Challenge drop down. This will display a list of all of the current Challenges. Select the Challenge you wish to associate your idea to. This will now be displayed on the Associated Challenge field.

Click on the OK button which will save your changes and the Idea is now associated with the chosen Challenge.
There are specific scenarios an idea and the challenge association may change:
- Updating an Idea from one Challenge to another - When an idea is already associated to a Challenge but it is better suited to another Challenge. Click on the Associated Challenge drop down and select the Challenge to associate it with.
- Updating a User Idea to a Challenge Idea – When a user idea is best suited to a Challenge it need to become a Challenge Idea. Click on the Associated Challenge drop down and select the Challenge to associate it with.
- Updating a Challenge Idea to a User Idea – When an idea no longer has any challenges it can be associated with can become a User Idea.
If a change is being made to a Challenge Idea the Challenge Name will be displayed in the Associated Challenge field.
If a change is being made to a User Idea – User Idea – will be displayed in the Associated Challenge field.
Back to HomeChanging a Challenge Type
When a Challenge is created a Type is configured which will determine which Form and Field configuration is used. At times, the Challenge Owner may require to change the Challenge Type.
When on the Review Challenge window click on the Challenge Type tab which will display.
 Clicking on the Change Challenge Type drop down will display a list of all the current Challenge Types. Once a new Challenge Type has been selected a set of additional fields will be generated. The fields are drop down fields, each representing a Challenge Stage for the newly selected Challenge Type.
By clicking on the Stage drop downs and selecting a stage you are selecting which stage from the newly selected Challenge Type each stage from the previous type will be used.
For example, in the image above currently all ideas will be in a Draft stage. Once the stage is changed using the drop down the selected stage will be used.
Back to HomeIdeas Board
The Ideas Board is a way of viewing the ideas for a challenge on a Kanban style board. It is broken down into columns of the different stages for an Idea.
Idea cards can be used in the same way as the Triage page. They can also be drag and dropped to change the stage.
Reviewers can also be assigned to an Idea; the Assigned Reviewers will have limited access to the Triage page from the Personal page Triage tab.

| No. | Item | Description |
| 1 | Possible Reviewers |
Users who are assigned to the Challenge and can be added to review an Idea. If the Team item is dragged all the possible reviewers will be assigned in bulk |
| 2 | Assigned Reviewers |
Users who are assigned to an Idea. If the Team Reviewer option was selected this will show as one reviewer. To remove a reviewer click on their image and a delete icon will be placed in the top right corner once clicked the reviewer will be removed from the Idea. |
| 3 | View Mode |
This is a dropdown to select which Ideas you wish to review. Internal Ideas are ideas created in edison365ideas. External ideas are ideas created in Open Innovation. You can switch between the 2 by clicking on the selected view which will display a dropdown showing the 2 different views. |
| 4 | Category Filters |
This is a dropdown field to allow you to select ideas for a specific Category. |
|
5 6 |
Owner Add Idea |
This is a dropdown to allow you to select ideas created by a specific owner. Clicking this will take you to the Add Idea page for the Challenge. |
When the + Reviewers button is clicked the following window will be opened. All of the assigned reviewers will be added to the assigned list along with a user form to search for additional reviewers to add. To remove a reviewer simply click on the − icon which will remove the user from the reviewers list.

Combining Ideas
Administrators / Challenge Creators only.
Ideas can be created which are similar without realising. They can be combined to make one Idea. Open the main Idea and click on the Combine Idea button.

Once clicked the Combine Ideas screen will be displayed.

When an Idea is selected the Idea is moved to the Selected Ideas table and a new button is displayed.
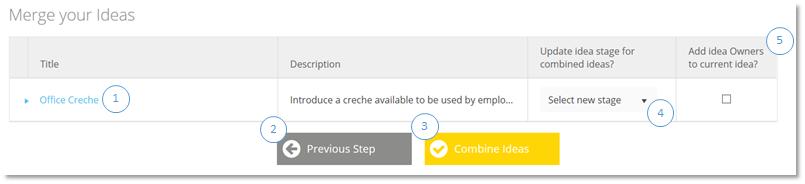
Click the Next Step button which will take you to the Merge your Ideas page.
| No. | Item | Description |
| 1 | Details |
Click to expand and view the full Title and Description |
| 2 | Previous Step |
Clicking this will take you back to the ideas select screen |
| 3 | Combine Ideas |
Once completed, click this button to combined the selected ideas into the current idea |
| 4 | Update Stage (Optional) |
The stage selected from this dropdown will be the stage set for the combined idea |
| 5 | Current Owners (Optional |
If this box is ticked the owners from the selected ideas will be added as owners to the current idea |
Anonymous Ideas
If a Challenge allows it, an Idea can be submitted anonymously. If enabled on a Challenge, a checkbox will be displayed on the Create an Idea form.

When checked the name box will be removed and the Submit anonymously check box is only left.

Complete the rest of the form and the Idea card will show the idea submission as anonymous.

Ideas Grid
Ideas can be viewed for a Challenge in a grid format. This can be accessed by clicking on the Ideas Grid button on a Challenge page.

When the Ideas Grid button is clicked the user will be presented with all of the Ideas for the selected challenge in a grid format. From the Ideas Grid you can select to view Ideas from all of the different stages of the Ideas.
The Ideas Grid is available for all users to view. The Challenge owner and administrators are able to edit all ideas in all stages other than the ideas in "Draft". Only the idea owner will be able to edit the draft ideas.
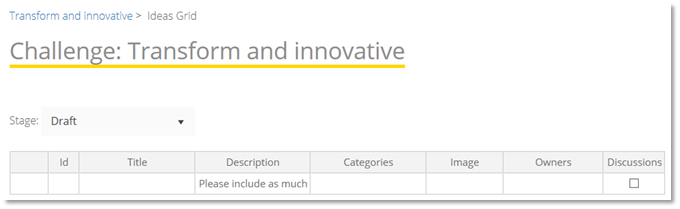
Clicking the stage button will display a list of all of the stages currently used for Ideas. When a stage is selected the fields and settings associated with the stage in Edit mode will be displayed on the Grid.
Those users that have permission to create new ideas will also be able to create new ideas using the grid when in the Draft stage. After data is added a Save Pending Changes button will be added below the Stage dropdown. Once clicked the Idea will be saved and a new button labelled Publish Draft Ideas will be displayed. Once clicked this will display a pop up to select the ideas to publish. If a field is set as mandatory and does not contain a value, it will flag the field when saved and the field will highlight in red.
Back to Home4. Integrations
Microsoft Teams
An Idea or Challenge can be associated with a Team in Microsoft Teams if you are an owner of an Idea or an owner of a Challenge.
This feature is only available if enabled by your system administrator. This can be accessed on the main page for any Idea or Challenge. The button will be displayed as below:

 Once the button is clicked Teams will authorise your login details to ensure you have authority. This will appear as a brief pop up so ensure pop up blockers are enabled. Once authorisation is completed the Link to a Team window will be displayed. From here you can create or select an existing Team to link your challenge or Idea to.

Once selected the Channel will also need to be set and finally the tab will need to be decided. Once all these are set the link is completed.
From here you can select whether you link the Idea or Challenge to an existing Team, Channel, or Tab by clicking the relevant tiles.

This will display a list of all the available Teams, Channels, and Tabs you are currently a member of in a dropdown when selected.
If a new Team, Channel, or Tab is created a form will be displayed for you to enter the data.
When you create a new Team for the Idea or Challenge. A window will be opened where you can set the Team name, email, description, and visibility (Public or Private).
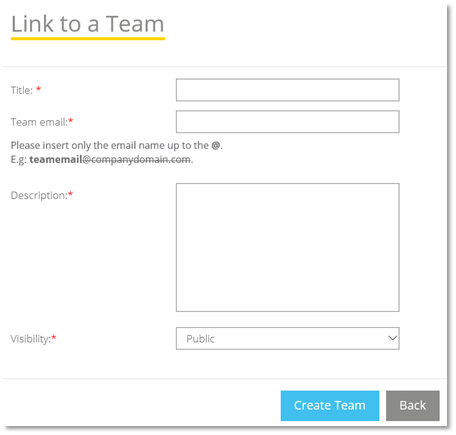
If you complete the form and click the Create Team button the team will be created in Microsoft Teams.
Title – This is the given name for the newly created team for the Team.
Team email – The email address for the Team that will be linked to the Challenge or Idea. You will not need to add the full email address. You will need to enter the email address without the domain.
Description: A brief description to provide further information on the team.
Visibility: This determines if other users can view and join the Team.
Private means only the assigned members can view the Team.
Public means all users can view and join the Team.
If a Channel or Tab is created to support the Team link a form similar for the Team creation is displayed but will only include fields specifically for the Channel or Tab. Below is an example of both forms with a summary of the data required.
 Both fields need to have data added to them prior to the Channel being created.
Channel Name: The name of the Channel to be displayed in Microsoft Teams.
Description: The message displayed to users when joining the Team on Teams to explain what Team is used for.
When a Tab is created for a Team and Channel link, the Idea or Challenge name is automatically assigned as the Tab name. This can be edited so it can be set as a different name of your choice.
When this is clicked in Teams the Idea or Challenge will be displayed and can be processed using the web browser or app for Teams.
Once a Team has been linked to a Challenge or Idea you can go directly to the Team, change the linked team or remove the link by clicking on the following buttons:

Go to Team: Clicking this link will take you to the Team in a web browser
Change Linked Team: Clicking this will display the same window as displayed when originally linking the team. The only difference being that the Team assigned will be displayed on the Teams drop down
Remove linked Team: Clicking this will completely remove the link between the Idea or Challenge and the Team
Back to Homeedison365businesscase
A Business Case can be created from an Idea. This is only possible when an instance of edison365businesscase has been mapped by an Administrator. If configured, you can create a Business Case on an individual idea basis.

To Create a Business Case you will need to click on the Type drop down to select which Business Case is used and then enter a name. Once set click the Create Business Case button which will then create the Business Case.
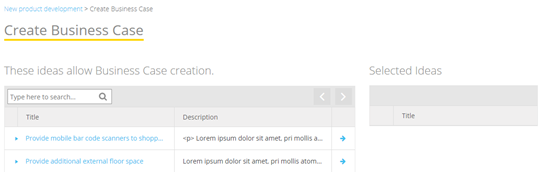
When creating from a Challenge, click on the Create Business Case button on the Challenge Page. This will take you to a grid with all of the ideas in a stage that allows a Business Case to be created from.
Click on the arrow button next to the idea name which will trigger Create Business Case button. Once clicked a Business Case will be created and linked to all the selected idea(s).
edison365projects
A Project can be created from an Idea. This is only possible when an instance of edison365projects has been mapped by an Administrator. If configured, you can create a Project on an individual idea basis.

To Create a Project you will need to click on the Type drop down to select which Project Type is used and then enter a name. Once set click the Create Project buttons which will then create the Project.
When creating from a Challenge, click on the Create Project button on the Challenge Page. This will take you to a grid with all of the ideas in a stage that allows a Project to be created from.
Click on the arrow button next to the idea name which will trigger Create Project button. Once clicked a Project will be created and linked to all the selected idea(s).
Back to Homeedison365ideas Open Innovation
Open Innovation Settings
To configure a challenge that is to be shared through the edison365ideas Open Innovation platform, navigate to the challenge page and select the Open Innovation Settings button.

Clicking this will open the Open Innovation Settings Summary. This will give you a brief summary of what happens when publishing a challenge to Open Innovation.

The first step to take is to decide the image used on the Open Innovation Challenge page. By default the image used in edison365ideas will be used. Should you wish to use a different image click the Upload Image button which will display the following window:

Once the Select Picture button is clicked a File Explorer window will appear and you can select the required image. Once uploaded click OK and the new image will replace the previously selected image. Now the Image has been selected click the Next button.
The next step is to determine the options for the Challenge:

The options available are 'Users should be able to view each others ideas submitted under this challenge?' If enabled users will be able to view other users ideas submitted to the Challenge in Open Innovation. If disabled they will be hidden and users will only be able to view their own ideas. The next option is 'Enable Rating'. If enabled users (who can view other users ideas) will also be able to rate them. This is using a 5 star visual in the UI.
The final option is to select which attachments from the Challenge are synced to the Challenge in Open Innovation. If you wish to include an attachment in Open Innovation for the Challenge simply click on the button underneath the attachment name which will sync them to Open Innovation once the configuration is completed. After configuration is completed and you wish to delete an attachment you can return to the Open Innovation settings and click the bin icon to delete the attachments
If an attachment is deleted from the Challenge in edison365ideas it will also be deleted from the Challenge in Open Innovation. If an attachment that is synced in Open Innovation is updated in edison365 the attachment will have to be deleted from the Open Innovation Settings and the new copy uploaded for the most recent version to be used.
Now the Challenge settings are configured click Next.
The next stage of the Open Innovation configuration is the settings for importing ideas from Open Innovation to edison365ideas if the idea submitted is successfully reviewed.

This section will determine how the ideas migrated from Open Innovation to edison365 will be set in edison365 ideas. This will be by the following options:
- Initial Stage - The stage the idea will be set to when migrated over. The stages you can select from will be determined by the stages for the Challenge Type.
- Default Image - The Image used on the Idea. You can either select a stock image or upload a custom image.
- Default Owners - This option allows you to select which users will be the designated owner(s) of the migrated ideas.
The Default Image, and Default Owner fields are both mandatory fields so a value will need to be added for these.
Should you not wish to enter any details for these options please use the Skip button which will move to the next stage.
The final configuration section is the Challenge Permissions. This is where you can limit which specific Open Innovation groups can view the Challenge in Open Innovation. To select a Group click on the check box before the desired group. If no Groups are selected this will result in all users being able to view the Challenge in Open Innovation.

Once the Challenge Permissions have been determined click the 'Go to summary' button. This will give a run down of the options you have selected for the Challenge you are using in Open Innovation.
Once happy with the configuration options click the Complete setup button. Should you wish to make any changes you can click the Previous Step button throughout the setup.
Open Innovation Challenge Page
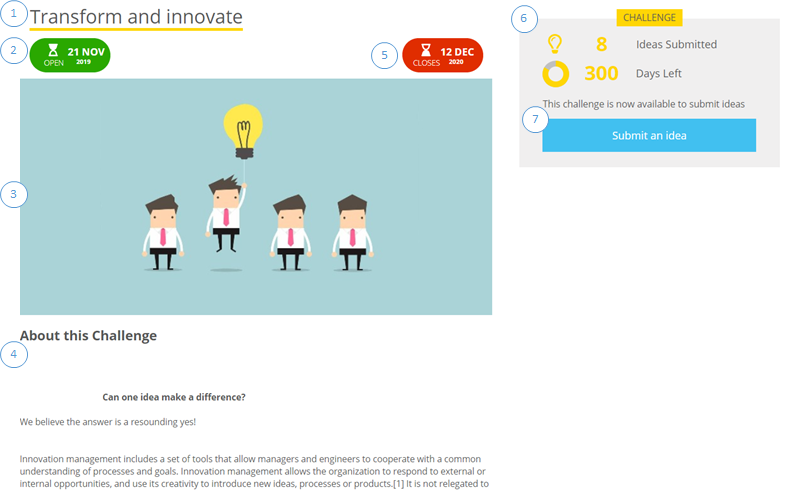
When a Challenge is published externally it will be displayed on the Open Innovation when accessed a version of the Challenge page will be displayed.
| No. | Item | Description |
| 1 | Challenge Name |
The name set for the Challenge in edison365ideas. |
| 2 | Open Date |
The date set as the Start Date in edison365ideas. |
| 3 | Challenge Image | The image set in the External Image field in the Open Innovation Settings. |
| 4 | Challenge Description |
Text to describe in clear detail the aim of the Challenge. This is set in edison365ideas. |
| 5 | End Date |
The date set in edison365ideas that the idea will close. Once closed Ideas can no longer be submitted. |
| 6 | Quick Stats |
Stats to show how many ideas have been submitted and how many days are remaining until the Challenge closes. |
| 7 | Submit and Idea |
Clicking this will display the form with the configured fields for Open Innovation. |
Open Innovation Idea Reviews
You will need to review the ideas created in Open Innovation to determine which you would like to progress in edison365ideas. This can be achieved on the Challenge Ideas Board. Once in the Ideas Board change the View to ‘External Ideas’ and the Ideas Board will change to show only the Ideas created in Open Innovation. From here you can review them and approve or reject them.

View Mode: Click to switch between internal and external ideas.
Approval / Rejections: To approve an Idea drag the Idea card in the same way as the rest of the Ideas Board to the Add Internally column. Once dragged the Owner window will appear which will contain the Owner(s) set in the Open Innovation Settings. The Idea will then be mapped with all of the data to the Challenge in edison365ideas.
If you would like to reject an Idea drag it to the Closed/Rejected column this will display a window with a Comments field to support your decision. Once set the reason will also be emailed to the user who submitted the idea.
Participant will be emailed once their ideas has either been progressed or closed.