Published July 2021 Version 0.1
| Version | Date | Author | Comments |
| 0.1 | 30 June 2021 | Jake Favell | Initial Draft |
Contents
2.1 Creating a Project- External Projects
2.2 Creating a Project- Microsoft Projects
3.1 Updating/Maintaining a Project
1.0 User Interface
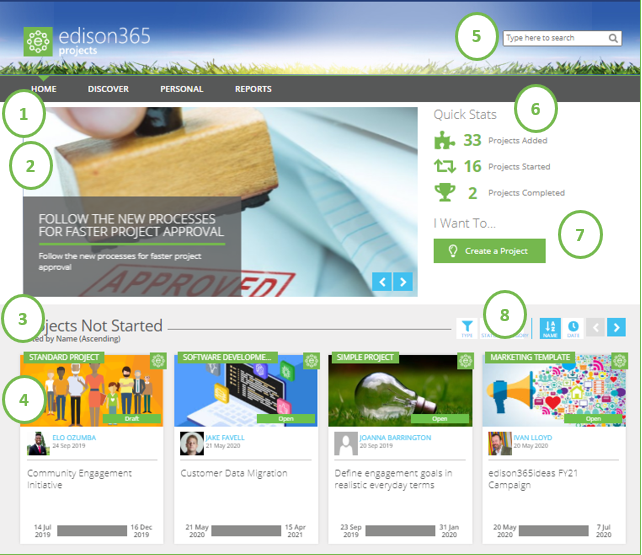
1.1 Home Page
1.2 Project Cards

1.3 edison365 Projects Banner


1.7 Project Page

Project Page- Form

- All fields assigned to a form will be displayed here. In edit mode the fields will be opened to enter data to them. Some fields or tables assigned to a form maybe set as read only so data cannot be entered. These are highlighted in grey and cannot be altered. Some fields will be mandatory to complete the form, these are marked with a *. If a form does not have any tabs set the form will be displayed in full on the project tab. Some sections of a form can also have a header included. This will only apply to single column zones and is set by an Administrator.
- If the Project Type you are working with has stages enabled each stage can have separate rules.
- Administrators can also set pre-populated data to a field on a form for a specific type. If an admin sets pre-populated data, this will be set when a new Project for the designated type is created.
- A form will occasionally include buttons. When selected, the buttons will redirect you to a URL or function that has assigned to that button.
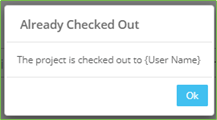
- Only one user can edit a project at a time. Whilst a user is in edit mode the Project will appear as checked out (See image for reference message). If two or more users try to edit the Project at the same time an error will be displayed depending on the action executed.
1.8 Tables

2.0 Creating a Project
When assigned to a Project type as an Owner you will have the ability to create Projects for that type. From the Home page if you want to create a project click on the Create a Project button:
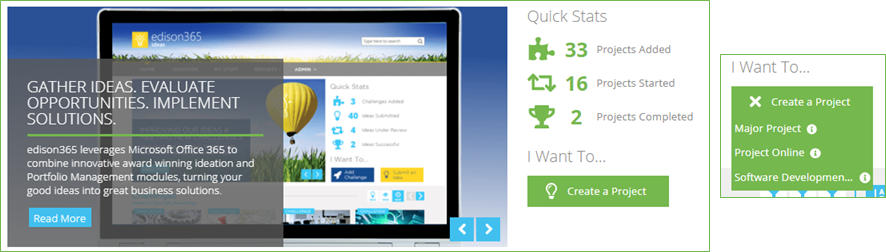
If you are assigned to a single Project type the form for that type will open automatically. If you are assigned to multiple Project types a list of assigned Types is displayed when clicking on the Create a Project button. Once selected the form for the chosen type will be displayed
Once opened complete the form and choose one of the following options:
Save – Saves the current state of the project and remains open for further changes.
Save and Close – Saves the current state of the project and returns to view mode.
Cancel – The project will not be created and any data for the project entered will not be saved.
2.1 Creating a Project- External Projects
Some Project Types can be used to surface Project Online Projects. When a Type that is selected that allows Project Online surfacing an additional window will be displayed before the project form is displayed.
Once the Project Online project is selected it will be highlighted and the OK button can be used. Once the OK button is clicked the Form for the Type will be displayed as normal.
Projects from edison365projects and Project Online can be differentiated by the icon on the top right corner of the project card.
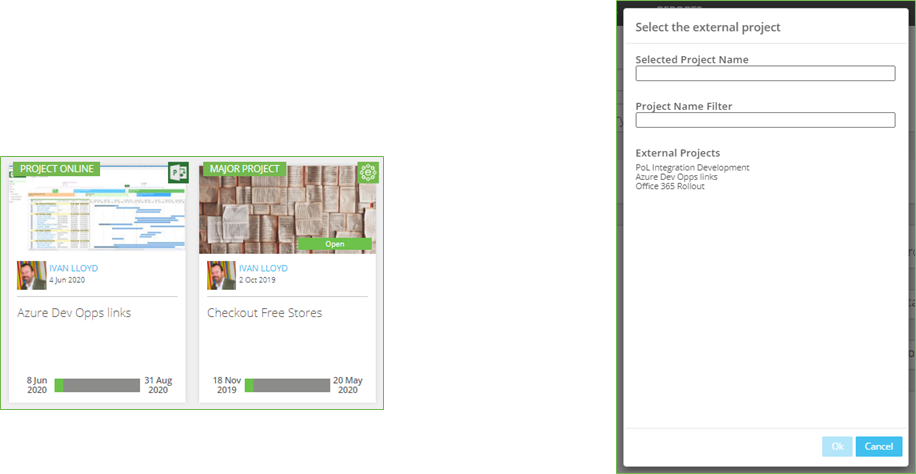
The Project Online projects have the Project Online icon and the edison365projects projects have the edison365projects icon. The icons are also displayed on the Properties page of the project.
2.2 Creating a Project- Microsoft Projects
The Projects module can be configured to allow projects to be created from a Microsoft Project mpp file. If a type is configured to support this the following will be displayed after the type is selected when creating a Project.
Once the modal is opened you can select whether to use an existing mpp file or create a new file.
To create a project from a new mpp file ensure the option of ‘Create New MSP Project’ is selected. Once selected click the OK button which will take you to the project form for the type with the Title already set as the name for the mpp file. This can be changed if required.

To create a project from an existing mpp file ensure the option of ‘Use Existing MSP Project File is selected. Once selected the files names below this option can be selected. When an mpp file is selected click OK and this will automatically assign the title and any tasks from the file to the designated tasks table on the form. Once the existing option is selected you can also enter search criteria in the Name Filter to narrow the name list.
Each mpp file is stored in your SharePoint site under the edison365 MPP Files section of the Site Contents. Any mpp files can be uploaded here and any created will also be stored in this location. Once added they will be added to Select the MPP file modal.
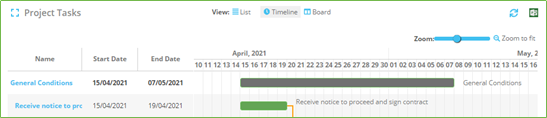
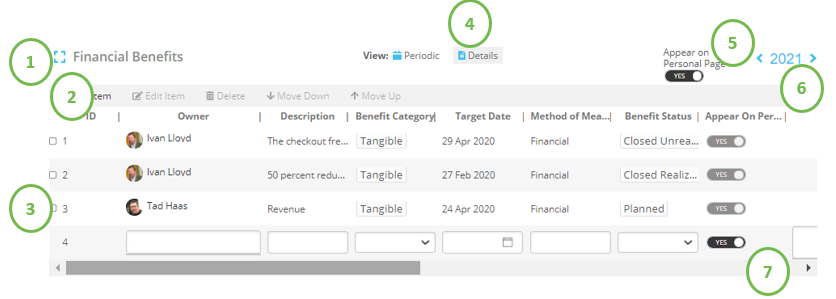
One major difference on a project created from an mpp fille is the tasks table data is read only and populated directly from the file. To refresh the data, click on the arrow icons above the zoom slider. Once clicked this will pull any new tasks data to the table.
You can also access the mpp file by clicking on the MS Projects icon next to the refresh icon
3. Managing a Project
3.1 Updating/Maintaining a Project
At times, all of the data required to complete a Project will not be available to the user when first created. As a Process Manager of a Project Type, you will be able Edit the Project to add the additional data or make any other changes. Such as assigning users, attaching or removing documents, and selecting the currency of the Project. To do this open the relevant Project and click on the Edit button.
This will open the Project in Edit mode and changes can now be made to the form and any other sections of the Project where it is allowed depending on user rights. Once the changes have been made Click Save and Close the project to confirm the changes.
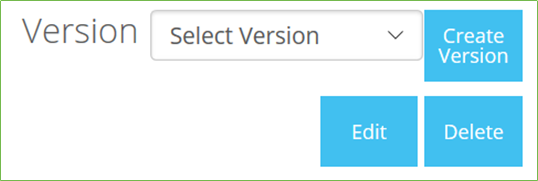
If a Project is no longer required it can be deleted by the owner(s) of the Project. To do so click on the Delete button. This will trigger a confirmation message. If Yes is selected the Project will be deleted. If No is selected the Project will remain as it is.
3.2 Stage Reviews
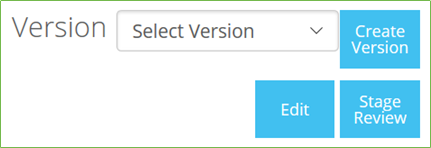
If Stages are enabled and you are assigned as a Process Manager your role will be to progress the project through the various stages. If you are happy with the current stage and wish to progress the project, further click on the Stage Review Button.
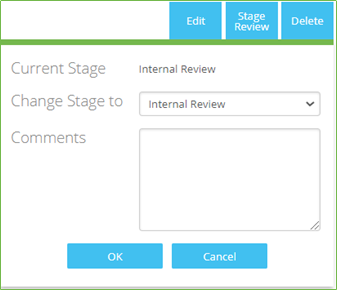
Once the Stage Review is button is clicked a sub menu will be displayed where you can select the stage to progress the project to. Click on the ‘Change Stage to:’ dropdown which will open the list of possible stages. Now select the stage to progress to and Click OK and add an optional comment to support the reason. This will now move the project to that selected stage
3.3 Reviewing a Project
If a project type has stages enabled, a Process Manager will be assigned. If the process manager moves a project into a 'Review' stage, a set of reviewers will be automatically assigned if the Administrator includes them on the Project Type.
If a project is in a Review stage and you are assigned as a Reviewer to allow the Process Manager to progress the Project, you will need to review the project. If this is the case the following button will be displayed on the Project page:

To review the Project, click on the Review button which will open the following modal:
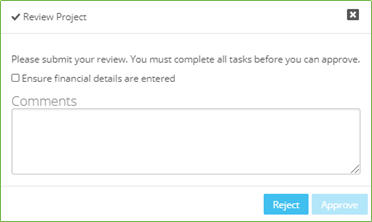
From here you can Reject the review if needed but if you want to Approve the stage ensure a tick is added to the Task list. Once a tick is added to all tasks the Approve button can be clicked. Once the Approve or Reject button is clicked your decision will be stored in the Reviewers for the stage and in the History tab.
3.4 Assigning Roles
Each Project will require specific roles. When a project is created you will be automatically assigned as an Owner. From here you can also assign any additional Owners. To assign a user to a specific role ensure the project is in Edit mode and click on the Management tab. From here click on the blue downward arrow on the role to open the user controls. All of the possible users for the role will be in the grey section on the left and all users currently assigned will be in the white section.

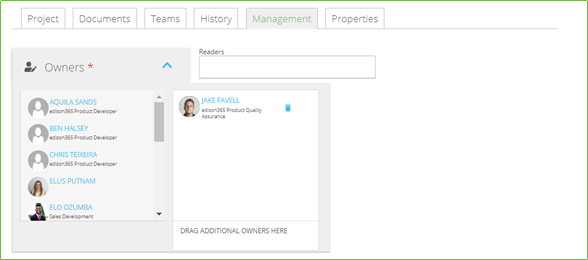
To assign a user to the desired role click and drag the user to the drag drop zone to add them to the role. Click on the Save or Save and Close to assign the user to that role. To delete a user from a role open the user controls for the role and click on the blue bin icon next to the users name which will remove them and re-add them to the available list.
The Reviewers role users are all automatically assigned when the project is moved into a specific stage. All of the reviewers are assigned by an Administrator when the Type is maintained.
Reviewers can also be set on an Ad-Hoc basis. To add a new reviewer open the user controls for the Reviewers and click on the textbox within the controls. Enter the name of the additional reviewers which will match to any users. Click on the user to add which will then add them to the list of current reviewers.

If an ad-hoc reviewer is deleted they will be completely removed from the reviewers and can only be added again at an ad-hoc basis
3.5 Project Versions
An Admin or an Owner of a Project can create different versions to keep track of any changes made to the Project at any time. On each Project a Create Version button is placed on the Project form.

Once clicked a Create Version window will be opened where you can add a summary of the changes or reasons why the version is being created. Once the Save button has been clicked the version is saved and can be opened by clicking the Select Version dropdown which will display a list of all versions created. Selecting a version will display the form in the same way as when the version was created along with the comment added when creating the version.

3.6 Supporting Documents
An Admin, Owner, or Manager of a Project may want to include additional documents to support the Project. Each Project has a Documents tab. Once clicked this will display the documents page for the Project. An administrator may also include documents to be attached automatically to a specific Project type at time of creation.

In view mode a list of all of the uploaded documents is displayed. To view the documents click on the attachment name which will download the file to view. When on the Documents tab in Edit mode additional buttons will be displayed to allow the user to upload and delete any new or existing supporting files respectively.

To upload a new file click on the Browse button which will open a Windows file explorer window. Simply double click on the file to attach or single click and click on the OK button which will show the file in the Upload file box. Click Upload and the file will be added to the Project. Ensure you click Save or Save and Close otherwise the file will not be kept on the project. To delete any attachments from a Project ensure the project is in edit mode and click the Delete button next to the relevant document. Confirm the deletion and the document(s) will be deleted. Again ensure the project is saved fully otherwise the document will remain on the project.
3.7 Email Notifications
If an administrator has enabled email notifications, there are certain actions that will trigger an automatic email notification to certain users when the actions
have been carried out. These actions are as follows along with an example of the email templates:
- Project Created > All possible project owners will be notified
- Project Owner Assigned > Assigned Project Owners notified.
- Project Submitted > All possible Process Managers will be notified (If stages are enabled)
- Project Stage Changed > All assigned Owners when a Process Manager changes the stage (If stages are enabled)
- Project Review Assigned > Any Reviewers listed or added (If stages enabled)
- Project Review Actioned > All Process Managers when a reviewer has reviewed a stage (If stages are enabled)
- Project Review Completed > All Process Managers when all Reviewers have reviewed a stage (If stages are enabled)
Below are 2 examples of what the notifications will look like.

3.8 Teams Integration
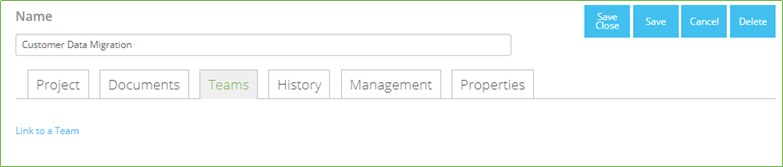
If your administrator has enabled the Teams feature you can link a Project to a Team in Microsoft Teams. When in edit mode for a Project you can link a Project to a Team by clicking the Link to a Team text on the properties tab (image below).
The image below also shows how a link to a Team is displayed when set. In edit mode the link can be deleted by clicking the bin icon next to the tab name. To view the Team click on the tab name and this will open the Team in the Teams app or the Teams browser depending on your selection.
Once clicked Microsoft Teams will authenticate your user account to ensure you have authority to link the Project to a Team. Once the authentication is complete a window will open where you can assign an existing any Team that you are a member of, or you can create a new Team.
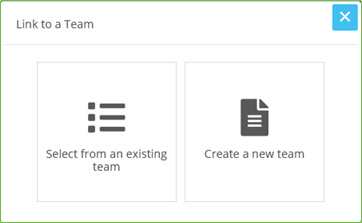
When an existing Team is selected the first below image is displayed. From here you can select any Team that you are a member of to link your Project to. The second image is the
form that needs to be completed to create a new Team. If a new Team is created the following info is required:
- Team Name – The name as displayed in Teams that the Project will be linked to.
- Team Email – The email address that you wish to associate the Team with to manage any memberships and any other management tasks.
- Team Description – Information on the Team that is displayed to users when they request access to the Team.
- Visibility – If set to Private only members will see the Team. If set to Public, all users can view the Team and request access.

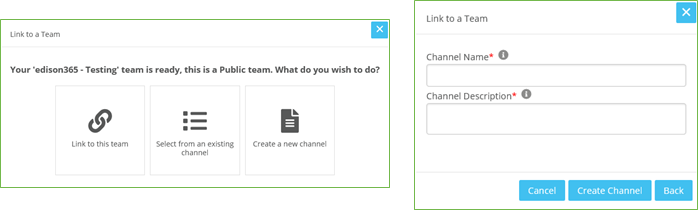
Once a Team has been assigned a Channel will need to be set. Again, you can assign an existing Channel from the selected Team or a new channel can be created. The first image below
is the selection window and the second is the new Channel form. Once the Channel is assigned the Tab will need to be set. Like Channels, an existing tab can be selected or a new tab
can be created.
If a new tab is created the name will be blank but this can be changed to a name of your choice. Once the Team, Channel, and Tab have been set a summary of the link
will be displayed. If happy with the details, click Link to Teams and the link to Teams will be made.

3.9 Read Only Access
A user who is not assigned a role to a Project or even a Project type can be assigned as a reader. This can be assigned by an Admin, Project Owner or Project Manager. If a user is
assigned as a reader the Project will be added to the designated users Home, Discover, and Personal pages in the relevant carousels. Once the user accesses the Project they will
have no authority to edit or manage the Project and can only view all the data.
This can be granted in the Management tab when in edit mode.

To assign a reader to the Project simply add the name of the user and a people picker will display any matches. Once the correct user is added click Save and Close and the user
will be able to view that Project and no others for that Project Type.
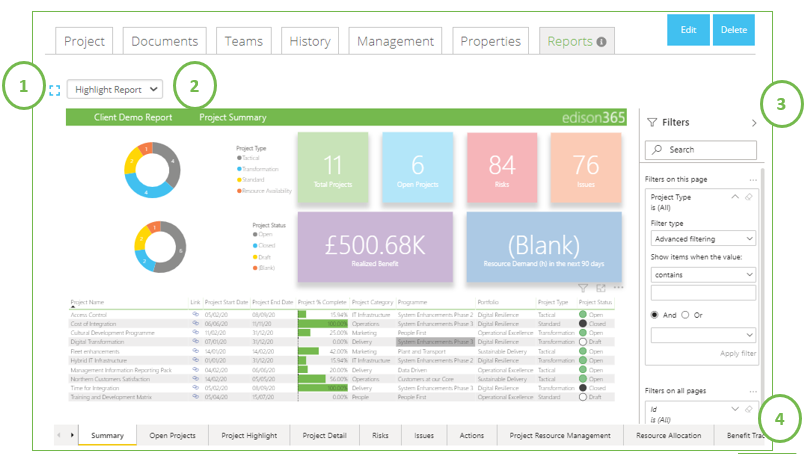
3.10 Reports
Each Project Type can now be configured to include reports embedded into each Project for that type. These reports are Power BI reports so a Power BI license will be required to
allow a user to view the report and the data for it. Below is an example of a project and each of the functionalities of the page.